• The SH Membership has gone live. Only SH Members have access to post in the classifieds. All members can view the classifieds. Starting in 2020 only SH Members will be admitted to the annual hunting contest. Current members will need to follow these steps to upgrade: 1. Click on your username 2. Click on Account upgrades 3. Choose SH Member and purchase.
  • We've been working hard the past few weeks to come up with some big changes to our vendor policies to meet the changing needs of our community. Please see the new vendor rules here: Vendor Access Area Rules

Sewing machines for DIY

I have a singer model 9005. I work next door to a thrift store and it was on their back donation dock. Top cover was half popped off and it had thread bird nested and coming from nearly every hole on the machine, they said it wouldn’t work and gave it to me free. I pulled all the thread out of it (it was only threaded incorrectly) and slammed he top cover back, googled how to properly set it up and it purrs like a kitten. I don’t know it’s limits, but I do know that 1” tubular webbing folded over on itself is a piece of cake. He thickest I’ve sewn with it was 2 pieces of seatbelt with a piece heavy cordura-like material sandwiched between them. The thinnest I’ve sewn was a coffee filter. I use thick Coats Upolstery thread for my stuff and it’s never let me down. Can’t beat it for free ha. I don’t know if the gears are metal or plastic, and the motor isn’t real strong, but that’s only at slow speeds with thick materials. Sometimes the starting hole is a bit much for the motor, but I can hand-crank the wheel for he first needle drop, then hammer down on it and I guess momentum carries it on through the rest of the way haha


Sent from my iPhone using Tapatalk
 
Wow, ckossuth, that was an all inclusive reply. I sure appreciate your help. In fact, after reading the post, I found an all metal 1968 singer 237 about two hours from my house in pristine condition. Without an ounce of hesitation I dashed for my truck, drove the two hours and purchased the sewing machine($80, works great), then hit the closest public land for a quick scouting trip. Haven't tried to sew heavy fabric with it yet. Just cleaned and oiled it last night. It looks like it has enough juice to sew right through the bones in my fingers and the fabric. I can't afford an industrial machine right now. I will post some pics of the machine.
 
Wow, ckossuth, that was an all inclusive reply. I sure appreciate your help. In fact, after reading the post, I found an all metal 1968 singer 237 about two hours from my house in pristine condition. Without an ounce of hesitation I dashed for my truck, drove the two hours and purchased the sewing machine($80, works great), then hit the closest public land for a quick scouting trip. Haven't tried to sew heavy fabric with it yet. Just cleaned and oiled it last night. It looks like it has enough juice to sew right through the bones in my fingers and the fabric. I can't afford an industrial machine right now. I will post some pics of the machine.

That’s awesome! Like I said, they are everywhere once you actually start looking for them.


Sent from my iPhone using Tapatalk
 
I should have took home ec in high school


Sent from my iPhone using Tapatalk Pro
I did...and I still didn't remember how to sew. YouTube is your friend! There are some great, easy to understand instructional videos out there.

Running a sewing machine isn't difficult, the challenge is making the end product look good!
 
Here's the specs for the Tera 40: (Suggested needle size: Metric 90-110, Singer 14-18). Most of your home machines will use the standard Singer sizing. I use Groz-Beckert or Organ needles for my Juki machine. I used Schmetz most of the time in my Kenmore with great results. Ebay has great deals on bulk buys. Schmetz makes good needles too that can be found at Wal Mart. I just added a needle size chart above with the other links.
I have another question...do you know the breaking strength of the TERA 40? I have looked a couple of times and have come up empty. I was just curious how it compares to the bonded poly thread I picked up from the thread exchange. I think they are the same size thread. The stuff from the TE is supposed to have an 11 pound breaking point.

I'm still going to pick up some Gutermann thread. I want to try it regardless. My need to research everything has just peaked my interest in comparing!

I don't know the exact breaking strength of the Tera 40 but I CAN NOT break one single strand no matter how many times I wrap it around my hands. It just starts cutting into my skin.
 
IMG_2964.JPG I have my Singer 237 set up and running now. I sewed upholstery fabric no problems. When I tried to sew two pieces of webbing material together it punched right through but isn't pulling the thread back through tight which causes birds nest on the underside of the material. Any ideas on how to fix this? Here are some pics showing the underside and topside of double layer webbing.
 

Attachments

  • IMG_2965.JPG
    IMG_2965.JPG
    241.1 KB · Views: 55
You can increase the tension on the top. No matter what you do, don't touch the bottom tension. And when you run out of options and look at the bottom tension, don't touch the bottom tension....

Sent from my SM-G955U using Tapatalk
 
Agree, I found the top tensioner fixes this issue. I don’t even know where to locate the bottom tensioner on my machine.


Sent from my iPhone using Tapatalk Pro
 
I agree with Ernie to a point. Looking at your pics and based on your description, I'm assuming the first pic is the underside. If so, then yes, you need to tighten your main tensioning knob. Also make sure your machine is oiled properly. This can be a huge factor in a machines overall performance.

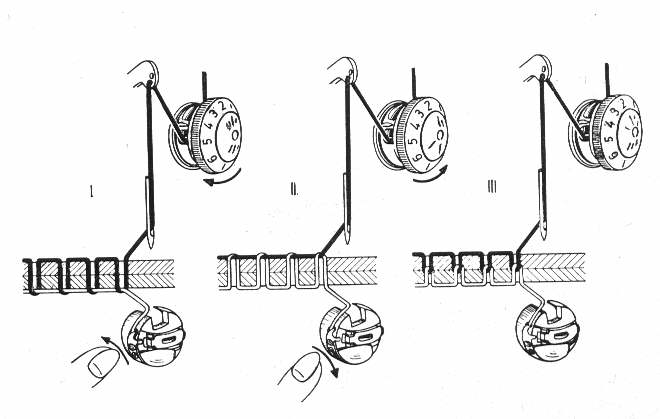
Odds are your Singer has never had thread of this diameter ran through it. I check, and adjust if needed, my bottom tension every time I put a different size thread in the machine. The spring steel tensioner on your bobbin cradle doesn't know you've changed thread and cannot automatically adjust for it. DO NOT BE AFRAID TO ADJUST THE BOBBIN TENSION!!!! You only having to set it once. After that you can use the main tensioning knob to adjust as you increase/decrease material thickness.

Bobbin tension adjustment: Remember, we are not making dainty little dresses. We are making Man Gear! A seamstress will set their bobbin tension to where when holding the thread and letting the bobbin and cradle hang, it will very slowly start to fall. This is a good starting point (even for us). My personal preference (and this works on all 4 of my machines) is to tighten it to where when I'm holding the thread with the full bobbin in the cradle, I have to give the thread a little twitch to get the bobbin to start falling, and it only falls 6-8 inches before stopping again. Done. Set it and forget it. It's just one little screw. A little turn does go along way though.

Your bobbin cradle/case is likely one of the two on the left.


This person almost has it right. The thread should be going into the slot in the bobbin cradle and then up under the tension spring. This is to show how you should let the fully loaded bobbin and cradle hang when adjusting the tension.


Here is a great diagram.
 
Last edited:
I agree with Ernie to a point. Looking at your pics and based on your description, I'm assuming the first pic is the underside. If so, then yes, you need to tighten your main tensioning knob. Also make sure your machine is oiled properly. This can be a huge factor in a machines overall performance.

Odds are your Singer has never had thread of this diameter ran through it. I check, and adjust if needed, my bottom tension every time I put a different size thread in the machine. The spring steel tensioner on your bobbin cradle doesn't know you've changed thread and cannot automatically adjust for it. DO NOT BE AFRAID TO ADJUST THE BOBBIN TENSION!!!! You only having to set it once. After that you can use the main tensioning knob to adjust as you increase/decrease material thickness.

Bobbin tension adjustment: Remember, we are not making dainty little dresses. We are making Man Gear! A seamstress will set their bobbin tension to where when holding the thread and letting the bobbin and cradle hang, it will very slowly start to fall. This is a good starting point (even for us). My personal preference (and this works on all 4 of my machines) is to tighten it to where when I'm holding the thread with the full bobbin in the cradle, I have to give the thread a little twitch to get the bobbin to start falling, and it only falls 6-8 inches before stopping again. Done. Set it and forget it. It's just one little screw. A little turn does go along way though. Your bobbin is likely one of the two on the left.


Here is a great diagram.
We may need you to hold a saddlehunter sewing clinic! I wish I would have had this info when I was messing with the bottom tension last go round.

Thank you for the tips!
 
Wow, you guys are helpful beyond my wildest expectations. I will try the suggestions. I did get it to sew a tear in my turkey chair that is a 600d type cloth. Sewed through that no problem and I basically paid for the machine by fixing the chair and two backpacks already. This is kind of addicting in a manly sort of way.
 
I adjusted the tension for the thicker thread and then found that the plates on the upper tension adjuster were literally rusted together and I don't think the tension adjuster was put together in the correct order the last time someone took it apart. I took them apart and used a dremel tool to buff them to a high shine. Then I took the entire sewing machine apart and gave it a liberal oiling, cleaned the feed dogs well and tried it. I sewed to pieces of 1 inch tubular webbing together and it worked great. I added some lineman's belt loops to my rock climbing harness. Very satisfying. Thanks for all the help.
 
Sweet! I would like to learn to sew.
If I can do it...you will be just fine! There is a ton of instructional info out there.

It's far more intimidating than it is difficult.
 
If I can do it...you will be just fine! There is a ton of instructional info out there.

It's far more intimidating than it is difficult.

Agreed! Once you sew a few things your whole mindset changes to a mentality of how you can improve upon your gear in ways that best suit your needs and not the mass public like a manufacture caters to.


Sent from my iPhone using Tapatalk Pro
 
My grandma used to sew commercial ...La-z-boy chairs. She also always sewed at home . She bought a new machine not long before she died in '95. My grandpa didn't want it and gave it to me. I played with it once, but never did much. Time to figure this thing out! White model 1033. Looks all metal inside. It's called "Jeans Machine " , so I'm hoping it's a heavier duty model.
 
Back
Top