• The SH Membership has gone live. Only SH Members have access to post in the classifieds. All members can view the classifieds. Starting in 2020 only SH Members will be admitted to the annual hunting contest. Current members will need to follow these steps to upgrade: 1. Click on your username 2. Click on Account upgrades 3. Choose SH Member and purchase.
  • We've been working hard the past few weeks to come up with some big changes to our vendor policies to meet the changing needs of our community. Please see the new vendor rules here: Vendor Access Area Rules

DIY Parachute Saddle and Pouches

Jaeckthesnake

New Member
Joined
Jan 3, 2021
Messages
16
Location
Baltimore, MD
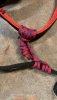
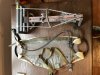
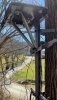
Finally getting around to busting out the sewing machine for some DIY ideas I’ve had during the season. Was going to make a DIY saddle using some webbing and mesh, but I have a few destroyed parachutes laying around I’ve been wondering what to do with, so I put some into a saddle panel and a little drop pouch. B8D9D969-BFD5-4E7E-9D82-2899EAA3525B.jpegDon’t worry about the dirty floor. Still need to add an adjustable belt at the top and some various other pieces. Just wanted to show the parachute panel in between the seatbelt webbing.
496BC1A9-C24F-4FA0-B154-CA227FE2C26E.jpeg
D8828BD0-4DCC-4FCD-9E8F-F2DD892510A6.jpeg
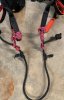
still needs an adjuster for the shock cord, but there’s the idea for the dump pouch.
 
Cool pouch and repurposing. Do you skydive then (I'm curious where you got the parachute)? Which machines are you using?
 
Cool pouch and repurposing. Do you skydive then (I'm curious where you got the parachute)? Which machines are you using?

No I’ve actually never been skydiving. I got a bunch of what are essentially parachute scraps from a friend of mine who was a parachute rigger in the army.
Right now, I’m using an older brother XR-7700. It’s been doing it’s job for years, but it has its issues.
 
No I’ve actually never been skydiving. I got a bunch of what are essentially parachute scraps from a friend of mine who was a parachute rigger in the army.
Right now, I’m using an older brother XR-7700. It’s been doing it’s job for years, but it has its issues.

Looks like it did alright there!
 
Looks good. I saw some black mesh "pet cage" they call it fabric at Joann Fabric's but they wanted about $20 a yard. I used what I had and it was a heavy ballistic nylon type black fabric and some real tree camo fabric as an outer panel cover to make a flex style saddle.
It is great that we DIY people can re-purpose stuff. I also made some pouches and some water and Pee bottle holders to put on my pack. Us old men have to have a Pee bottle. LOL
I scrounged my cord locks off of some stuff like the cheap Jonas packs I got free from various fund raising events I have been involved with.
 
Just a few updates since this initial pic. Added a 1” webbing belt with cobra style buckle (nothing fancy), leg straps, molle webbing along the edges creating attachment points for the lineman’s belt, loops for attaching the G hooks, a few more things. Need to tidy up a few more things and add an adjustable Amsteel bridge and it should be good to go. 23DCE676-2FE2-4B51-A117-2864D4B5CEF0.jpegADF892D4-0F45-4B7E-A7E4-43EF303AE070.jpeg
CB04C3BF-F6D6-4397-9DEA-E25A4D6C844C.jpeg
57231E92-C468-4A27-B412-1BE3CB8BAE03.jpeg
65690036-C8EE-4F62-B484-99AFC54FB102.jpeg
Let me know what you guys think. Anything you want to see or any ideas. I’ve got a bunch of material laying around with to stitch up in my free time (provided the machine doesn’t break on me). I’ll also be sewing up some more dump pouches made from the parachute material, trying out a few different ideas.
 
Only thing I think I see is it looks like you may not have melted the ends of your hollow webbing you used for your bridge and lineman loops. This will keep them from fraying. You can still do this. Carefully use a flame and pass it over this area and watch the fuzees melt. I used 100 % Polyester thread on my saddle and went back over all my sewing and if there was a little tag end of thread I just passed a flame over it and it melted right down to the fabric. Otherwise your saddle looks very good.

What kind of bridge do you plan on using? I have posted a triad style I made in this DIY section using 6mm to 8mm rope that works really well. I like being able to adjust the amount of pull on the bottom and top of the saddle. You can do this by where you position the prusik hitch on the bridge loops with this type. Good luck.

Yea the tubular webbing for the lineman’s belt loop is definitely having some fraying from cramming the 1” webbing through a half inch tubular webbing. I melted them a little before hand, but not too much to keep the opening as wide as possible. Then it was a pain to work through. I’ll probably melt and press then throw some stitching In to keep from sliding.

I plan on adding an Amsteel bridge, not entirely sure on the diameter yet, with a prusik or similar on one side for adjusting. I like working with Amsteel and have a good bit laying around.
 
Go on YouTube and look at the triad bridge which is done with Amsteel. Search triad bridge and you will find it. Being able to adjust both sides where it hitches to your bridge loops is a game changer for comfort.

If you ever do another saddle here is a little tip for the loops. When you melt the hollow tubing run your finger inside and work it around to round out the melted end. Also fold your 2" belt 1/2" in on each side toward the middle and then fold it in the middle again. This makes a pretty tight fold that slides easier inside of the hollow 1" webbing.

Also to get a good firm loop, after you have slid your 1" hollow webbing over the 2" take another piece of flat 1" webbing and lay it on the inside portion of your loop and then sew it to the loop only going in about 1/8" on each side and only sew it across one end of the hollow webbing. I used some orange flat webbing I had. Leaving one end of the hollow webbing unsewn you can then slide a 1/4" wide piece of zip tie inside the loop and it will stop when it hits the sewn end. I measure my zip tie and make sure that it will go past the end where I am pushing it into enough to allow me to sew across the end when finished. I had to use a unsharpened lead pencil to poke the zip tie all the way inside. This makes a good firm loop that will stay open on the lineman loop.

Here are some pictures of my triad bridge and my loops.
 

Attachments

  • IMG_0322 (2).JPG
    IMG_0322 (2).JPG
    367.8 KB · Views: 44
  • IMG_0321 (3).JPG
    IMG_0321 (3).JPG
    386.3 KB · Views: 44
Go on YouTube and look at the triad bridge which is done with Amsteel. Search triad bridge and you will find it. Being able to adjust both sides where it hitches to your bridge loops is a game changer for comfort.

If you ever do another saddle here is a little tip for the loops. When you melt the hollow tubing run your finger inside and work it around to round out the melted end. Also fold your 2" belt 1/2" in on each side toward the middle and then fold it in the middle again. This makes a pretty tight fold that slides easier inside of the hollow 1" webbing.

Also to get a good firm loop, after you have slid your 1" hollow webbing over the 2" take another piece of flat 1" webbing and lay it on the inside portion of your loop and then sew it to the loop only going in about 1/8" on each side and only sew it across one end of the hollow webbing. I used some orange flat webbing I had. Leaving one end of the hollow webbing unsewn you can then slide a 1/4" wide piece of zip tie inside the loop and it will stop when it hits the sewn end. I measure my zip tie and make sure that it will go past the end where I am pushing it into enough to allow me to sew across the end when finished. I had to use a unsharpened lead pencil to poke the zip tie all the way inside. This makes a good firm loop that will stay open on the lineman loop.

Here are some pictures of my triad bridge and my loops.

That bit about adding the ziptie is some truly genius innovation. I honestly debated even adding in the lineman's belt loops for this saddle, as I just one stick with the rappel line and haven't used any trees that require any branch transition. But, since I was sewing in the molle loops anyway, I figured I'd make it a complete loop with lineman's loops that sit out of the way in case I needed them in the future.

Aside from a few things here and there, I think changing the shape of the actual panel could make things easier and fit better, so I'll probably try that next. It is very rounded on the bottom which made sewing the 2" webbing more difficult. Also, where all the webbing overlaps in the middle on the bottom sits in between the legs when things are cinched down and it's a decent clump of material. Thinking of making the overlap happen at the top of the saddle instead, so it's not crammed between my legs.
 
I did not put leg straps on my saddle. Most that are on saddles are not load bearing and the only reason that I can see that they are there is to help hold the saddle on while walking in. As you have found they are mostly in the way. I used a length of 1 1/2" webbing that came from a safety strap with the raptor style buckle as my waste belt sewn into the saddle. This holds my saddle on me good for walking and in case of a fall while climbing It is tight on my waste and goes all the way around my waste and is load bearing capable.

If you are 1 sticking and using a rock harness for sure you don't need leg straps.

Here is how to custom fit a saddle to you. Use a tape measure and measure from point of hip bone around the biggest part of your butt to the other point of hip bone. Your point of hip bone if refer to is about middle of the side of your leg above the side pocket of your pants. My measurement was 26 inches.
This will be width of your saddle.

Now at the back measure from the top of your waste where you want the top of your saddle to ride down to the back of your leg below your butt where you want the bottom of the saddle to ride. Mine was 17". I made a pleated style saddle. Closed up the depth of my saddle is 11 inches but open it is 17" and cups my butt good and is really comfortable.

Go on YouTube and look Jerry Grose saddle build video 1 - 3 of this pleated style saddle, he is on this forum also. He shows all of this and how to make your pattern and easily get the proper football curve to your saddle.

Here is a heads up if you need a small platform for a Hawk climbing stick. Midway has the Hawk stick platform on sale for $29.99 which is normally $59.00.

In hindsight I probably should have used thinner webbing for the leg straps to cut down on overall thickness with the overlap. They’re only there for wearing the saddle in. I need to find some better G hooks. There is one in my camelbak bag that is excellent. Going to have to search eBay probably. Definitely have some things to tweak for the next build.

I wanted to finish up the bridge and get outside to hang and test it out and overall I’m happy. It could be tidied up and some things could be tweaked, but it is very comfortable to walk in, easy to adjust, and weighs next to nothing. I’ll have to get the scale out for an actual weight. It was very comfortable to hang in as well, and the points were easy enough to adjust during the hang.

I actually just grabbed the hawk stick platform off camofire and it makes a huge difference. It’s not very gritty, could use some adjustments to prevent slippage, but I was also on a steep lean on the tree out front.
 

Attachments

  • 05D23A61-6418-4DC5-8F63-0FC0E0023F35.jpeg
    05D23A61-6418-4DC5-8F63-0FC0E0023F35.jpeg
    404.9 KB · Views: 35
  • 5D8FBBBA-11C2-44ED-875F-439726950273.jpeg
    5D8FBBBA-11C2-44ED-875F-439726950273.jpeg
    503.1 KB · Views: 36
In hindsight I probably should have used thinner webbing for the leg straps to cut down on overall thickness with the overlap. They’re only there for wearing the saddle in. I need to find some better G hooks. There is one in my camelbak bag that is excellent. Going to have to search eBay probably. Definitely have some things to tweak for the next build.

I wanted to finish up the bridge and get outside to hang and test it out and overall I’m happy. It could be tidied up and some things could be tweaked, but it is very comfortable to walk in, easy to adjust, and weighs next to nothing. I’ll have to get the scale out for an actual weight. It was very comfortable to hang in as well, and the points were easy enough to adjust during the hang.

I actually just grabbed the hawk stick platform off camofire and it makes a huge difference. It’s not very gritty, could use some adjustments to prevent slippage, but I was also on a steep lean on the tree out front.
Man that’s tight! Really nice job on the saddle and the stick. Wish I could do that, but at my advanced state of decay I have more money than patience. Nice job for sure and I’d certainly wear that!
 
I would just get some spray paint or clear coat spray paint and spray the top of the platform and then sprinkle sand on it and let it dry. That should add grip to it.

I made my own stick platform and covered it with some pebble rubber matting that I found at my Dad's house when I was cleaning it out after his death a few years ago.
I need to paint my sticks when the weather warms up.

I am a real DIY guy. LOL I made my own G-hook to use on my HYS strap I made. I used a piece of aluminum I had laying around a drill and a file.
 

Attachments

  • IMG_0314 (2).JPG
    IMG_0314 (2).JPG
    357.9 KB · Views: 26
  • IMG_0316 (3).JPG
    IMG_0316 (3).JPG
    344.9 KB · Views: 26
Back
Top