Well!
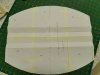
I did a "fit" test by making the base of the saddle
without attachments for the bridge and the linesman,
just to see if there was enough room for my rear.
 View attachment 27538
In the end I rounded the edges as you suggested.
@always89y
The textile is an old cotton bed sheet used for various experiments ( It's NOT for hanging on it !!!
).
Obviously, having not used neither gros grain nor webbing, it does not look nice but it was enough
for me to prove, as I said, to see if it was large enough to contain me.
I am not a beast, on the contrary, I am quite small... let's say average...
I am 5ft 6.93" tall and weight about 155lb, I have 32 (46 Ita) around the waist.
View attachment 27540View attachment 27541View attachment 27542
Now I just have to recover the necessary material ...
Wait until we can move home without problems with the law ...
Go to my sister-in-law who has an Industrial Juki and assemble everything.
I read that to sew this type of equipment it is good to use the needle without the "sharp tip" to avoid damaging the
fiber and make it more dangerous than it already is.
it's right?
Best Regards!
Dino