• The SH Membership has gone live. Only SH Members have access to post in the classifieds. All members can view the classifieds. Starting in 2020 only SH Members will be admitted to the annual hunting contest. Current members will need to follow these steps to upgrade: 1. Click on your username 2. Click on Account upgrades 3. Choose SH Member and purchase.
  • We've been working hard the past few weeks to come up with some big changes to our vendor policies to meet the changing needs of our community. Please see the new vendor rules here: Vendor Access Area Rules

Sewing Resources and Information

Well my semi industrial walking foot machine is here. It’s an omega walking foot that does straight stitch and zig zag and has a 9” bed.
So far making some more gear straps it is doing pretty well, size 16 needle and v69 thread
View attachment 25026View attachment 25027View attachment 25026View attachment 25027View attachment 25027View attachment 25028View attachment 25028
Just curious where you bought this and which model you went with.

Sent from my SM-G973U using Tapatalk
 
eBay, offered the seller $425 plus shipping, also eBay collects taxes even though the seller was from Canada; right around $525 to my house.

this model is their zig zag/straight stitch machine with the nine inch bed, I wanted more room. Otherwise I would have went with a sailrite model.

you can get a model that has a version of sailrite’s monster wheel but it doesn’t use the posi pin. if you get one without the heavy wheel which is around $125 add from them, goldstartool sells them for $79.

It is 135x17 needles and can use sizes from 14-22 and up to 92 size thread, it can run 138 but you have to add some more tension to get it sew well.
 
My Valentine's Day's gift to myself arrived today...

LSZ1.jpgLSZ1-1.jpg

I didn't get a chance to sew with it today but I was very impressed from the start by how it was packaged. Every part came in it's own sealed bag and individual instructions for assembling the base and preparing and mounting the machine along with a detailed owners manual was included. The overall fit and finish is excellent too, I didn't notice any mars or blemishes on either the machine or base. Also included was three separate test pieces of different types of fabric of multiple layers sewn with both straight and zig-zag stitches. I did do quick test run with the flywheel disengaged to see how sensitive the foot pedal control is compared to my 15-91 and the difference is worlds apart. It is as easy to operate at a snails pace as it is to go full speed. This weekend I will go full tilt testing with webbing to find it's limits.

Prior to this I did look into purchasing one of the clones (Omega, Tuffsew, Rex etc) but after researching I found that most reviews of those machines stated something like "the machine worked great at first..." or that some modifications needed to be done to get them to perform better (like adding the Sailrite Power Wheel) or couldn't reach/no response from customer service or something as simple as not including an owners manual, all which I found to be unacceptable. Saving $300 at purchase time was not worth it if there was a good chance I would have to spend additional money and time modding or repairing instead of sewing. And with the added insurance of knowing I bought from a well known reputable company like Sailrite with customer support (as opposed to some international bulk supply house dealer) and that I can contact them for help or parts sealed the deal. I've always subscribed to the "buy once cry once" mantra.

Hope this initial review helps for those in the market for a walking foot machine.
 
My Valentine's Day's gift to myself arrived today...

View attachment 25174View attachment 25175

I cried pretty hard Sunday night after ordering my Sailrite and a Monster wheel but the wife unit finally had enough of me searching eBay to find a good used one for the right price and said, “Just buy the damn thing. I know you want a brand new one so just buy it already!”

It’ll be here this week hopefully. I guess I shouldn’t feel too bad about spending the money on it being that it was on sale and she just spent $4k on a Glowforge for her jewelry business.
 
I did some tests on webbing loops I sewed. I stepped on one end of the strap and pulled on the other and pulled up as hard as I could. I could break all the 50 thread size loops. The v69 thread loops were variable. I was able to break one loop sewn with two lines of V69 thread. The V69 strap ends sewn together held. These loop tests load a few stitches at a time so are a severe test of sewing thread. Strap ends sewn together load all the threads and are much stronger.
Gutterman V69 loop front and back - I couldn't tear this completely.


Gutterman V69 thread - This one was stable.

50 size poly sewing thread Tore easily
 
Last edited:
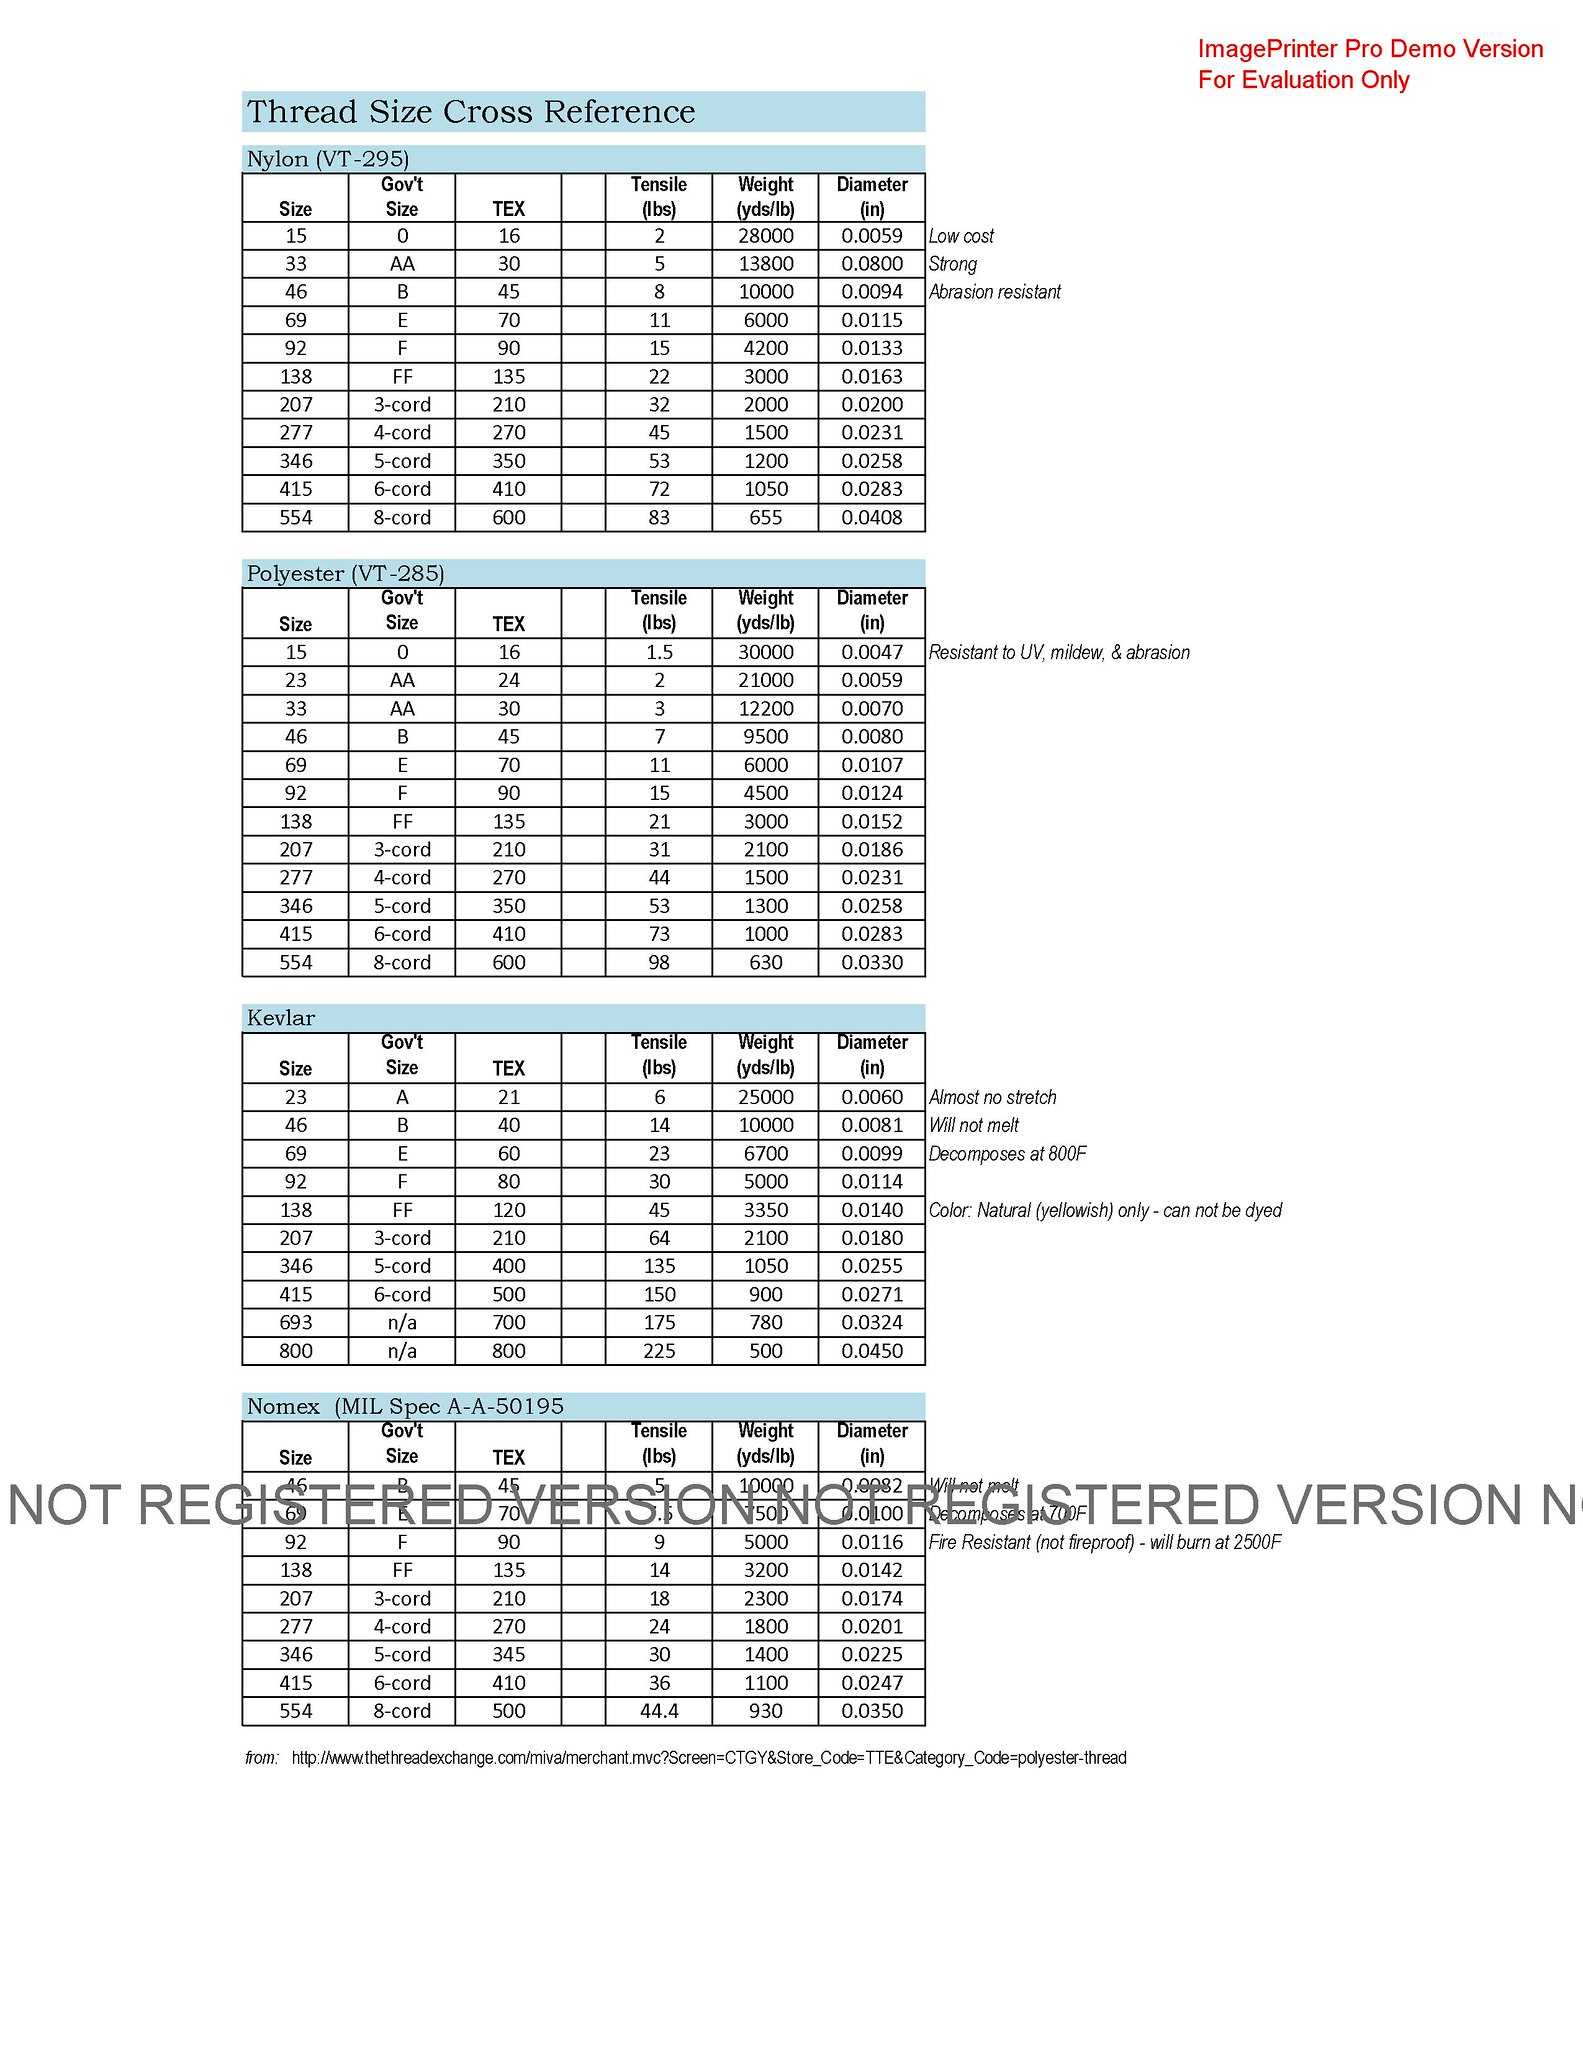
Based on this chart, I was thinking of getting some V92 Kevlar thread. It is only slightly larger in diameter than V69 polyester and has a breaking strength of 30 pounds instead of 11 pounds. Anyone know of any downsides to this?
 
@bj139 try it again with the same stitch pattern and thread, but run a 3 to 4 rows of stitching perpendicular to the strap just past the other stitching. I think it will avoid the other stitching getting started pullling loose.
 
@bj139 try it again with the same stitch pattern and thread, but run a 3 to 4 rows of stitching perpendicular to the strap just past the other stitching. I think it will avoid the other stitching getting started pullling loose.
Was just fixing to post the same thing before I read your post. Bonus tip- increase your SPI (stitches per inch) to 8-9 in your current pattern will add strength. Then decrease SPI in the perpendicular will help keep strength in your webbing.
 
@bj139 try it again with the same stitch pattern and thread, but run a 3 to 4 rows of stitching perpendicular to the strap just past the other stitching. I think it will avoid the other stitching getting started pullling loose.

Was just fixing to post the same thing before I read your post. Bonus tip- increase your SPI (stitches per inch) to 8-9 in your current pattern will add strength. Then decrease SPI in the perpendicular will help keep strength in your webbing.

Good info. I'll just add I remember when reading on sewing webbing for life support (don't recall where specifically) seeing a suggestion on starting and ending those perpendicular lines in the middle of the webbing. So your back stitching would be in the center of the webbing. Reason being that any force placed on the edges of the webbing are not working on the ends of you stitches.
 
Good info. I'll just add I remember when reading on sewing webbing for life support (don't recall where specifically) seeing a suggestion on starting and ending those perpendicular lines in the middle of the webbing. So your back stitching would be in the center of the webbing. Reason being that any force placed on the edges of the webbing are not working on the ends of you stitches.
This is accurate infor, glad you added that.
 
Good info. I'll just add I remember when reading on sewing webbing for life support (don't recall where specifically) seeing a suggestion on starting and ending those perpendicular lines in the middle of the webbing. So your back stitching would be in the center of the webbing. Reason being that any force placed on the edges of the webbing are not working on the ends of you stitches.
Starting in the center is important but this applies more to design stitches like box,zigzag, diamond etc. Perpendicular stitches are getting lock buy the back-and-fort. Still doesn’t hurt to stat in the center. Just know sure on the locking part on the stitch we are talking about. Does this sound correct?
 
@bj139 try it again with the same stitch pattern and thread, but run a 3 to 4 rows of stitching perpendicular to the strap just past the other stitching. I think it will avoid the other stitching getting started pullling loose.
The loops I made with Gutermann v69 thread where I just did about five rows of perpendicular I could not break. The loop where I just did two rows of V69 I could break with difficulty. The zigzag pattern on the overlapped ends without any perpendicular stitches, I could not break. These loops are an extreme test since a few stitches can break at a time, something that would not occur with overlapped strap ends.
 
Thank you guys for all of this great info. It's been a long time since I have sewed anything and you all have answered a ton of my questions in this thread. I have a question I either can't find the answer to or I'm overlooking. My machine (111w) will handle thicker/stronger thread than the tera 40 normally recommended. For webbing, is there a strength advantage to going with a heavier thread or is the tera 40 just about perfect for this? I appreciate the responses.
 
Thank you guys for all of this great info. It's been a long time since I have sewed anything and you all have answered a ton of my questions in this thread. I have a question I either can't find the answer to or I'm overlooking. My machine (111w) will handle thicker/stronger thread than the tera 40 normally recommended. For webbing, is there a strength advantage to going with a heavier thread or is the tera 40 just about perfect for this? I appreciate the responses.
The Tera 40 thread I have seems thin to me for heavy duty applications, especially life support. I have a Trophyline Ambush saddle and an Aero Evolution. I just looked at them and both use thicker thread. It seems like some of the thread is one size larger and some 2 sizes larger. I don't have any V92 or V138 thread to compare it to. The Gutterman's Tera 40 is supposed to be V69. I am going to try thicker. I am still experimenting with sewing before I build a saddle.
 
Anyone add a heavier flywheel to a standard sewing machine to increase punching power? I have been thinking.
 
Anyone add a heavier flywheel to a standard sewing machine to increase punching power? I have been thinking.

Not to a standard machine but I have one on my Sailrite and I’m pretty sure I could sew thru plywood with it!
 
Anyone add a heavier flywheel to a standard sewing machine to increase punching power? I have been thinking.
There's an upholster (Cechaflo) on YouTube that changes wheels to slow down his machines so he can go really slow stitching.

I'm not certain how much more power you will gain but it's worth a try.

Sent from my SM-G973U using Tapatalk
 
Last edited:
Back
Top