
Hu? JBDaddy is your real name?What is this alternate name stuff?
Sent from my SM-G950U using Tapatalk
-
The SH Membership has gone live. Only SH Members have access to post in the classifieds. All members can view the classifieds. Starting in 2020 only SH Members will be admitted to the annual hunting contest. Current members will need to follow these steps to upgrade: 1. Click on your username 2. Click on Account upgrades 3. Choose SH Member and purchase.
-
We've been working hard the past few weeks to come up with some big changes to our vendor policies to meet the changing needs of our community. Please see the new vendor rules here: Vendor Access Area Rules
You are using an out of date browser. It may not display this or other websites correctly.
You should upgrade or use an alternative browser.
You should upgrade or use an alternative browser.
The Wraptor
- Thread starter Bwhana
- Start date

JBDaddy
Well-Known Member
Hu? JBDaddy is your real name?
Heh, nearly. Initials & primary occupation. Was just teasing
")
kenn1320
Well-Known Member
- Joined
- Sep 15, 2015
- Messages
- 2,753
Ok ive got rings and figured out how long of webbing for 1 continuous belt. I can't seem to feed the strap without 1 end being inside the other wraps and the other being outside. Is this correct? Also if I purposely pull slack in one and then try to pull the rings apart,, the friction of webbing doesn't allow the loops to even out.. Guess I'm not seeing the advantage of this style right now. Even tried flipping the rings and running webbing through the big round portion, same effect. Help....
PM sentOk ive got rings and figured out how long of webbing for 1 continuous belt. I can't seem to feed the strap without 1 end being inside the other wraps and the other being outside. Is this correct? Also if I purposely pull slack in one and then try to pull the rings apart,, the friction of webbing doesn't allow the loops to even out.. Guess I'm not seeing the advantage of this style right now. Even tried flipping the rings and running webbing through the big round portion, same effect. Help....
Ok ive got rings and figured out how long of webbing for 1 continuous belt. I can't seem to feed the strap without 1 end being inside the other wraps and the other being outside. Is this correct? Also if I purposely pull slack in one and then try to pull the rings apart,, the friction of webbing doesn't allow the loops to even out.. Guess I'm not seeing the advantage of this style right now. Even tried flipping the rings and running webbing through the big round portion, same effect. Help....
How did you determine length for the one continuous belt? I am interested in building one of these. How did you correct the issue with the webbing not sliding?
Schwonkhead
Active Member
I just started one of these, https://saddlehunter.com/community/index.php?threads/slinging-webs-with-thread.37483/#post-516488. While not very scientific, to determine the length of the continuous belt I didn't cut any webbing off of my roll and fed it through the rings how I wanted the finished product to be. I then held it up to my backside as it would be when wearing the sling and adjusted the length until I got the rings to sit where I wanted them, for me the flat part of the D's are about even with the front of my hips.How did you determine length for the one continuous belt? I am interested in building one of these. How did you correct the issue with the webbing not sliding?
After you find the correct length just make sure you cut it off with enough excess to create a good overlap, I went with about six inches. I read somewhere that double the webbing width is sufficient but I wanted the extra security.
It also helps to use binder clips as described above when test fitting to hold everything together.
Hope this helps, best of luck to you.
I just started one of these, https://saddlehunter.com/community/index.php?threads/slinging-webs-with-thread.37483/#post-516488. While not very scientific, to determine the length of the continuous belt I didn't cut any webbing off of my roll and fed it through the rings how I wanted the finished product to be. I then held it up to my backside as it would be when wearing the sling and adjusted the length until I got the rings to sit where I wanted them, for me the flat part of the D's are about even with the front of my hips.
After you find the correct length just make sure you cut it off with enough excess to create a good overlap, I went with about six inches. I read somewhere that double the webbing width is sufficient but I wanted the extra security.
It also helps to use binder clips as described above when test fitting to hold everything together.
Hope this helps, best of luck to you.
Thanks for the help. I built a sling like you referenced and used tri-glides to find the most comfortable length. I wanted to try the more traditional Anderson design where the entire sling is one continuous loop. I guess I can start with twice the length of my individual loops.
Thanks for the help. I built a sling like you referenced and used tri-glides to find the most comfortable length. I wanted to try the more traditional Anderson design where the entire sling is one continuous loop. I guess I can start with twice the length of my individual loops.
Shot Thru,
The original Anderson design is constructed with two loops, not one continuous webbing loop. The two loops are formed as such. Loop one is for the top uppermost strap and the lower bottommost strap with Loop two being the two middle straps. The vertical ladders are then sewed to them to make the six inch wide panels. Each panel therefore is made up of one strap of each loop.
I have two Anderson slings and can confirm the routing is two separate loops. You can also look up the Anderson patent which shows the routing as well.
Last edited:
Shot Thru,
The original Anderson design is constructed with two loops, not one continuous webbing loop. The two loops are formed as such. Loop one is for the top uppermost strap and the lower bottommost strap with Loop two being the two middle straps. The vertical ladders are then sewed to them to make the six inch wide panels. Each panel therefore is made up of one strap of each loop.
I have two Anderson slings and can confirm the routing is two separate loops. You can also look up the Anderson patent which shows the routing as well.
Thanks Navigator. I was having a little trouble envisioning how it could all be one continuous piece of webbing. This should not be too difficult.
Here is the true Anderson style layout, hope this helps understand the separate parts of webbing via colors.


That is the cool part of diy, you can tweak it to the way you need and get it very comfortable for you. The picture is just to show the sections and skews the view, but both loops are identical length and need to be for that layout to work right.Got it. I put one together last night. I reduced the strap length to 73" to better fit me, 5'-8", 160#. It still seems a little big.
Okieoutdoors
New Member
- Joined
- Aug 12, 2018
- Messages
- 9
Bwhana - Thanks for making the thread. I Originally started with a customized sit drag two years ago and now to the point that I want something more comfortable 6 feet 220lb here. Lots of hip pinch even with the adjustable bridge. I tried copying the ESS saddle from Tetherd with scraps to see if it was better. Well it is... but I don't like the way the two panels seem to come together through the rings. I then came across this thread yesterday and I can tell from the design that it solves the issues I didn't like from the ESS and will definitely be more comfortable than my Sig Drag. Just ordered the stuff to make one. Ordered twice the stuff because now a buddy wants in. So even with the Crazy prices of stuff right now. I can make the whole saddle for $70 each and I know how strong it is instead of assuming. Thanks again for the post and updates!
tylerray378
Well-Known Member
Add another one to the list of a successful hunts/kills with the wraptor. I made some modifications to this design but it’s still basically the same frame as the original wraptor. Thanks for the thread on this @Bwhana ! Let’s rekindle the fire of this thread lol
Attachments
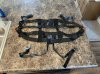

As long as I've been studying these and made a couple I did not realize that. Thats probably why mine is not too comphy.Here is the true Anderson style layout, hope this helps understand the separate parts of webbing via colors.
- Joined
- Jan 3, 2022
- Messages
- 4,240
I'm planning to start building one (several?, lol.) of these once the season is over. I have been trying to learn about the design for a while now and I have to say that the picture above that Bwhana posted was an "Ah Ha" moment when I saw it. All this time I was thinking that the two loops were entirely independent. I think there are variations that have this independent design as well as one where the panels are made of one continuous loop.
I have a Recon currently and I love it. I have tried an ESS and the only reason I don't own one is that they were on backorder when I was looking and I spent my Hunting "fun money" and just had to draw a line somewhere, lol. I do plan to get one before next fall.
I bought a box of parachute slotted D rings at a good price a week or so back. They are rated to 5000 pounds. I do have some concern about the weight of the steel D rings. We will see. I have seatbelt webbing headed my way along with some Mil Spec tubular webbing. I want this to be a minimalist 2 panel saddle along the lines of the Anderson, Recon, Wraptor, etc. I suspect it will get a single mole loop set like the Recon and lineman's loops and a simple belt.
One area I do need help with is the sewing. I have looked around on here and have seen a Singer 15-91 machine recommended. I would like to buy a machine and learn to do the work myself. If I could get a good, solid machine capable of sewing 4 layers of webbing without breaking the bank that would be great. Any and all advice would be appreciated.
I plan to thoroughly test all this at ground level first. I have grown accustomed to having all my parts in their current locations, lol.
@NMSbowhunter Lot’s of expertise on sewing machines in this thread
Sewing Machine Deals for the DIY Guys
Heres a 15-91 near you. I wouldnt pick it up for more than $40-50. https://www.facebook.com/marketplace/item/714360846205384/ Thanks man
saddlehunter.com
- Joined
- Jan 3, 2022
- Messages
- 4,240
That is just what I need.
- Joined
- Jan 3, 2022
- Messages
- 4,240
I have my seat belt webbing, my tubular webbing and my D rings on hand. For those of you with vastly more experience with fabricating these 2 panel saddles I would appreciate some advice. As I understand it, the saddle loops can be constructed in three distinct ways.
1. Two separate and independent loops with neither being sewn to the other.
2. Two separate loops with the bottom of one being sewn to the top of the other via the spacing vertical straps.
3. One continuous loop of strap fed through and then connected via the vertical straps.
There may be something I am missing as well.
To those of you who have been down this road, which one of these three is the best and why. Thanks in advance for answering a newby's questions. I have read through the threads but I am sure I am missing some things.
tylerray378
Well-Known Member
I made mine with independent panels and used the metal rings as opposed to the d rings towards the beginning of the thread. I also incorporated weight rated tri-glides at the connection of the panels for piece of mind. I don’t have a sewing machine so I hand stitched everything with quality thread. This year I also added straps to connect the two panels similar to the way the overwatch transformer does it. Saddle was super comfortable and I was successful with it too. Good luck with the build. It’s a fun and easy one.
to answer your last question I preferred this saddle of my ESS which uses one continuous strap. The thought on the one continuous strap is it can balance or equal out the weight.
to answer your last question I preferred this saddle of my ESS which uses one continuous strap. The thought on the one continuous strap is it can balance or equal out the weight.