
Has anyone added magnets to manage the panels?
-
The SH Membership has gone live. Only SH Members have access to post in the classifieds. All members can view the classifieds. Starting in 2020 only SH Members will be admitted to the annual hunting contest. Current members will need to follow these steps to upgrade: 1. Click on your username 2. Click on Account upgrades 3. Choose SH Member and purchase.
-
We've been working hard the past few weeks to come up with some big changes to our vendor policies to meet the changing needs of our community. Please see the new vendor rules here: Vendor Access Area Rules
You are using an out of date browser. It may not display this or other websites correctly.
You should upgrade or use an alternative browser.
You should upgrade or use an alternative browser.
The Wraptor
- Thread starter Bwhana
- Start date
- Joined
- Jan 3, 2022
- Messages
- 4,268
I believe a commercial 2 panel incorporates magnets for this purpose. I can't remember which one.Has anyone added magnets to manage the panels?
tylerray378
Well-Known Member
The latitude method has it. I made a wraptor and a method. I preferred the wraptor. This summer I made a new wraptor with a single piece of webbing. I made it where the outside panel is your seat portion. With that being said I just use 1 single 2” clip in the middle. It’s worked great so far.
The only short coming of my Wraptor was the panels getting twisted up. I sewed Timber Pimp Fleece to the inside. The two are still movable but don't get tangled up.
- Joined
- Jan 3, 2022
- Messages
- 4,268
Ok, here it is. Wraptor #3! I made this one out of that green strapping I bought when i originally started working on these. I decided that I wanted to try something different so this time instead of two interlaced loops like the Recon and Anderson I would use one continuous loop and see how I like it. These get easier to make once you do a few.
I have a few items like a cobra buckle on order and some strap to make a belt for it. I'm not sure I will put lineman's on this one since I am 2TCing now and I am on my tether and not using a lineman's. I need to mull that over. Maybe I can get a hunt report from this one soon.
I have a few items like a cobra buckle on order and some strap to make a belt for it. I'm not sure I will put lineman's on this one since I am 2TCing now and I am on my tether and not using a lineman's. I need to mull that over. Maybe I can get a hunt report from this one soon.
Attachments
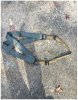
Nice job. Need some timber pimp fleece on it.Ok, here it is. Wraptor #3! I made this one out of that green strapping I bought when i originally started working on these. I decided that I wanted to try something different so this time instead of two interlaced loops like the Recon and Anderson I would use one continuous loop and see how I like it. These get easier to make once you do a few.
I have a few items like a cobra buckle on order and some strap to make a belt for it. I'm not sure I will put lineman's on this one since I am 2TCing now and I am on my tether and not using a lineman's. I need to mull that over. Maybe I can get a hunt report from this one soon.
- Joined
- Jan 3, 2022
- Messages
- 4,268
I may do a timber pimp hunt before it is over this season. I have some baby yoda pants and a corgi shirt, so you never know.
NMSbowhunter,
Great work! Where is the overlap of the 2" webbing, as I can't see it in the pictures? Have you thought about sewing one of the ends of the bridge, thus eliminating one of the tri-glides? I know Eberhart sews both of this bridge ends, as he says that once he has settled on a bridge length, it never changes unless one loses/gains a lot of weight.
Great work! Where is the overlap of the 2" webbing, as I can't see it in the pictures? Have you thought about sewing one of the ends of the bridge, thus eliminating one of the tri-glides? I know Eberhart sews both of this bridge ends, as he says that once he has settled on a bridge length, it never changes unless one loses/gains a lot of weight.
tylerray378
Well-Known Member
Looks great! I’m taking my green strap continuous loop build on it maiden voyage asap. Fridays hunt was on a different build it wasn’t nearly as comfortable actually hunting with it compared to practicing at ground level. Keep us updated
- Joined
- Jan 3, 2022
- Messages
- 4,268
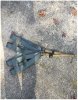
Thanks! I have a 10 inch overlap at the back that goes flush with the outside of the two uprights. So, two of the uprights are 4 layers and all the others are three layers, if that makes sense. Right now, I can orient them any way I want so I have to think on that a bit. If I keep the overlap on the inside it is then supported by solid strap. I may do it that way.NMSbowhunter,
Great work! Where is the overlap of the 2" webbing, as I can't see it in the pictures? Have you thought about sewing one of the ends of the bridge, thus eliminating one of the tri-glides? I know Eberhart sews both of this bridge ends, as he says that once he has settled on a bridge length, it never changes unless one loses/gains a lot of weight.
I have thought about sewing at least one side of the bridge permanently and I may do both sides. I tend to do like John Eberhart and once I get the bridge length set, I don't change it. I spent a little time out back hanging in it and it is very comfortable so far. The only pressure point is from my wallet in my back pocket, but I don't carry the wallet back there when hunting so that will be a non-issue.
Attachments
Last edited:
- Joined
- Jan 3, 2022
- Messages
- 4,268
Thanks. I will keep you updated on the build and any hunts from it. So far so good. I will likely just add a belt so I can keep it pulled tight while I climb. I want it to be a really streamlined, no nonsense saddle. I look forward to hearing a report of a hunt out of your saddle and how you like it. I know what you mean about the difference in using one for a while in the back yard and sitting in one for 4 or 5 hours in the woods.Looks great! I’m taking my green strap continuous loop build on it maiden voyage asap. Fridays hunt was on a different build it wasn’t nearly as comfortable actually hunting with it compared to practicing at ground level. Keep us updated
Right now, I can orient them any way I want so I have to think on that a bit. If I keep the overlap on the inside it is then supported by solid strap. I may do it that way.
Followed everything except the part quoted above. I understand the 4 layers in two of the ladder parts and 3 in the remaining. I guess I'm not following you on the "inside" portion, unless you are referring to one of the "panels" being inside versus outside, and having the outside one overlapping the inside one.
- Joined
- Jan 3, 2022
- Messages
- 4,268
Well right now the saddle is sort of ambidextrous, meaning I can flip it inside out or back and turn one panel up or have it down. Until there is a belt or a row of molle loops added, it can go several different ways. What I was talking about was flipping is so that the strap that is the joint on the inside so that there is a solid strap overlapping it on the outside. If that makes sense.Followed everything except the part quoted above. I understand the 4 layers in two of the ladder parts and 3 in the remaining. I guess I'm not following you on the "inside" portion, unless you are referring to one of the "panels" being inside versus outside, and having the outside one overlapping the inside one.
tylerray378
Well-Known Member
I had the same idea as you with it being ambidextrous. I couldn’t find one way being more comfortable than the other. I ended up having the overlap on the top of the outside loop. I added the LB on the inside loop. That way I can just drop the outside loop under my butt and hunt.
- Joined
- Jan 3, 2022
- Messages
- 4,268
Good idea. I may give that a try and see how I like it. I thought about putting the belt connections through the D rings like on the Recon and not sewing anything to the actual loops. The belt is just there to hold it tight to me, so it stays put under my rear end.I had the same idea as you with it being ambidextrous. I couldn’t find one way being more comfortable than the other. I ended up having the overlap on the top of the outside loop. I added the LB on the inside loop. That way I can just drop the outside loop under my butt and hunt.
Good idea. I may give that a try and see how I like it. I thought about putting the belt connections through the D rings like on the Recon and not sewing anything to the actual loops. The belt is just there to hold it tight to me, so it stays put under my rear end.
Check out these "mods", essentially just adding an Anderson style belt. Pretty easy.
I would imagine you would want the overlap to be on the bottom of the bottom most panel, such that it would be easier to sew molle, linemans loops, etc. on the upper of the uppermost panel.
Still not following you on the solid strap overlapping the overlap, unless you are referring to overlapping the two panels (the overlap on the upper of the bottom panel being overlapped by the bottom of the upper panel strap). The overlap is going to be on one of the 4 webbing portions. So what webbing portions are you describing. Flipping the sling inside or out doesn't change the actual overlap, but it could determine where it is located in relation to the other panel.
I do overlap my panels to make a 9" seat for about half of my sit, and then spread them farther apart for the other half of my sit.
FWIW, I like to have my bottom panel be the inside panel, as I rarely ever move it and only move my upper panel to change saddle width. I find it much easier to overlap my upper panel over the lower one that way.
- Joined
- Jan 3, 2022
- Messages
- 4,268
Ok, so yellow A and B are part of the same loop and are on the outside, top. Loops C and D are the bottom inside panels. If the connection is in strap D (red) then it has strap B overlapping it on the outside. That would give the D strap added support since it is the only one with a sewn connection.
Attachments
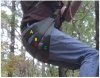
I understand that now! I would concur that the way you have it configured is the way I use my saddle as well (but mine is the original Anderson and I have a Recon). The upper panel (A&B) is the one I adjust the "depth" of my seat, with the lower panel (C&D) hardly ever moving during my sits. Having that sewn connection at D eliminates one webbing strap in order to sew anything on Strap A as well (less straps to sew through).
- Joined
- Jan 3, 2022
- Messages
- 4,268
Yes, the C & D panels stay put under my butt when I hunt. I have the Recon now and love it. I overlap it just like shown above and it stays like that pretty much the whole hunt. I might make minor adjustments from time to time.
I’ve recently started deer hunting after a very long hiatus. Watching lots of videos I came across saddle hunting. i have been going back and forth between buying sit drag, already have rch, and buying a bonafide saddle. After reading this thread from start to finish I think I have found my solution. You guys have done some great work.