• The SH Membership has gone live. Only SH Members have access to post in the classifieds. All members can view the classifieds. Starting in 2020 only SH Members will be admitted to the annual hunting contest. Current members will need to follow these steps to upgrade: 1. Click on your username 2. Click on Account upgrades 3. Choose SH Member and purchase.
  • We've been working hard the past few weeks to come up with some big changes to our vendor policies to meet the changing needs of our community. Please see the new vendor rules here: Vendor Access Area Rules

Adding thumb holes to clothing...

Weldabeast

Well-Known Member
SH Member
Joined
May 23, 2019
Messages
13,508
Location
Northeast Florida
Ok jerkies....how do we add thumbholes to existing clothing without ruining it? A sewing machine isn't totally out of the question but most of us don't have 1 or know how to use 1.

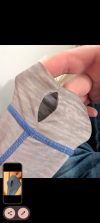
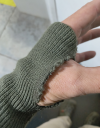
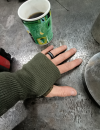
I have made my first attempt on a wool sweater I keep and wear only at work. It's full of holes already so if I ruined it I'm not too upset. Visually I'm not too happy with it but I really didn't care what it looks like as long as it's functional. Hands are in and out of gloves all day so it won't take long to tell me if it's gonna hold up good or not. I just cut a slice right beside the existing seam and stealth stripped it. Stealth strip is just heavy duty fabric tape anyway... correct?


Hahahaha.... Kinda ghetto
Screenshot_20250108-072841~2.pngScreenshot_20250108-072834~2.png
 
Ok jerkies....how do we add thumbholes to existing clothing without ruining it? A sewing machine isn't totally out of the question but most of us don't have 1 or know how to use 1.

I have made my first attempt on a wool sweater I keep and wear only at work. It's full of holes already so if I ruined it I'm not too upset. Visually I'm not too happy with it but I really didn't care what it looks like as long as it's functional. Hands are in and out of gloves all day so it won't take long to tell me if it's gonna hold up good or not. I just cut a slice right beside the existing seam and stealth stripped it. Stealth strip is just heavy duty fabric tape anyway... correct?


Hahahaha.... Kinda ghetto
View attachment 113243View attachment 113244
With wool knit, I think you'll probably need to darn the edges. I bought a wool sweater from someone on SH and there was a small hole in the chest area and I know the knit was going to start to unravel unless I had someone darn the edges.
Like with everything else, there are YouTube vids on how to darn. I was a little intimidated by it and a friend of my wife offered to do it for me. The repair look good as new...can't even see here the hole was.
 
Thermal was the first thing I bought with a thumb hole and I was like w t f is this crap. I'll never use that.....hahaha
Thumb holes are nice just for slipping your arms into coat sleeves. Some fabrics are "sticky" to other fabrics. I hate slipping my arm into the next layer and have the one layer's sleeve bunch up inside the other layer's sleeve.
When layers bunch-up, they are less efficient and certainly less comfortable.
 
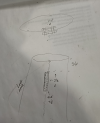
What if u laid out where u want the cut to be inside and out and then take 2 strips of another fabric say maybe 3/8 wide and 2 1/2 long and sew the strips inside and out with couple rows of simple straight stitch on either side of center. Couple stitches side to side on either end isolating the cut from the rest of the sleeve. Then slice down the center? I suck at sewing and don't want to learn a new sewing technique unless I totally have to....hahahaha

Again...I don't care what it looks like but don't want it to mess up article of clothing.Screenshot_20250108-093519~2.png
 
I looked up hand stitching button holes and it is kinda intimidating
Repairing a hole is probably more complicated than it is to secure the edges of a thumb hole from unraveling. Maybe?? I really don't know for sure. But it seems to me that a repair needs to follow the pattern of the weave, but just securing the edges so they don't unravel might just be a matter making loops around the edges order to hold it together?
I have no experience with this but it seems logical to me that repairing a hole is more complicated. And I assume that the actual appearance of the thumb hole on a hunting garment is not super important so so I'd just go round and round the edges. Maybe practice with a worn out garment with a similar style weave.
 
What if u laid out where u want the cut to be inside and out and then take 2 strips of another fabric say maybe 3/8 wide and 2 1/2 long and sew the strips inside and out with couple rows of simple straight stitch on either side of center. Couple stitches side to side on either end isolating the cut from the rest of the sleeve. Then slice down the center? I suck at sewing and don't want to learn a new sewing technique unless I totally have to....hahahaha

Again...I don't care what it looks like but don't want it to mess up article of clothing.View attachment 113256
Seems like a decent plan.
 
Not knit fabric, but my kids have a few shirts like this and they are right on the seam. Seems like splitting the seam by removing the stitches from the end instead of cutting the fabric, tacking back the sides on themselves and then "repairing" the seam might be the easiest as that wouldn't introduce a tear/break/hole in the fabric.
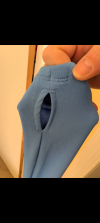
Screenshot_20250108-102839.pngScreenshot_20250108-102836.png
 
I'm not sure why I know this... but apparently the Brits modified their issued field jackets by stitching the tops of wool sock to the cuffs, to make them warmer and more comfortable. Also, in Scouts we cut old wool socks to make what amounted to fingerless gauntlets with thumb holes, to keep the snow out of out sleeves when we fell down skiing and snowshoeing.
 
I'm not sure why I know this... but apparently the Brits modified their issued field jackets by stitching the tops of wool sock to the cuffs, to make them warmer and more comfortable. Also, in Scouts we cut old wool socks to make what amounted to fingerless gauntlets with thumb holes, to keep the snow out of out sleeves when we fell down skiing and snowshoeing.
I Made Wool Mitts Like That For Black Powder Rendezvous!
 
If you know how to whip the end of a rope, you know how to darn a hole or secure one you've deliberately created. You can literally just sew in and out of the garment wrapping the edge of the hole created in the loop of thread. There are better ways but this one will work. If you want it to look good do that then sew another "trim" fabric around the hole thing similar to what you suggested in post 7.
 
Most sewing machines have a "button hole" setting that pretty much does it all for you. I have designed a few hunting blinds, and some other hunting stuff, so got used to a sewing machine. If it doesn't have one, you can easily learn to stitch up each side of the seam, then slice it with a razor blade.
 
Some of the clothes I was looking at adding them too dont have a seam or the seam isn't anywhere in line of where ur thumb falls naturally in the sleeve
 
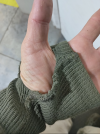
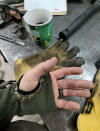
The stealth strip has failed and I ripped it off. Surprisingly no frays or runs in the sweater material. Supposed to have a rainy day this weekend so maybe I'll find another shirt to test on and try the sewn rectangle patch idea and see how that goes. Putting my hands in and out of various gloves all throughout the day and dirt is what did it in for the stealth strip. It did good for a couple daysScreenshot_20250116-061353~2.pngScreenshot_20250116-061320~2.png
 
Can you singe it with a lighter and melt the ends of the fibers together? Not sure of the material youre working with. Kinda like you do the end of a nylon strap if you cut it.

May be a little scratchy though.

BT
 
Can you singe it with a lighter and melt the ends of the fibers together? Not sure of the material youre working with. Kinda like you do the end of a nylon strap if you cut it.

May be a little scratchy though.

BT
Probably work better to use a large darning needle and some yarn to blanket-stitch or whip-stitch the edges.
 
Back
Top