• The SH Membership has gone live. Only SH Members have access to post in the classifieds. All members can view the classifieds. Starting in 2020 only SH Members will be admitted to the annual hunting contest. Current members will need to follow these steps to upgrade: 1. Click on your username 2. Click on Account upgrades 3. Choose SH Member and purchase.
  • We've been working hard the past few weeks to come up with some big changes to our vendor policies to meet the changing needs of our community. Please see the new vendor rules here: Vendor Access Area Rules

How have you modified the predator?

How do you do the sponge deal?

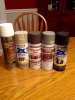
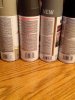
I'll take a pic of the cans and try to get a shot of the color tags or I'll list them. You'll prolly laugh at the goofy mixture I used but I don't think it really matters because you actually use so little paint
 
Paint and a Night Ize gear tie. I’m still a fan of the factory strap and buckle after trying other methods.

During an SRT ascent I attach the end of my gear tie to the left side of my saddle. At hunting height I tie and alpine butterfly in my static rope and connect that loop to a carabiner on my right lineman’s loop. This backs up my Mad Rock Safeguard and allows an easy two hand set up of my platform.

The gear tie stays attached to my platform.

0ad55fc180ec2d3f0f883fb5723acf5b.jpg


The carabiner on my lineman’s loop is also dual purpose and backs up my bridge and ropeman 1 during the hunt by adding a prusik to the end of my tether.

4506e73facbbce321e7f91801429a609.jpg


Sent from my iPhone using Tapatalk
Looks awesome. That's quite the vegatation you are hunting over.
 
Combination of bad weather and the whole family being sick at once kept me inside for a few days, did let me update my predator though. Aluminum primer, spray on bedliner, sponge camo and flat clear coat. Tried to replicate Sitka's elevated II and burnt orange logo. View attachment 9614View attachment 9615
Here is the paint I used for this but I'm sure y'all could find something just as close at any hardware.
 

Attachments

  • IMG_0219.JPG
    IMG_0219.JPG
    351.8 KB · Views: 593
  • IMG_0221.JPG
    IMG_0221.JPG
    429.3 KB · Views: 578
Here is the paint I used for this but I'm sure y'all could find something just as close at any hardware.
I used the aluminum primer as the white. The clear coat can I already threw out but it was just an ultra flat. I would recommend the clear coat it seems to be helping to protect the paint and bedliner pretty well but I think the key is to allow plenty of time for the paint to dry.
 
I used the aluminum primer as the white. The clear coat can I already threw out but it was just an ultra flat. I would recommend the clear coat it seems to be helping to protect the paint and bedliner pretty well but I think the key is to allow plenty of time for the paint to dry.

How good did the paint stick to the bedliner?

I have some “rugged texture” bed-liner I got from Walmart I may try out
 
How good did the paint stick to the bedliner?

I have some “rugged texture” bed-liner I got from Walmart I may try out
Seems to be fine. I've used the platform 4-5 times since I finished and the only wear is where the cleats rub the tree. I used the Rust-Oleum spray on bedliner but I think the primer was more important.
 
Thanks. I also added a Versa strap, I'm still figuring it out on the platform but the lites are awesome on my beast sticks
If you used spray paint, how did you involve the sponge to get the effect? Only time I've watched sponge painting was paint from can onto sponge onto surface. Thanks!!
 
Just spray the paint in a small puddle on a piece of cardboard then dip the sponge in it. You don't use much paint so it dries fast. I did all of the actual camo in about 35-45 mins. Just kept putting on layers and filling in spots till it looked ok.
 
Just spray the paint in a small puddle on a piece of cardboard then dip the sponge in it. You don't use much paint so it dries fast. I did all of the actual camo in about 35-45 mins. Just kept putting on layers and filling in spots till it looked ok.
Yeah, that's what I thought! You really did a nice job on that platform! ! I guess since there's so much time left before next season I will take my time!
 
Yep, time and weather. I clear coat anything I paint. Then let it sit. Or put it in the lake. Or mud. (Unless it's stealth stripped, then it just stays on a tree). About to start on my sticks and predator now, gonna try and replicate some camo patterns (like the deer will care, huh?!)
 
Yep, time and weather. I clear coat anything I paint. Then let it sit. Or put it in the lake. Or mud. (Unless it's stealth stripped, then it just stays on a tree). About to start on my sticks and predator now, gonna try and replicate some camo patterns (like the deer will care, huh?!)[/QUOTE
I used Gregs vid as a guide but used I a pack of Sea sponges for the paint application. I think 5 came in a pack for $2.00. I cut some of them up a little to try to fit in the cracks. They seemed to leave a more random pattern than a standard dish/cleaning sponge.
 
Back
Top