• The SH Membership has gone live. Only SH Members have access to post in the classifieds. All members can view the classifieds. Starting in 2020 only SH Members will be admitted to the annual hunting contest. Current members will need to follow these steps to upgrade: 1. Click on your username 2. Click on Account upgrades 3. Choose SH Member and purchase.
  • We've been working hard the past few weeks to come up with some big changes to our vendor policies to meet the changing needs of our community. Please see the new vendor rules here: Vendor Access Area Rules

DelaWhere’s Breakfast Sausage

DelaWhere_Arrow

Well-Known Member
SH Member
Joined
Jul 16, 2019
Messages
2,595
Location
Delaware
  • 5 lbs Venison trimmings, cut into 1-2” cubes
  • 3 lbs boneless Pork Shoulder (Boston Butt), cut into 1-2” cubes
  • 4 1/2-5 Tbsp Brown Sugar; could substitute with honey powder or maple powder, but it may throw your ratio off
  • 10 tsp (3 1/3 Tbsp) dried Sage, ground
  • 10 tsp (3 1/3 Tbsp) salt
  • 5 tsp (1 2/3 Tbsp) Black Pepper
  • 1 1/2 tsp dried Oregano, ground
  • 1 tsp dried Chili pepper, ground (I used cayenne); could substitute pepper flakes, I just prefer the finished texture that ground pepper produces
  • 1/2-1 tsp ground Clove (for a really interesting flavor profile, double this measurement and/or the following Nutmeg measurement)
  • 1/2-1 tsp ground Nutmeg
  • 1-2 Tbsp dried Garlic, ground (I used 1 which tasted nice, but I like a garlicky breakfast sausage, so I should have added more); could substitute minced fresh garlic, about 1/2-1 clove per pound of meat
  • 2 tsp dried Onion, ground (optional)
  • 2-3 tsp sweet or smoked Paprika (optional)
*Measurements should provide enough seasoning for up to 10 lbs of meat, so you can be as liberal or stingy when seasoning as you’d like. I used enough seasoning for about 9 lbs of meat, even though I came in just under 8 lbs of finished product, then saved the remainder in a baggie for a rainy day.
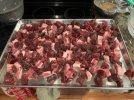
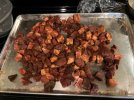
  1. Combine all dry seasonings (if using wet seasonings, add them to your meat immediately after dry-seasoning) and spread hunks of meat evenly on a very large baking sheet. You want even visual representation of pork and venison across the sheet, to facilitate the process of mixing the two meats together right away. Season all meat evenly with your dominant hand, and periodically toss/mix the meat with your non-dominant hand. Dust, toss, dust, toss, repeat. By the time you’re done, the meat should be red and greenish-brown all over, and slightly tacky.D03FC448-09CD-4BED-9D57-225B0E768D1D.jpeg747606F4-6E49-4DE7-9957-16DD2637D5C9.jpeg92603726-62B4-46BA-A034-0611E08112D3.jpeg
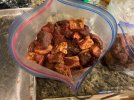
  2. Toss seasoned meat into an airtight freezer bag, and let it marinate in the refrigerator for up to 24 hours (I did about 16). After that, transfer meat to the freezer for several hours, up to another 24. You want the meat to come as close to freezing as possible, without freezing solid. Alternatively, if you have to schedule your sausage making incrementally like I did (three kids and two jobs), you can keep the meat frozen solid then partially defrost in the fridge when you’re ready to grind. Another way to store the meat before grinding is by sticking the bags into a large glass or metal bowl, putting that bowl onto a larger bowl bottomed-up with ice, then laying a large ice pack (such as a Yeti Ice) over the top and placing the entire setup in the fridge for 24 hours. You will need nearly-frozen meat for the next step no matter which method you choose. D35BC209-8F5D-42E5-8DF6-EEC0E5BA8091.jpeg
  3. While your meat is chilling, make sure your meat grinder’s components are clean and store any metal in the freezer for at least a few hours before grinding, and leave it there until right up to the moment you are ready to grind. About one hour before that, lubricate all food-contact components with a food-safe silicone spray and return them to the freezer.
  4. Defrost the meat just enough to be able to separate the hunks with your finger strength. However, it’s better to be more frozen than less, so if you have to use a sharp, stout knife to help you separate/chop apart the hunks, don’t stress—it’s going to get ground up anyway, and you’re going to want 1-2” chunks for the grinder regardless of how they get that way.
  5. Assemble your grinder with the coarse/medium plate installed. Arrange a glass/metal bowl with ice and a slightly smaller, empty glass/metal bowl on top of that ice. You’ll be catching the ground meat in that smaller bowl (if you haven’t figured it out yet, keeping everything VERY COLD is extremely important through this whole process).
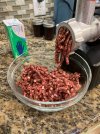
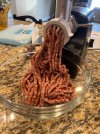
  6. At a ratio of 2-3 pieces of venison to every piece of pork in the feed tube, grind your meat one time. The resulting “noodles” of sausage should be evenly pink, red, and white with a smattering of brownish seasoning throughout. You can hand-mix the contents at this point, but I prefer not to; the warmth of human hands could possibly change the consistency of your grind for the worst. Instead of hand-mixing, I simply wrap the mix in a freezer bag and freeze overnight. If you’re pressed on time, stick the ground meat in the freezer for 30-45 minutes, break into chunks again, then skip to Step 8 below. CF8CBE99-6ADA-4FF4-AAE0-8732872688E8.jpegE6C98D47-D765-4641-9A6B-760320408695.jpegA421D65F-755A-4299-BF24-6CD1918A2D8A.jpeg
  7. After another night in the freezer, stick the meat back in the fridge until you’re ready to grind for the second time. It should be defrosted just enough to allow you to cut into strips with a sharp, stout knife. These “meatsicles” should be about 1-2” thick and 3-5” long. 2E3B52E8-24F6-4159-BC28-2579606F7135.jpeg
  8. Reassemble your sanitized, re-chilled, and re-lubricated grinder with the same coarse/medium plate, and grind the meat a second time. The resulting mixture should be uniformly pink-red and the seasoning should be mostly homogenized with the meat. F75A6392-58E3-4E82-80A9-4BD83DD8C68D.jpeg
  9. Package in 1-lb “loaves”, wrapping each in a double layer of airtight plastic wrap/Saran, then tightly packing in freezer paper.
  10. If you want to make links (I greatly prefer patties for breakfast sandwiches) you can stuff them at any time, as long as the meat is pre-chilled or frozen and partially thawed prior to stuffing. You can also pre-form patties (1/4-1/3 lb each) and freeze them in stacks with wax paper layered between them and plastic wrap around the bundles. 52C13194-34FA-4D0C-AD9E-6FB73F2B6CBD.jpeg
 
Last edited:
  • 5 lbs Venison trimmings, cut into 1-2” cubes
  • 3 lbs boneless Pork Shoulder (Boston Butt), cut into 1-2” cubes
  • 4 1/2-5 Tbsp Brown Sugar; could substitute with honey powder or maple powder, but it may throw your ratio off
  • 10 tsp (3 1/3 Tbsp) dried Sage, ground
  • 10 tsp (3 1/3 Tbsp) salt
  • 5 tsp (1 2/3 Tbsp) Black Pepper
  • 1 1/2 tsp dried Oregano, ground
  • 1 tsp dried Chili pepper, ground (I used cayenne); could substitute pepper flakes, I just prefer the finished texture that ground pepper produces
  • 1/2-1 tsp ground Clove (for a really interesting flavor profile, double this measurement and/or the following Nutmeg measurement)
  • 1/2-1 tsp ground Nutmeg
  • 1-2 Tbsp dried Garlic, ground (I used 1 which tasted nice, but I like a garlicky breakfast sausage, so I should have added more); could substitute minced fresh garlic, about 1/2-1 clove per pound of meat
  • 2 tsp dried Onion, ground (optional)
  • 2-3 tsp sweet or smoked Paprika (optional)
*Measurements should provide enough seasoning for up to 10 lbs of meat, so you can be as liberal or stingy when seasoning as you’d like. I used enough seasoning for about 9 lbs of meat, even though I came in just under 8 lbs of finished product, then saved the remainder in a baggie for a rainy day.
  1. Combine all dry seasonings (if using wet seasonings, add them to your meat immediately after dry-seasoning) and spread hunks of meat evenly on a very large baking sheet. You want even visual representation of pork and venison across the sheet, to facilitate the process of mixing the two meats together right away. Season all meat evenly with your dominant hand, and periodically toss/mix the meat with your non-dominant hand. Dust, toss, dust, toss, repeat. By the time you’re done, the meat should be red and greenish-brown all over, and slightly tacky.View attachment 98544View attachment 98545View attachment 98546
  2. Toss seasoned meat into an airtight freezer bag, and let it marinate in the refrigerator for up to 24 hours (I did about 16). After that, transfer meat to the freezer for several hours, up to another 24. You want the meat to come as close to freezing as possible, without freezing solid. Alternatively, if you have to schedule your sausage making incrementally like I did (three kids and two jobs), you can keep the meat frozen solid then partially defrost in the fridge when you’re ready to grind. Another way to store the meat before grinding is by sticking the bags into a large glass or metal bowl, putting that bowl onto a larger bowl bottomed-up with ice, then laying a large ice pack (such as a Yeti Ice) over the top and placing the entire setup in the fridge for 24 hours. You will need nearly-frozen meat for the next step no matter which method you choose. View attachment 98547
  3. While your meat is chilling, make sure your meat grinder’s components are clean and store any metal in the freezer for at least a few hours before grinding, and leave it there until right up to the moment you are ready to grind. About one hour before that, lubricate all food-contact components with a food-safe silicone spray and return them to the freezer.
  4. Defrost the meat just enough to be able to separate the hunks with your finger strength. However, it’s better to be more frozen than less, so if you have to use a sharp, stout knife to help you separate/chop apart the hunks, don’t stress—it’s going to get ground up anyway, and you’re going to want 1-2” chunks for the grinder regardless of how they get that way.
  5. Assemble your grinder with the coarse/medium plate installed. Arrange a glass/metal bowl with ice and a slightly smaller, empty glass/metal bowl on top of that ice. You’ll be catching the ground meat in that smaller bowl (if you haven’t figured it out yet, keeping everything VERY COLD is extremely important through this whole process).
  6. At a ratio of 2-3 pieces of venison to every piece of pork in the feed tube, grind your meat one time. The resulting “noodles” of sausage should be evenly pink, red, and white with a smattering of brownish seasoning throughout. You can hand-mix the contents at this point, but I prefer not to; the warmth of human hands could possibly change the consistency of your grind for the worst. Instead of hand-mixing, I simply wrap the mix in a freezer bag and freeze overnight. If you’re pressed on time, stick the ground meat in the freezer for 30-45 minutes, break into chunks again, then skip to Step 8 below. View attachment 98548View attachment 98549View attachment 98551
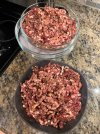
  7. After another night in the freezer, stick the meat back in the fridge until you’re ready to grind for the second time. It should be defrosted just enough to allow you to cut into strips with a sharp, stout knife. These “meatsicles” should be about 1-2” thick and 3-5” long. View attachment 98552
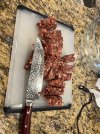
  8. Reassemble your sanitized, re-chilled, and re-lubricated grinder with the same coarse/medium plate, and grind the meat a second time. The resulting mixture should be uniformly pink-red and the seasoning should be mostly homogenized with the meat. View attachment 98553
  9. Package in 1-lb “loaves”, wrapping each in a double layer of airtight plastic wrap/Saran, then tightly packing in freezer paper.
  10. If you want to make links (I greatly prefer patties for breakfast sandwiches) you can stuff them at any time, as long as the meat is pre-chilled or frozen and partially thawed prior to stuffing. You can also pre-form patties (1/4-1/3 lb each) and freeze them in stacks with wax paper layered between them and plastic wrap around the bundles. View attachment 98554
That looks amazing!!! That’s the missing piece from my game that I’m going to address this year. A decent grinder!!!
 
That looks amazing!!! That’s the missing piece from my game that I’m going to address this year. A decent grinder!!!
Hey thanks! First round of venison sausage ever. Used to make a gang of turkey and pork breakfast patties at the butcher shop so I just adjusted the seasoning a little to make it my own.
I didn’t want to get into home butchering until I bought a grinder, so Santa (me) brought the Cabela’s Heavy-Duty jawn. I was looking at some $200-300 units but I didn’t want to spend that much cuz I’m not grinding bone or giant slabs of elk. This one was about $130 and I figured for 2-4 deer per year it would be plenty reliable and it makes short work of a pile of trim. The whole 8 lbs of sausage only took a few minutes to grind.
Mind sharing the model? I’m with you a lot of this stuff is but once cry once, but the actual amount of meat I’d run through that grinder now vs when I was younger ( based on what we prefer for ground) I love beef for burgers & like ground venison for chili & tacos but adding sausage to the rotation would be huge!!
 
Mind sharing the model? I’m with you a lot of this stuff is but once cry once, but the actual amount of meat I’d run through that grinder now vs when I was younger ( based on what we prefer for ground) I love beef for burgers & like ground venison for chili & tacos but adding sausage to the rotation would be huge!!

https://www.cabelas.com/shop/en/cabelas-heavy-duty-meat-grinder?searchTerm=2516153

Of course I don’t mind! You know me, I share whatever I can.
Don’t forget to pick up a can of the food-safe silicone spray! Their brand is the right in the same price range as Amazon.
 
Mind sharing the model? I’m with you a lot of this stuff is but once cry once, but the actual amount of meat I’d run through that grinder now vs when I was younger ( based on what we prefer for ground) I love beef for burgers & like ground venison for chili & tacos but adding sausage to the rotation would be huge!!
If you are going to stuff casings with it, get a foot pedal. A foot pedal will allow you to use both hands to add meat and control the casing.
 
Last edited:
Back
Top