• The SH Membership has gone live. Only SH Members have access to post in the classifieds. All members can view the classifieds. Starting in 2020 only SH Members will be admitted to the annual hunting contest. Current members will need to follow these steps to upgrade: 1. Click on your username 2. Click on Account upgrades 3. Choose SH Member and purchase.
  • We've been working hard the past few weeks to come up with some big changes to our vendor policies to meet the changing needs of our community. Please see the new vendor rules here: Vendor Access Area Rules

DIY Bow Hydro Dip

Vtbow

Well-Known Member
Joined
Mar 21, 2018
Messages
5,516
Did this a few months ago and had a follow along thread on another site...thought people might be interested in it while its not hunting season...

In the next two weeks I will be doing a 76er hydrodip/camping bow build and thought people might want to follow along. I've never done a hydro dip and hope others can learn from my mistakes :) all feedback and ideas are welcome, thanks!
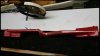
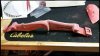
This will be the subject of the experiment!
#1.JPG
Kit showed up yesterday. I'll do an unboxing of it tonight. $69 to my door, everything needed but masking tape and a container.2.JPG
3.JPG
4.JPG

Quick file work to remove original mold lines6.JPG 8.JPG

Making a little progress, sanded to whiteout, then down to 220, then red em pad

8.JPG

First coat of primer
9.JPG

Limbs and riser primed....base coat in 2 hrs...
10.JPG
 

Attachments

  • 5.JPG
    5.JPG
    15.3 KB · Views: 57
  • 7.JPG
    7.JPG
    24 KB · Views: 58
Tan base coat applied. Plan is to dip tomorrow night!
11.JPG

It's dipping time!
12.JPG

Don't know why I did the riser first.
13.JPG
14.JPG
15.JPG
16.JPG

Learning curve is pretty instant on this....much better!
17.JPG 18.JPG 19.JPG

Ok, this is pretty awesome...
20.JPG
 
3rd coat of clear drying...
21.JPG

I call it the camo mobile! Back into the basement to hang near the furnace for some good dry heat to cure the clear coat. Will hang here for 12 days to harden to full cure.
22.JPG


Finished:

23.JPG

24.JPG
 
Ok so here are quick takeaways:

-As with everything finishing, PREP PREP PREP

-The directions do not mention wiping down with solvent, or tack cloth/etch between each step, definitely do!

-They suggest edging the film with masking tape when dipping-- I did this withe blue 1" masking tape. Not sure if the 1" was too large and heavy or what, but this made the film lose surface tension and not float--this lead to poor activation and the issues with some spotty finish on the riser. I wouldn't use tape at all, worked MUCH better without.

-container size MATTERS. you do not want the film to even touch the sides, and you need plenty of space to get the part in without hesitation.

-make sure water is deep enough to shake item below the surface

-DIP SLOWWWWWWWWWWLY
.....did I say slow?

-Water temp matters, a little higher than lukewarm seemed to work best

-I dipped in a rubber made bin on the floor. IF you can, raise it up to waist height, I Think I would have had more control and been able to move more slowly, as well as seen what was going on better

-DO NOT REUSE WATER- I tried to do a quick touch up on a spot and really just made a mess and wasted material--nothing worked as it should in the water which already had activator in it

-Wear gloves...I know this is common sense, but I didnt because I was moving around so much to get water from the laundry room etc. My fingernails are still a little camo, and luckily I was able to get it off my wedding ring with some acetone...don't think the camo ring would have flown with my wife.


This really wasnt too difficult at all, and I think anyone could do it if you are patient and follow the directions you can get a professional job at home. I'm going to do a quiver hood for this bow next and I am confident my lessons will make a huge difference in the end process.

Feel free to reach out if you have questions!

-Brian
 
Oh yeah... I contacted the company....they specifically said DO NOT USE ACRYLIC based clear coats with the hydrodip...must have missed that warning(it wasnt there) They say stick with urethane based products the whole way through and shouldnt have a problem. Just wanted to keep anyone interested in this in the loop. Cheers!

Oh crap....apparently my favorite automotive matte clear coat does NOT play well with the hydrodip film....don't use this!!!
25.JPG
 
Looks great. Glad everything worked out for you.

Heck, I lost my wedding ring in Bermuda on our Honeymoon. We are were swimming and it came off. Spent about 2 hrs before I found it. So I understand about the camo ring
 
Looks great. Glad everything worked out for you.

Heck, I lost my wedding ring in Bermuda on our Honeymoon. We are were swimming and it came off. Spent about 2 hrs before I found it. So I understand about the camo ring

I had mine go down the lavatory of an aircraft at work... it took 2 mechanics 50 minutes to disassemble the toilet, retrieve it, put it all back together, and let the passengers on the plane. I couldn’t believe dispatch let us take an hour delay just to get my ring back.

When my wife tells the story, I “threw it down the toilet and broke the plane”


Sent from my iPhone using Tapatalk
Too funny....way too funny...
 
Vtbow,

Digging up your thread. Looked like some amazing results you ended up with. Curious how well the finished product is holding up if it has seen some use?
 
Vtbow,

Digging up your thread. Looked like some amazing results you ended up with. Curious how well the finished product is holding up if it has seen some use?
I actually sold the bow this winter, but fin ish was rock hard and quit durable. As with any paint though, it's all about the prep!!!!
 
Back
Top