Weisman125
Member
Wanted to post about my DIY Ozone Generator unit that I thought might help others that would like to build one this off season without spending $400 or better. The bulk of this can be completed for less than $100 plus whatever you decide to use for a battery and is really very simple. I still practice all the good scent control measures of washing myself and clothes in scent free soap, scent free totes, dress/undress in the field, etc. I know ozone is not perfect but I notice a significant improvement in the number of deer that get down wind and don't blow out. The extra 10 seconds I believe it gives me to get a shot off is worth the added weight and bulk. Others may have different experiences and that is fine but I won't go to a tree without it. Before it gets brought up; disclaimer: ozone is toxic, do not use in enclosed area and avoid breathing ozone.
You need four main components to produce the unit; ozone air cell, air cell power supply, a computer fan, and 12V power bank. The SS-05H79 air cell and fixed power supply can be purchased from amazing1 for $60. I believe the output is the same or close to the Ozonics HR300 unit but cannot confirm for sure. the smaller air cell amazing1 sells is the exact same that was used in the HR200. My buddy used it to replace his. This is a 12V system and mine runs somewhere between 1.5 and 2 amps.
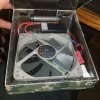
The fan is the biggest driver of the design. I went with the 120 MM size. The bigger the fan, the more airflow and less noise. A smaller fan would mean smaller box but increased noise. I decided on a 1700 RPM fan that offered the highest CFM to dBA that I could find. However, I used a resistor I had from another fan to cut down on the noise and back pressure. I assume this brought it down to around 1400 RPM but I have no way to test. I also tried an 800 RPM fan which actually ran completely silent but not enough airflow. Something in the 1200-1500 RPM range seems to be the sweet spot from my testing. Fans I looked at run anywhere from $8-$25. Quietpc.com is a good place to look at a bunch of fans of all sizes with their CFM and dBA ratings.
The fan, air cell, and power cell are wired to a 5.5mmx2.1mm female barrel connector in the back of the unit. I keep the battery power bank in my pack and use a 5' male/male 5.5mm x 2.1/2.5mm barrel connector cord to the unit. Keeping the battery in my pack keeps it protected from the elements. My power bank is 23000mAh with 4.5A max output. This allows me to run about 12hrs on a charge. I can also charge my phone from it if need be. Any 12V power bank with 5.5mmx2.1/2.5mm connector will work for this setup so I can always change as battery technology improves. Most 12V power banks designed for laptops will have this plug as an option. This one was $80 and is 7.3"x4.8"x1" but I've also got a couple others that are $30 and will give me 3-4 hrs on a charge.
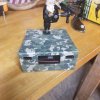
I added a 1/4-20 insert to the lid and connected a mini ball head clamp mount so I could quietly clamp the unit to a screw-in tree arm that I used before I started hunting from the saddle this year. Shrink tubing really helped to quiet this down from stock. I need to figure out a good way to mount it now using a HYS strap and be able to point it in any direction so if any of you have an idea I'm all ears. It'll need to stick out about 6" from the tree to be able to spin in any direction with the current mount.
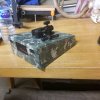
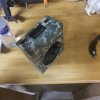
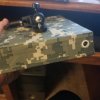
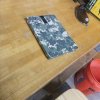
I made the box as small as I could to fit the components. It measures 6"x7.25"x3" on front and 1.5" in back. It's almost 4" in the middle with clamp attached. I used 1/8" poly-carbonate sheets that I laying around with holes cut out for the fan intake at the bottom and output in the front. The air cell is mounted in front of the output so all air that exits get's ozone charged. 120mm fan cover and mesh from a small trash can cover these holes. Camo tape to cover and hold the lid on so I can easily take it apart if I need to change something.
This was my 3rd DIY unit after my original HR100 crapped out and by far my best design. This off season I may get some thinner plastic to make a new box and play with some smaller fans to cut down on the size for version 4.0. I'm open to some constructive criticism from others in this great DIY community and will gladly help anyone that wants to tackle this project.


