I see them all the time in in with the fencing supplies. Manager here says that the company won't pick them up unless there is a full semi load palleted and shrink wrapped. She told me to take all of them if I wanted. Didn't need 300 of them! Other family members have done the same at other locations.How do I ask for these free blocks? What do they use them for? Packaging of some sort I assume?
Sent from my SM-G900V using Tapatalk

-
The SH Membership has gone live. Only SH Members have access to post in the classifieds. All members can view the classifieds. Starting in 2020 only SH Members will be admitted to the annual hunting contest. Current members will need to follow these steps to upgrade: 1. Click on your username 2. Click on Account upgrades 3. Choose SH Member and purchase.
-
We've been working hard the past few weeks to come up with some big changes to our vendor policies to meet the changing needs of our community. Please see the new vendor rules here: Vendor Access Area Rules
DIY Target back stop
- Thread starter Marv833
- Start date
You are using an out of date browser. It may not display this or other websites correctly.
You should upgrade or use an alternative browser.
You should upgrade or use an alternative browser.

Thanks for the recommendation, I just bought a 4’x6’ section of 3/4” horse mat. How did you hang it vertically? It’s pretty damn heavy as is.Rubber horse mat from Tractor Supply. Amazing. 20 yards 580 grain arrow stopped with only 10 inches of penetration. I wanted to test it to make sure if I did miss my 4' x 4' target I would be safe.
Last edited:
Got a photo?I finally gave up on the perfect backstop and installed a sand pit. I like it and the kids can lay anything in it to shoot at.
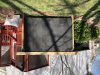
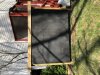
I sandwiched it between a couple 2x10's and put a bunch of wood screws right through the meat of the "sandwich." Then I bolted the whole thing to a couple wooden posts I set in concrete footers. Thing is rock-solid.Thanks for the recommendation, I just bought a 4’x6’ section of 3/4” horse mat. How did you hang it vertically? It’s pretty damn heavy as is.
Thanks man, can you send a picture? Sounds perfect for what I’m trying to do.I sandwiched it between a couple 2x10's and put a bunch of wood screws right through the meat of the "sandwich." Then I bolted the whole thing to a couple wooden posts I set in concrete footers. Thing is rock-solid.
Cannot post pics but stacked 4 x4's 4' long against posts. Made two wings out the ends w/4 x 4's also on a 45 deg angle. Fill w/sand and shoot, Never wears out. Its hard to move around though...Got a photo?
How tall vs long. Gravity is pulling sand so u gotta have correct face to back distance to keep sand in check?Cannot post pics but stacked 4 x4's 4' long against posts. Made two wings out the ends w/4 x 4's also on a 45 deg angle. Fill w/sand and shoot, Never wears out. Its hard to move around though...
Back is 4' but sand is only about 3'. It wants to leech ahead but I just shovel it up once in awhile. Just drove t-posts in behind and one at each front corner.How tall vs long. Gravity is pulling sand so u gotta have correct face to back distance to keep sand in check?
An even easier method is to stack 4 x 4s or cut small logs and stack into a V- shape on the ground and shovel sand into it. When I have kids shoots, I hang a sheet of rubber roofing across above my pit for those errant arrows.
If You Want To Give Me a No. I'll Txt You a Pic But I'm Sure You Can Improve on Mine.Got a photo?
Seen some photos on the internet....I got a general idea.... thanks.If You Want To Give Me a No. I'll Txt You a Pic But I'm Sure You Can Improve on Mine.
Thanks man, can you send a picture? Sounds perfect for what I’m trying to do.
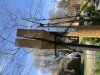
Here it is. I actually did two side by side and I hang the bag target from the braces on both posts.
Attachments
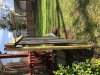
If you took those today, it looks like you missed the bad parts of last night.Here it is. I actually did two side by side and I hang the bag target from the braces on both posts.
Praise the Lord, we did. The worst of it was about 20 minutes north of us, but we made it out scot-free.If you took those today, it looks like you missed the bad parts of last night.
A couple notes:Here it is. I actually did two side by side and I hang the bag target from the braces on both posts.
(1) Sorry the photos uploaded with rotation--don't know what happened there.
(2) If I was doing it again, I would cut the posts down to a level height and set the 2x10's on top instead of using the L-bracket so it wouldn't be pulled forward. This design is fine, but I think that would be better.