• The SH Membership has gone live. Only SH Members have access to post in the classifieds. All members can view the classifieds. Starting in 2020 only SH Members will be admitted to the annual hunting contest. Current members will need to follow these steps to upgrade: 1. Click on your username 2. Click on Account upgrades 3. Choose SH Member and purchase.
  • We've been working hard the past few weeks to come up with some big changes to our vendor policies to meet the changing needs of our community. Please see the new vendor rules here: Vendor Access Area Rules

First saddle build kestrel flex clone

tcg144

Member
Joined
Oct 4, 2021
Messages
71
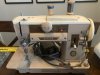
New to saddle hunting this year, my friend had a kestrel his first year and then get a method 2 so he let me use his backup. Didn’t take long before I was hooked and needed my own. The kestrel was ok for leaning but it always felt too short and I knew I wanted something that I could sit as well. I stumbled across this DIY forum and did tons of reading. Already had a Singer 401 so figured I would try to build my own.
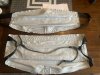
I started with some seatbelts and bed sheets trying diffferent things until I decided to cut into the cordura. Jcline released his new saddle and I liked the straps to manage the pleat so I attempted to add them. Right now I’m working on sewing the overlap together for the lineman loop webbing before I try to sew it to the cordura below the pleat, not sure if this is the right order but I’ll know shortly haha.
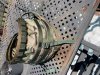
I found a waist band at army/navy for $5 and cut it apart for the hardware.
I realized right away why guys have multiple machines, what a pain to switch for all the different materials and thickness. My biggest issue so far is tension with the V92 thread, did a lot of tests and seam ripping, I think it’s testing the limit of the machine. Do I need to use the V92 for load bearing or can I use the terra40? I thought I would just need more linear stitch to reach the equivalent strength?

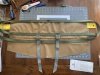
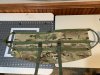
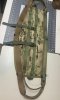
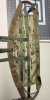
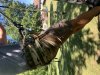
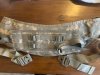
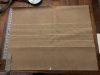
some pics of where I’m at, still working on the bar tacks on that overlap for lineman’s belt
 

Attachments

  • 924CF4A0-1904-46C9-A9CB-2C11C02FF7B8.jpeg
    924CF4A0-1904-46C9-A9CB-2C11C02FF7B8.jpeg
    29.1 KB · Views: 196
  • CD120CD3-4CFC-41E2-9F18-0B551B44DDAB.jpeg
    CD120CD3-4CFC-41E2-9F18-0B551B44DDAB.jpeg
    33.7 KB · Views: 204
  • 0FA73657-4D6D-4083-A5BD-4BDDD0EC2EEC.jpeg
    0FA73657-4D6D-4083-A5BD-4BDDD0EC2EEC.jpeg
    32.2 KB · Views: 198
  • 8CCE2672-ABD9-4EE5-BFCA-57C733A3C465.jpeg
    8CCE2672-ABD9-4EE5-BFCA-57C733A3C465.jpeg
    19.2 KB · Views: 195
  • 77133424-8ECF-433A-B33F-9297EB90F3AE.jpeg
    77133424-8ECF-433A-B33F-9297EB90F3AE.jpeg
    31 KB · Views: 183
Another picture
Nice build. I can't speak to the use of the lower strength thread. I used the V92 in a build I just did and I was really struggling with tension issues for a while. I am new to sewing and sewing machines and I bought a Singer 15-91. It was pointed out to me that with heavy thread you need a lot of tension and that the top stitch is controlled by the bobbin tension and the bottom stitch is controlled by the thread tensioner on the machine. I had to double wrap my thread through the tension disks to get adequate tensioning. Hope this helps.
 
Most home machines are meant to sew with up to V69 thread with a size 18 needle. You could get some Kevlar thread in V69 with a 23 lb break strength, double the strength of nylon or polyester. I bought some V92 Kevlar for the saddle I sewed and it worked fine in a Singer 15 or Singer 15 clone. V135 was really too thick for the Singer 15. The V92 Kevlar breaks at 30 lbs. The commercial saddles I have seen are sewed with bigger thread than V69. Only you can decide if it is enough for you after calculating the breaking strength of the joints you sew. The V designation is a military spec which specifies the breaking strength of the thread whereas the other designations are for diameter only so I like to use the V.
 
Thanks for the feedback guys. Made a little bit of progress by sewing on the grosgrain. View attachment 61158
Make sure you’re calculating the joint strength of your webbing that is weight loading (lineman’s belt and chassis or bridge). Sailrite has a great page that shows your how to calculate it. It appears you’re just using bar racks, and that likely not going to do the trick. Also I’m not sure if you added your chassis yet or if it’s going to be the 1” webbing but you’ll likely want to add that before adding your lineman’s belt. The order of operations to put the saddles together always messed with me. Looks great so far, keep at it.
 

0B5FCA64-9A59-4539-B43A-1E0E59980E94.png
 
Should be fine with Tera 40 just make sure you figure out the thread strength so you can calculate how much weight per inch you can hold.

For Example:
if thread strength = 10 lb
SPI (stitches per inch) = 10
10 x 10 x 1.5 = 150lbs/in
If you want to match your webbing strength which is say 4000 lbs then divide by your strength per inch to determine how many inches you’ll need.
4000lbs / 150 lbs/in = ~27 inches

then take my length (27 inches) and figure out my zig zag pattern that will fit on the size webbing I am sewing. For 1.5” webbing chassis I’d probably do something like 5 lines and 6 inches a piece

5 x 6 = 30”
30 > 27 so I’m good to go.

This is ultra conservative considering that both the webbing for the bridge and lineman’s are only holding 1/2 or 1/4 of the total weight where they are connected. Use the weight and stitches that you need to be confident it’s not gonna fail. The calculation is just for the the webbing piece connected being pulled in tension.F31CC9C2-C72E-44BF-AB80-9ABFF1DA60AA.jpeg
 
@gcr0003
Thanks for the link and the feedback, I did read through that when I started my research but reading it again now is useful since I’ve done some sewing now.

The 1” webbing is for the lineman loops, right now only the section on the bottom pleat is sewn to the saddle panel. The top will be sewed to the top of the 1-3/4” webbing to make some molle loops. I sewed the 1” webbing overlap together(before attchinbtgto with the W pattern, but then went back and added all the bar tacks as some extra security.

I switched over to the terra40 to sew the grosgrain on, I’m going to switch back to the v92 for the load bearing items.

I agree the order of operations takes some planning ahead. I sat at the table for an hour last night pinning stuff together to plan it out.
 
We must have been typing at the same time thank you for taking the time to comment and provide guidance.

Here is what my plan is with the 1-3/4”. 7AC71FF1-3FE2-4957-A8D3-F89954BA34AD.jpeg
 
We must have been typing at the same time thank you for taking the time to comment and provide guidance.

Here is what my plan is with the 1-3/4”. View attachment 61171
Looks good, you know us on this website can never be too safe. Glad you’re doing a W Or zigzag, couldnt tell from the picture. Rock on!
 
Just some tips to get you headed in the right direction and help with your next build. Start with the seat portion flat, with your inner and outer panel sewn together. Then mark out all your webbing placements and folds. Then sew the 1 inch webbing for the linemans and leg buckles to the flat panel. Then sew your 4 pleats starting with the ones close to the webbing before moving to the inside pleats. Once you have that, cut it to shape and put your edge binding on. Once you have that you can take a piece of stiff one inch webbing and sew it into the pleat really close to the binding on each end. This helps keep that pleat from separating at the edges and stiffens that space between the suspension. Then I put on the suspension starting at the top then joining on the bottom. After that you add the waist belt and the final step is the molle. As far as thread, v92 will work for the entire saddle. 138 is even better. Terra 40 or other 69 threads will possibly work but wouldn’t be my first choice for those pleats. I use terra 40 for the binding, 138 for the pleats and suspension connection point. And 92 for everything else. But like I said before 92 would work for the whole saddle and your machine will likely do fine with it on the pleats at least because it doesn’t take much tension at all to sew just the cordura and get your knots between the layers.
Now that I’ve explained the entire process you should be able to build one yourself and possibly buy one from another manufacturer soon lol. I don’t know how long you’ve been sewing but you’re miles ahead of where most people start. Your stitching looks really well spaced and straight. And you tackled a very complicated build, somehow figuring it out just by looking at pics. Kudos to you
 
@JCLINE84
I really appreciate the guidance, says a lot when the vendor is helping people that are doing DIY clones. If I ever buy a saddle I will definitely be getting one from you, but I have always been into making anything I possibly can. Its hardly ever less money in the end, but I like the process. I started building custom fishing rods a few years ago and that spiraled out of control quickly. You can’t even buy components for what you can purchase most rods.

I didn’t realize I should be using two layers of fabric. But thats OK, this won’t be my last one I make . I actually haven’t gotten much done the last couple of weeks, I decided to order some tan 1-3/4” and I still need to order some amsteel. and then the zigzag assembly on my machine got jammed up. I took it apart and got it fixed last night so hopefully some more progress pics soon!
 
Well I took a couple month break on this project and worked on some other things. Ended up buying a tacsew that wasn’t complete, tools some time to get it sorted out and then a Juki came up local that you guys tipped me off on. So now I’m back at it, didn’t like a few things about the first attempt so I changed some things and then stared again. Tan out of thread so waiting for more with new needles to try.
 

Attachments

  • 6C815F5C-F5A1-47BA-81B9-5C04C0277616.jpeg
    6C815F5C-F5A1-47BA-81B9-5C04C0277616.jpeg
    119 KB · Views: 60
Edge binding on, stiffeners sewed into pleat ends and lineman loops done.
 

Attachments

  • F53FAAF3-554D-4F02-B153-248268CAA165.jpeg
    F53FAAF3-554D-4F02-B153-248268CAA165.jpeg
    359.4 KB · Views: 54
got the suspension on tonight, started on the molle. Any tips for doing the molle? I marked out 1.5” increments on bottom and then 1.75” increments on top piece and figured I’ll match them up and sew my way across.

some goodies showed up as well, amsteel belt from amsteel guy and amsteel bridge from wood saddles. Just need to decide on leg strap buckles. I have G hooks, not sure if I want to use those or order buckles
 

Attachments

  • 16A99A51-5C10-4B61-91B9-B45FEE2BBA38.jpeg
    16A99A51-5C10-4B61-91B9-B45FEE2BBA38.jpeg
    332.6 KB · Views: 50
got the suspension on tonight, started on the molle. Any tips for doing the molle? I marked out 1.5” increments on bottom and then 1.75” increments on top piece and figured I’ll match them up and sew my way across.

some goodies showed up as well, amsteel belt from amsteel guy and amsteel bridge from wood saddles. Just need to decide on leg strap buckles. I have G hooks, not sure if I want to use those or order buckles

Looking good [mention]tcg144 [/mention] !
 
All done except ordered an amsteel belt but it came 2’ shorter than supposed to, I got it tied on but will need to wait for a new one as it’s hard to get on/off.

want to thank everyone that helped me get through this project and provided support/knowledge!
 

Attachments

  • 06B2BEE6-AD24-48A8-9CB3-E7158A2CF954.jpeg
    06B2BEE6-AD24-48A8-9CB3-E7158A2CF954.jpeg
    160.8 KB · Views: 71
  • 1D573D3E-33C0-4031-8252-9DC5E4219EF0.jpeg
    1D573D3E-33C0-4031-8252-9DC5E4219EF0.jpeg
    172 KB · Views: 73
  • EF560925-CC38-49F9-98AC-62FDFBD95DA2.jpeg
    EF560925-CC38-49F9-98AC-62FDFBD95DA2.jpeg
    171.1 KB · Views: 72
Haha. Found ya. Knew you couldn't just be a new guy on AT.

Any update on how that configuration is working for 'ya? Looks comfy.

Good job for sure!
 
Back
Top