
It's almost mandatory that I butcher fresh... If recovered whole; I hang in my garage for an hour or two and then skin/debone (it currently takes me 40-60min to skin and debone/remove all recoverable meat from the carcass). I immediately transfer the deboned meat to a meat lug with a drain sheet on the bottom, then stick it in the fridge for one to two days. When trimming/cleaning I take individual pieces out of the lug in the fridge and process them (this is the tedious part because I am PICKY). I prefer to work with cooler/firmer meat. I use both filet and boning knives, and there's not enough differences to argue over, but they need to be SHARP! Once all trimmed/cleaned/ground, I will vacuum pack everything and then stick all of the packed stuff back into the fridge for one to two weeks, then into the freezer.
-
The SH Membership has gone live. Only SH Members have access to post in the classifieds. All members can view the classifieds. Starting in 2020 only SH Members will be admitted to the annual hunting contest. Current members will need to follow these steps to upgrade: 1. Click on your username 2. Click on Account upgrades 3. Choose SH Member and purchase.
-
We've been working hard the past few weeks to come up with some big changes to our vendor policies to meet the changing needs of our community. Please see the new vendor rules here: Vendor Access Area Rules
You are using an out of date browser. It may not display this or other websites correctly.
You should upgrade or use an alternative browser.
You should upgrade or use an alternative browser.
Help me with processing
- Thread starter MattMan81
- Start date
If packed out, the only difference is that I don't need to hang it in my garage, it's already done up to the fridge portion.
samu
Active Member
If all else fails, vacuum pack immediately and refrigerate the packs for one week before freezing. Usually I freeze ground meat immediately though. If it's possible to hang the deer whole in steady 35F I'll do that, much nicer to do the processing next day.
I try to maximize efficiency once a deer becomes food. I try to do the same earlier in hunts, but we all hunt for different reasons.
A few things I’ve learned and that I do that may help:
If you can pack out a deer, and it would be difficult to utilize sleds carts and disposing of the rest of the bits, pack it out. I have found that deboning one in the field in anything but a downpour or 80* weather is a really relaxing way to come down from a hunt. The first step(getting from animal to meat) and the last step(getting from meat pile to disposing of offal) are now complete.
Have an idea of how you plan to consume meat. If you’re going to try and make perfect steaks out of perfect cuts of meat later, well then save that carving for a more controlled environment. If you’re going to make stew or roast or grind out of everything - no amount of you making a mess of getting it off the carcass will change the outcome. I make steaks out of straps, everything else is made into jerky, ground, stew or roast.
Freezer burn doesn’t make as big of a difference on anything you’re going to cook for a while. Of course a ribeye cooked medium rare that has been burnt won’t taste great. But I just cooked an elk roast that has been in freezer for two years with a compromised vac seal and was freezer burnt. Tasted exactly the same as the one that sat next to it with no burn. Relax when you prep - it’s fine.
I like to do my own processing when I can. But I’m not above paying someone else. This is where some real efficiencies show up. I debone in field and get the meat to truck. It goes into 5lb portions in vac seal bags as soon as possible, and is frozen. I now can go to butcher tomorrow, or in 6 months. Dropping off frozen deboned meat saves the deboning cost. It helps them with storage(it’s getting frozen or iced down anyways) - some reflect that in your cost. Telling them to get to it when they get to it is sometimes reflected in the cost. Talking to your processor and making a good connection helps with this.
When I send meat in I do the following math: I spend x dollars on meat from someone else. I spend x dollars on hunting related costs. If I kill deer and have meat, I know my average cost per pound of store bought meat. I know my cost per pound to have deer meat processed. With the efficiency above, I add processing cost to the pile, and subtract that much store bought meat from the pile. In the end, I usually come out ahead. Not by much. But I lose all the externalities of store bought meat. And the last couple years, I came out WAY ahead. My average cost of processed deer was about half of my average cost of store bought meat. I saved thousands of dollars. I’m not saying hunting became cheaper, because I could not hunt and just buy meat. I’m saying not hunting is not an option- with that, and the fact we eat about 250-350lbs of meat per year, I’m coming out way ahead.
Watch YouTube to learn how to take an animal apart. Then stop watching YouTube. Who cares how it turns out. It’s meat. Learn how to cut hide to minimize cutting hairs in half and getting them in meat. Take your time and just get the meat off the bones.
I carry a scalpel in the woods. Whether it’s Texas Louisiana or the Midwest or Colorado. I’ve taken 70lb deer and 600lb elk apart with it.
Watch as many deer get taken apart in person as you can. Ask to cut up your buddies’ deer for them if you want practice.
I just kill more and cut up more. Making groceries is annoying - it’s why people pay other people to do it for them. It will never make full time/financial sense to do things yourself. That’s why it nags at you and is perceptibly annoying.
Iron_llama
Well-Known Member
I rather enjoy processing. It's tedious but almost meditative when you get into a rhythm. But what your intended final products are has a huge impact on how enjoyable processing is.
If it's cold enough, I hang in my garage for a week. If not I quarter it out and keep it in the fridge. Pull out a quarter at a time to trim out and package.
I like bone-in shanks and shoulders, and neck roasts, for the crock pot. My county now offers CWD testing so at minimum I'll wait until my deer comes back before cooking a bone-in neck roast. Cutting the meat from the vertebrae and trimming the sinew off the shanks drove me up the wall, but cooking these on the bone is worthwhile as well as makes for an easier processing job.
Along those lines you can do bone-in haunches on the smoker... https://1source.basspro.com/recipes...cipes/29648/smoked-whole-venison-hind-quarter which of course will save you the time and effort of seaming out a hindquarter to football roasts, etc.
I leave the silverskin on, and wait until I'm about to cook it before I trim it. It provides a sacrificial layer for freezerburn, etc.
Also, vac-pac the backstraps whole. Coil them up, tie them off with butcher's twine, and vac-pac in custom-length gallon-size roll bags. You can turn a backstrap roast into butterflies but you can't turn butterflies back into a roast.
I swear by a 4" Rapala panfish fillet knife. It's almost a scalpel. I also have boning knives from Victorinox and LEM but the small blade of the Rapala is almost like a scalpel. I can't find the scalpel handle I ordered off Scamazon this summer; my plan was to put a Havalon blade on that and use that for both field dressing and trimming at home. Maybe a veterinary supply house or your doctor can get you a scalpel with a semi-flexible blade a couple inches long. If you ever happen to break a fillet knife blade you might be able to turn the pieces into a venison scalpel. At any rate, home deer butchering cutlery is not something to spend big money on.
Iron_llama
Well-Known Member
If I can be forgiven for replying to my own comment... a meat lug is a huge asset but is not necessary. Cleaned/sanitized Rubbermaid/Sterilite totes are invaluable for schlepping quarters around. My go-to though is dishpans from the dollar store; you can easily overload them to the point of breaking but if you put a reasonable quantity of meat in them you have excellent vessels for holding in-process primals in the fridge while you're working on other primals. Get 6-10 of them, 1 for grind, 2 for shoulders, 2 for haunches, 1 for shanks, etc., etc. to keep things organized and clean while you work. At the end run the Foodsaver, and then clean and sanitize everything.I rather enjoy processing. It's tedious but almost meditative when you get into a rhythm. But what your intended final products are has a huge impact on how enjoyable processing is.
If it's cold enough, I hang in my garage for a week. If not I quarter it out and keep it in the fridge. Pull out a quarter at a time to trim out and package.
I like bone-in shanks and shoulders, and neck roasts, for the crock pot. My county now offers CWD testing so at minimum I'll wait until my deer comes back before cooking a bone-in neck roast. Cutting the meat from the vertebrae and trimming the sinew off the shanks drove me up the wall, but cooking these on the bone is worthwhile as well as makes for an easier processing job.
Along those lines you can do bone-in haunches on the smoker... https://1source.basspro.com/recipes...cipes/29648/smoked-whole-venison-hind-quarter which of course will save you the time and effort of seaming out a hindquarter to football roasts, etc.
I leave the silverskin on, and wait until I'm about to cook it before I trim it. It provides a sacrificial layer for freezerburn, etc.
Also, vac-pac the backstraps whole. Coil them up, tie them off with butcher's twine, and vac-pac in custom-length gallon-size roll bags. You can turn a backstrap roast into butterflies but you can't turn butterflies back into a roast.
I swear by a 4" Rapala panfish fillet knife. It's almost a scalpel. I also have boning knives from Victorinox and LEM but the small blade of the Rapala is almost like a scalpel. I can't find the scalpel handle I ordered off Scamazon this summer; my plan was to put a Havalon blade on that and use that for both field dressing and trimming at home. Maybe a veterinary supply house or your doctor can get you a scalpel with a semi-flexible blade a couple inches long. If you ever happen to break a fillet knife blade you might be able to turn the pieces into a venison scalpel. At any rate, home deer butchering cutlery is not something to spend big money on.
Speaking of meat lugs, they do sell liners for the things now so you don't have to clean the things again unless a piece of bone pokes a hole.If I can be forgiven for replying to my own comment... a meat lug is a huge asset but is not necessary. Cleaned/sanitized Rubbermaid/Sterilite totes are invaluable for schlepping quarters around. My go-to though is dishpans from the dollar store; you can easily overload them to the point of breaking but if you put a reasonable quantity of meat in them you have excellent vessels for holding in-process primals in the fridge while you're working on other primals. Get 6-10 of them, 1 for grind, 2 for shoulders, 2 for haunches, 1 for shanks, etc., etc. to keep things organized and clean while you work. At the end run the Foodsaver, and then clean and sanitize everything.
Last edited:
Iron_llama
Well-Known Member
I've never seen one. I think I'd be more comfortable sanitizing it before each use regardless of any liners. But you could probably put the lug inside a trash bag that's large enough to conform to the inside of the lug without ripping. At the end put the trash in it, turn the bag inside out, and go dump it.Speaking of meat lugs, they do sell liners for the things now so you don't have to clean the things again unless a piece of bone pokes a hole.
Speaking of liners, a roll of hardware sheeting or disposable picnic tablecloth - really light plastic film - makes an excellent table cover to facilitate cleanup. Still want to sanitize the table ahead of time but the plastic will make things easier.
Meat Lugs | LEM Products
Mix meat, store cuts, and harvest vegetables with a reliable meat lug. We carry meat lugs, meat lug liners, and lug covers for convenient storage.
 www.lemproducts.com
I set up in my basement on 3/4" plywood between 2 work benches. I cover it with 2 cheap Picnic table clothes that I sanitize each night and throw away when I am done with that deer.I've never seen one. I think I'd be more comfortable sanitizing it before each use regardless of any liners. But you could probably put the lug inside a trash bag that's large enough to conform to the inside of the lug without ripping. At the end put the trash in it, turn the bag inside out, and go dump it.
Speaking of liners, a roll of hardware sheeting or disposable picnic tablecloth - really light plastic film - makes an excellent table cover to facilitate cleanup. Still want to sanitize the table ahead of time but the plastic will make things easier.
huskerhunter13
New Member
- Joined
- Nov 16, 2022
- Messages
- 11
Wife and I have been processing our own for a few years now, a few things have made all the difference.
0. Aging
If it's warm I move immediately to quarter and get everything in my freezer setup (info in step 2), if it's cold I'll let it hang outside for a few days and drip. When we used to live in MKE county I would hang it from a tree in my back yard and throw a tarp around it, kept the neighbors calm and protected it a bit. Now I live in the country and it's not a problem.
1. Setup to hang, skin, quarter, and age all in my garage.
I have a lag bolt stuck in the ceiling of my garage, when I get one we'll hang it from there and I set up 2 folding tables. I'll then skin and quarter everything out. Having a dedicated space once I do come in to quarter is big. Throw a cheap drip pan underneath and it keeps your concrete clean, mine's an old kiddie pool we got for the dogs.
2. Cooler
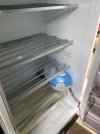
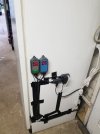
2 years ago I made an aging cooler. Go on marketplace or craigslist and buy a cheap upright freezer. You then buy a temp regulator and humidity regular off of amazon, a computer fan, a small humidifer, and a small dehumidifer. The freezer plugs directly into the temp regulator, which turns it on and off to keep it between 35 and 38. The humidify regulator connects to the humidifier and dehumidifier, both of which go in the bottom of the freezer, and keeps the humidity in there in a good range. Fan is just for air circulation. This lets you age the quarters for a week, draining the blood and keeping the meat in good shape. Pop it open once a day to rotate everything, but otherwise leave it alone. This thing was an absolute gamechanger for 2 reasons: it made it so I didn't have to do everything in 1 day and let me keep meat aged and drained properly. The entire setup should not cost you more than $200 and the freezer is half of that.
3. Processing Round 1
Everything that's smaller and ready to wrap immediately (tenderloins, backstraps, etc) gets washed, patted dry, and wrapped once in plastic wrap and again in butcher paper. Only the larger quarters go into the cooler, these cuts get wrapped ASAP. This is also how everything gets wrapped in the end, but we do the important stuff first. For wrapping the pat dry and getting air out is key, air and standing water are what freezer burn meat. Pat everything dry, squeeze the air out of the plastic wrap, then don't think too hard about the butcher paper. We haven't lost 1 piece of meat since we started doing this, but we're diligent about the prep.
4. Processing Round 2
Usually a week or so later we'll pull the quarters into the house and debone everything. Big roasts and cuts get trimmed, wrapped, and frozen immediately. All small and misc cuts we do a quick silverskin trim (don't have to be as diligent for the ground stuff), but then everything goes into a bunch of ziploc bags. Those bags of misc cuts gets all the air squeezed out and we save them all for later. At the end of the year we do our own grinding and sausage making, but we do it once after the season because we do it all with hand grinders, no fancy machines. If I was doing more than 4 deer or a couple elk I'd buy one, but no need for one good day of work.
The biggest things that have helped:
- Dedicated space to hang and quarter
- Aging cooler, not only to protect the meat, but to help break the process up into stages.
- 2 good knives: one for boning and one for filleting (and a hackzall blade for cutting bone when we need it). You don't need expensive, but you have to be comfortable with them and they HAVE to be sharp. Sharp knives don't cut your hands, dull knives do because they're harder to control. My wife taught me this and man was she right.
- Doing things in stages. The initial hanging and quartering takes the longest around 2-3hrs, but after that the big processing and meat grinding each take about 1-2hrs a piece.
- Spending some time learning. Spend a good hour or so on youtube watching tutorials on gutting and processing, it'll help a ton.
Overall you'll have to invest a bit up front, and in our first home space was a much bigger issue, but we did the math and after 2 deer we were saving vs. processing fees. Plus, the amount of meat you get when you do it yourself is WAY more, just because you take your time and get all the little cuts right. Butchers don't have that luxury, they have to turn and burn on numbers or they'd never get anywhere, but I can take my time and I get a lot more out of it.
That's my way-more-than-2 cents.
0. Aging
If it's warm I move immediately to quarter and get everything in my freezer setup (info in step 2), if it's cold I'll let it hang outside for a few days and drip. When we used to live in MKE county I would hang it from a tree in my back yard and throw a tarp around it, kept the neighbors calm and protected it a bit. Now I live in the country and it's not a problem.
1. Setup to hang, skin, quarter, and age all in my garage.
I have a lag bolt stuck in the ceiling of my garage, when I get one we'll hang it from there and I set up 2 folding tables. I'll then skin and quarter everything out. Having a dedicated space once I do come in to quarter is big. Throw a cheap drip pan underneath and it keeps your concrete clean, mine's an old kiddie pool we got for the dogs.
2. Cooler
2 years ago I made an aging cooler. Go on marketplace or craigslist and buy a cheap upright freezer. You then buy a temp regulator and humidity regular off of amazon, a computer fan, a small humidifer, and a small dehumidifer. The freezer plugs directly into the temp regulator, which turns it on and off to keep it between 35 and 38. The humidify regulator connects to the humidifier and dehumidifier, both of which go in the bottom of the freezer, and keeps the humidity in there in a good range. Fan is just for air circulation. This lets you age the quarters for a week, draining the blood and keeping the meat in good shape. Pop it open once a day to rotate everything, but otherwise leave it alone. This thing was an absolute gamechanger for 2 reasons: it made it so I didn't have to do everything in 1 day and let me keep meat aged and drained properly. The entire setup should not cost you more than $200 and the freezer is half of that.
3. Processing Round 1
Everything that's smaller and ready to wrap immediately (tenderloins, backstraps, etc) gets washed, patted dry, and wrapped once in plastic wrap and again in butcher paper. Only the larger quarters go into the cooler, these cuts get wrapped ASAP. This is also how everything gets wrapped in the end, but we do the important stuff first. For wrapping the pat dry and getting air out is key, air and standing water are what freezer burn meat. Pat everything dry, squeeze the air out of the plastic wrap, then don't think too hard about the butcher paper. We haven't lost 1 piece of meat since we started doing this, but we're diligent about the prep.
4. Processing Round 2
Usually a week or so later we'll pull the quarters into the house and debone everything. Big roasts and cuts get trimmed, wrapped, and frozen immediately. All small and misc cuts we do a quick silverskin trim (don't have to be as diligent for the ground stuff), but then everything goes into a bunch of ziploc bags. Those bags of misc cuts gets all the air squeezed out and we save them all for later. At the end of the year we do our own grinding and sausage making, but we do it once after the season because we do it all with hand grinders, no fancy machines. If I was doing more than 4 deer or a couple elk I'd buy one, but no need for one good day of work.
The biggest things that have helped:
- Dedicated space to hang and quarter
- Aging cooler, not only to protect the meat, but to help break the process up into stages.
- 2 good knives: one for boning and one for filleting (and a hackzall blade for cutting bone when we need it). You don't need expensive, but you have to be comfortable with them and they HAVE to be sharp. Sharp knives don't cut your hands, dull knives do because they're harder to control. My wife taught me this and man was she right.
- Doing things in stages. The initial hanging and quartering takes the longest around 2-3hrs, but after that the big processing and meat grinding each take about 1-2hrs a piece.
- Spending some time learning. Spend a good hour or so on youtube watching tutorials on gutting and processing, it'll help a ton.
Overall you'll have to invest a bit up front, and in our first home space was a much bigger issue, but we did the math and after 2 deer we were saving vs. processing fees. Plus, the amount of meat you get when you do it yourself is WAY more, just because you take your time and get all the little cuts right. Butchers don't have that luxury, they have to turn and burn on numbers or they'd never get anywhere, but I can take my time and I get a lot more out of it.
That's my way-more-than-2 cents.
Last edited:
Think the ones I bought came from Rural KingI've never seen one. I think I'd be more comfortable sanitizing it before each use regardless of any liners. But you could probably put the lug inside a trash bag that's large enough to conform to the inside of the lug without ripping. At the end put the trash in it, turn the bag inside out, and go dump it.
Speaking of liners, a roll of hardware sheeting or disposable picnic tablecloth - really light plastic film - makes an excellent table cover to facilitate cleanup. Still want to sanitize the table ahead of time but the plastic will make things easier.
LEM Meat Lug Liners, 25 Count - 1293 | Rural King
LEM Meat Lug Liners, 25 Count - 1293
 www.ruralking.com
They also sell drain trays for the lugs now so you can put the meat on top of the drains and it will keep the meat out of blood pool
The cooler sounds really interesting, I would love to see some pictures or a post on it.Wife and I have been processing our own for a few years now, a few things have made all the difference.
0. Aging
If it's warm I move immediately to quarter and get everything in my freezer setup (info in step 2), if it's cold I'll let it hang outside for a few days and drip. When we used to live in MKE county I would hang it from a tree in my back yard and throw a tarp around it, kept the neighbors calm and protected it a bit. Now I live in the country and it's not a problem.
1. Setup to hang, skin, quarter, and age all in my garage.
I have a lag bolt stuck in the ceiling of my garage, when I get one we'll hang it from there and I set up 2 folding tables. I'll then skin and quarter everything out. Having a dedicated space once I do come in to quarter is big. Throw a cheap drip pan underneath and it keeps your concrete clean, mine's an old kiddie pool we got for the dogs.
2. Cooler
2 years ago I made an aging cooler. Go on marketplace or craigslist and buy a cheap upright freezer. You then buy a temp regulator and humidity regular off of amazon, a computer fan, a small humidifer, and a small dehumidifer. The freezer plug directly into the temp regulator, which turns it on and off to keep it between 35 and 38. The humidify regulator connects to the humidifier and dehumidifier, both of which go in the bottom of the freezer, and keeps the humidity in there in good range. Fan is just for air circulation. This lets you age the quarters for a week, draining the blood and keeping the meat in good shape. Pop it open once a day to rotate everything, but otherwise leave it alone. This thing was an absolute gamechanger for 2 reasons: made it so I didn't have to do everything in 1 day and let me keep meat aged and drained properly. The entire setup should not cost you more than $200 and the freezer is half of that.
3. Processing Round 1
Everything that's smaller and ready to wrap immediately (tenderloins, backstraps, etc) gets washed, patted dry, and wrapped once in plastic wrap and again in butcher paper. This is how everythings gets wrapped, but we do the important stuff first. For wrapping the pat dry and getting air out is key, air and standing water are what freezer burn meat. Pat everything dry, squeeze the air out of the plastic wrap, then don't think too hard about the butcher paper. Haven't lost 1 piece of meat since we started doing this, but we're diligent about the prep.
4. Processing Round 2
Usually a week or so later we'll pull the quarters into the house and debone everything. Big roasts and cuts get trimmed, wrapped, and frozen immediately. All small and misc cuts we do a quick silverskin trim (don't have to be as diligent for the ground stuff), but then everything goes into a bunch of ziploc bags. Those bags of misc cuts gets all the air squeezed out and we save them all for later. At the end of the year we do our own grinding and sausage making, but we do it once after the season because we do it all with hand grinders, no fancy machines. If I was doing more than 4 deer or a couple elk I'd buy one, but no need for one good day of work.
The biggest things that have helped:
- Dedicated space to hang and quarter
- Aging cooler, not only to protect the meat, but to help break the process up into stages.
- 2 good knives: one for boning and one for fileting (and a hackzall blade for cutting bone when we need it). You don't need expensive, but you have to be comortable with them and they HAVE to be sharp. Sharp knives don't cut your hands, dull knives do because they're harder to control.
- Doing things in stages. The initial hanging and quartering takes the longest around 2-3hrs, but after that the big processing and meat grinding each take about 1-2hrs a piece.
- Spending some time learning. Spend a good hour or so on youtube watching tutorials on gutting and processing, it'll help a ton.
Overall you'll have to invest a bit up front, and in our first home space was a much bigger issue, but we did the math and after 2 deer we started saving. Plus, the amount of meat you get when you do it yourself is WAY more, just because you take your time and get all the little cuts right. Butchers don't have that luxury, they have to turn and burn on numbers or they'd never get anywhere, but I can take my time and I get a lot more out of it.
That's my way-more-than-2 cents.
I have been trying to watch those. Im a hands on learner. So hard to watch and remember what to do when it's time. Maybe I will have to shoot one, and have my kids run the video back and forth.the bearded butchers on youtube have good videos on it. ageing do right makes a big difference on quality.
I have been trying to watch those. Im a hands on learner. So hard to watch and remember what to do when it's time. Maybe I will have to shoot one, and have my kids run the video back and forth.
Listen to the Meateater podcast episode 227 “red cutter” with Dr. Chris Calkins a person who has spent his career studying the handling of meat. It will help to really understand what happens when meat goes through the aging process, rigor mortis, etc. and will help you distinguish between the good advice and the not so good advice that hunters often give based on our own anecdotal experiences.
i found the BB vids, both of them, to be a little hard to follow. The newest one is better but those guys don’t wait for the camera to start cutting and they still move way too fast for the average guy to follow on their first time trying to butcher an animal. They start describing what they’re doing way before the camera reaches the activity and they’re halfway through cutting before you know what they even cut. I’m sure it’s because they’re so practiced at it and they are just on autopilot but it’s tough to watch IMO. Good info, presentation is lacking.I have been trying to watch those. Im a hands on learner. So hard to watch and remember what to do when it's time. Maybe I will have to shoot one, and have my kids run the video back and forth.
I found Grant Woods’s video to be one of the best in a sea of kinda-average butchering videos on YT.
If you have a good deer butcher near you, ask if you can help take your own deer apart. A lot of them are open to it, depending on legality and liability. They might at least let you watch and pack, if not cut.
huskerhunter13
New Member
- Joined
- Nov 16, 2022
- Messages
- 11
Here's a couple pics, the first shows everything inside the freezer and the second shows the 2 regulators. Pretty simple setup.The cooler sounds really interesting, I would love to see some pictures or a post on it.
Attachments
Very coolHere's a couple pics, the first shows everything inside the freezer and the second shows the 2 regulators. Pretty simple setup.
Thanks for the photos