
beaston
Well-Known Member
- Joined
- Oct 25, 2019
- Messages
- 202
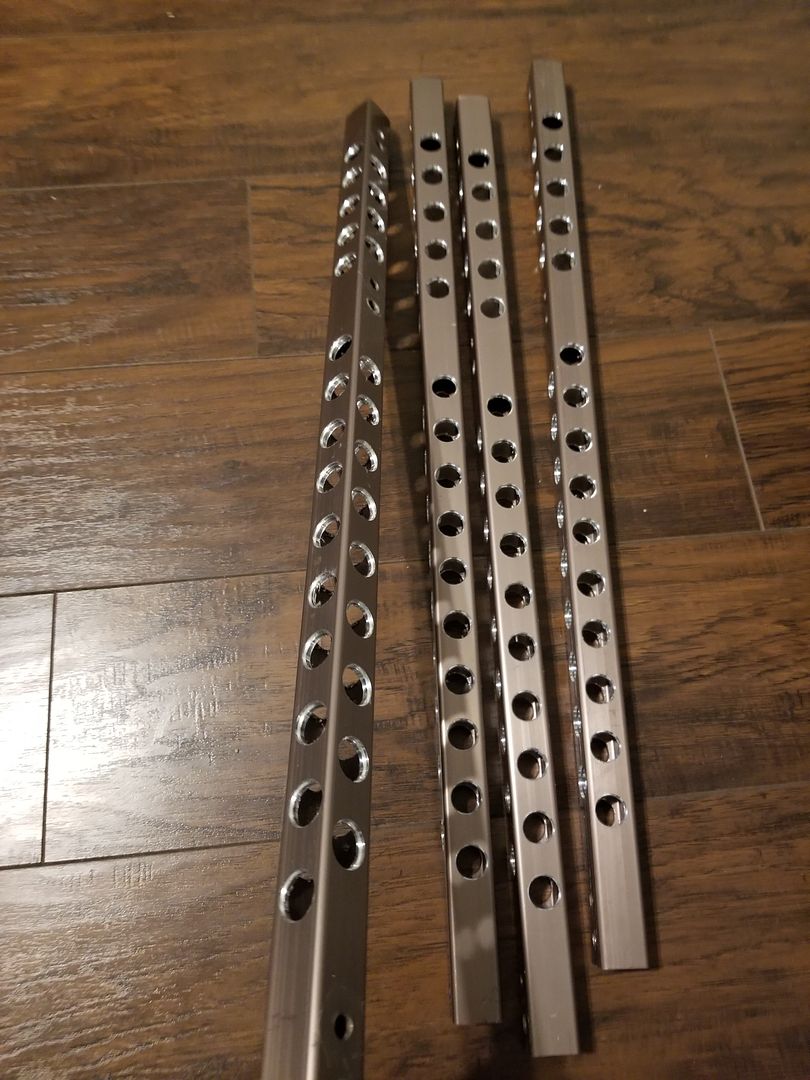
Nothing new just how I modified my sticks to fit me. First off I chose to modify my sticks based on what I fealt would suit me and of course support me. I do not claim that my method of modifying the original LW sticks would work for anyone but me and if you choose to modify your sticks similarly than you assume all risk inherent to such modifications. Ok thats over! This project covers my conversion of a 32" stick into a 24.5" stick that has a 22" step. I'm 6'2"- 200lbs these sticks do not noticeably flex or bend when supported horizontally by the ends with me standing in the middle so the weight reduction holes do not appear to weaken the stick or cause any damage with a 200lb load. Also most of the load carried by the sticks will be vertical with some side torque so enough said about that.
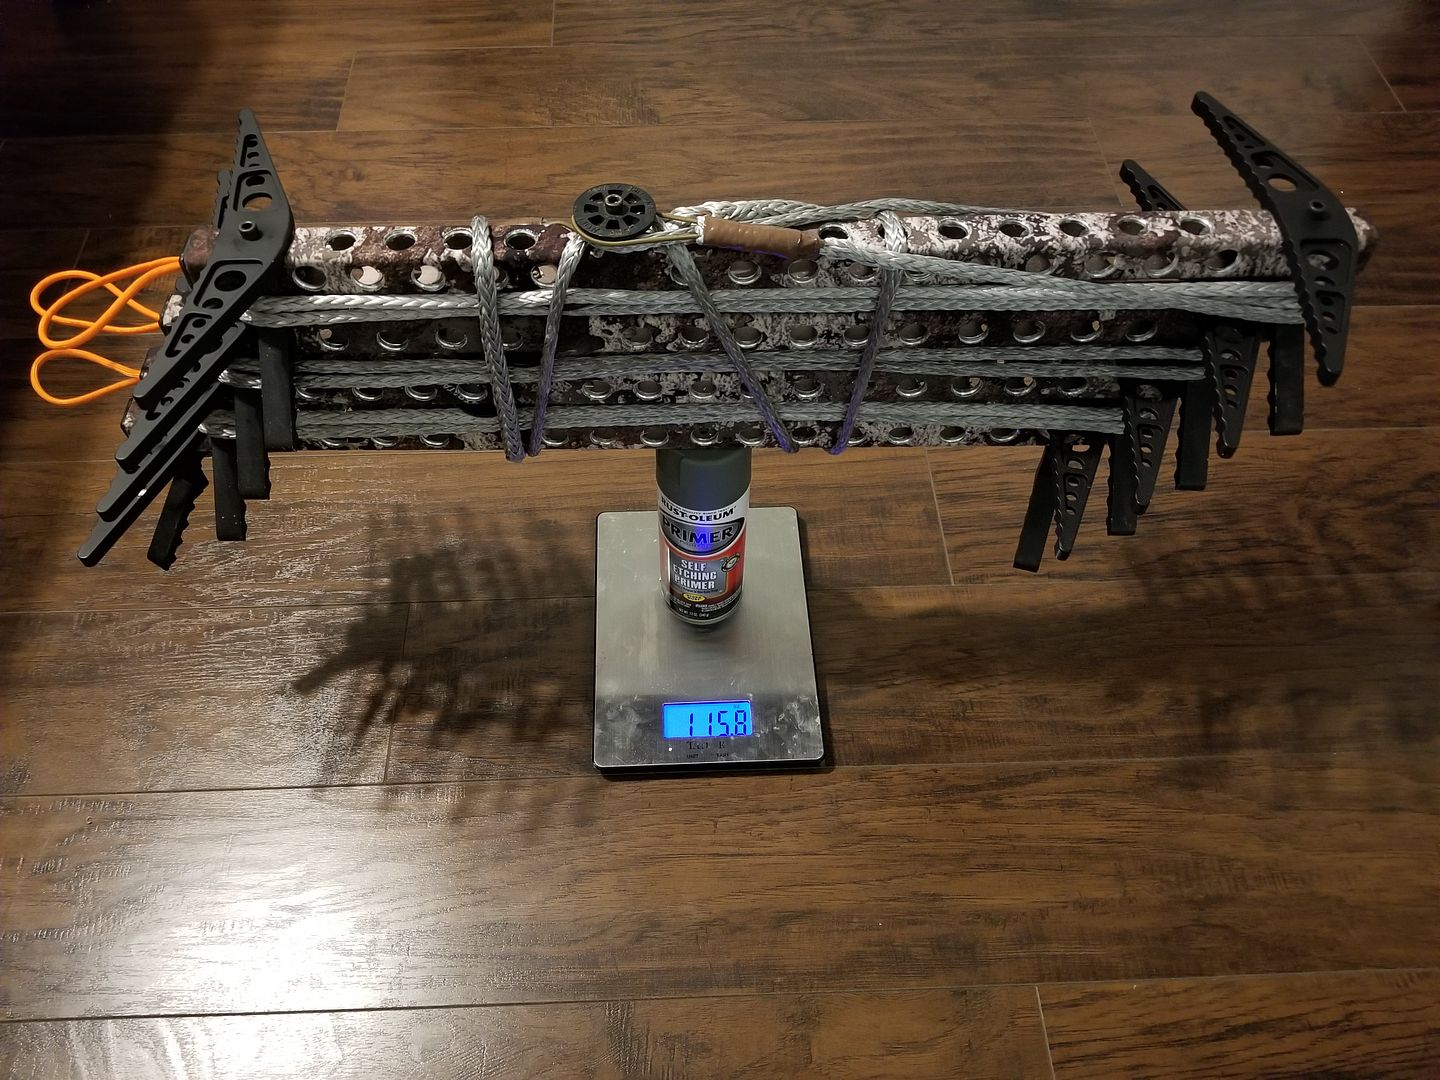
You can see in the pic I avoided drilling holes near the versa and step locations although I do believe I could've drilled a few more without harm.
Some numbers:
32" stick w/ 1/4" amsteel rope mod = 2lbs 7oz they have a 15" step spacing which is great for the inseam challenged but most people can easily do 18" step spacing. I think there are rules imposed by the TMA to get the official stamp. maybe? I chose a 22" spacing when figuring out my final stick length. I went 24.5 inches to allow them to nest/stack. Actual step spacing ended up being 21-7/8" so close enough you could adjust the top drilled hole to make up the difference if you feel neccessary.
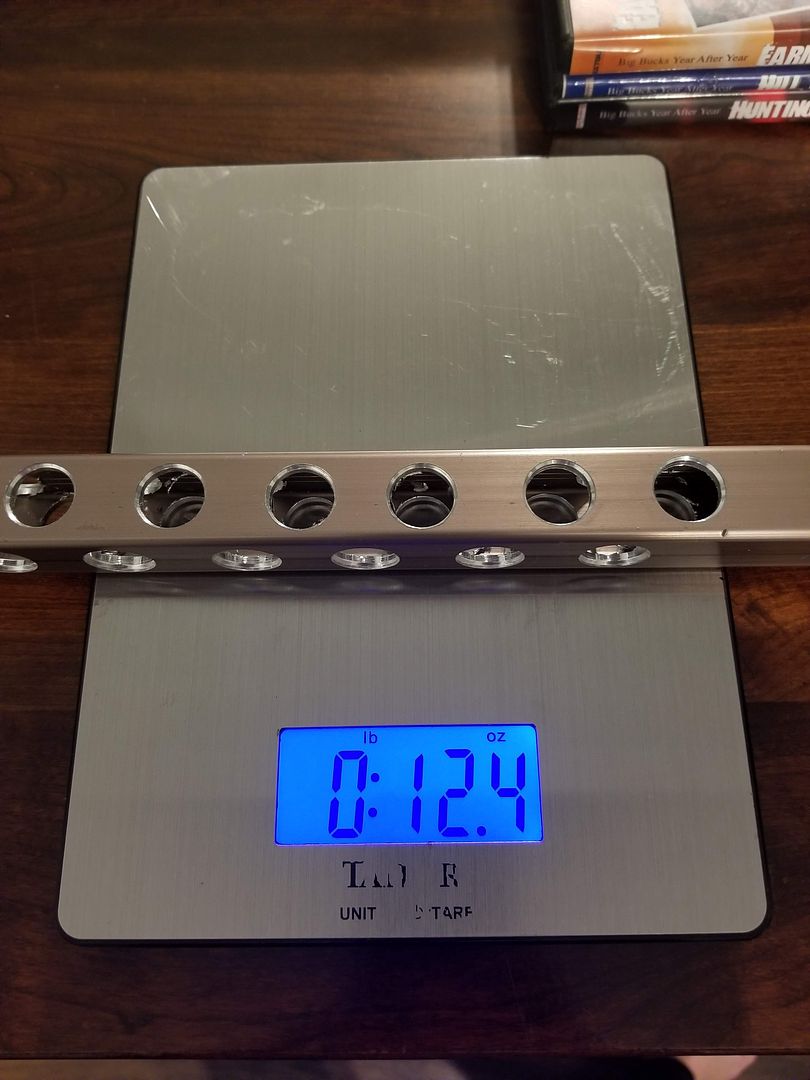
I included this to reference on what benefit or "maybe not" the task of drilling all the holes will save in weight.
24.5" stick = 16.5oz
After weigh reduction holes = 12.4oz = 4.1oz savings/stick
A little over a pound with 4 sticks not to shabby but it was very very tedious and if yours are stealth stripped like mine were than you are probably in for an unforgettable treat. Lets just say the shavings from the stepper bit the heat from drilling and the blue painters tape I used to lay out the holes created a total mess and I ended up stripping them down. If you ever removed stealth stripping than you already know that it is near impossible and even acetone isn't effective to desolve the adhesive
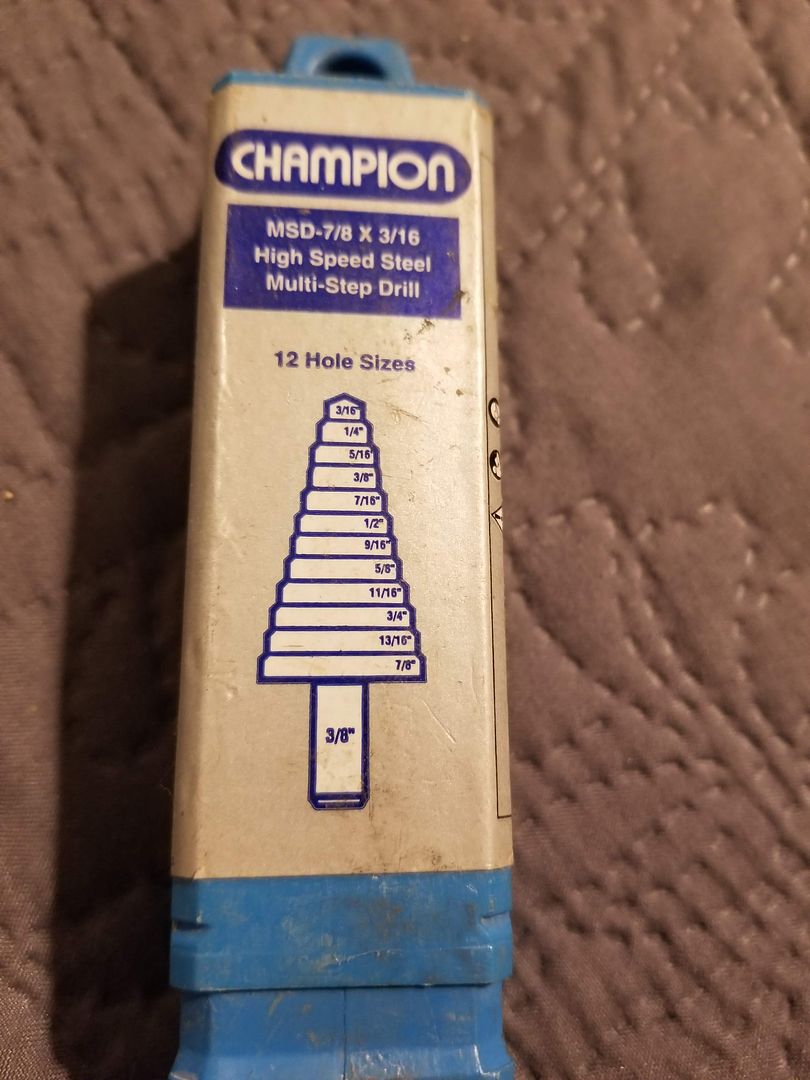
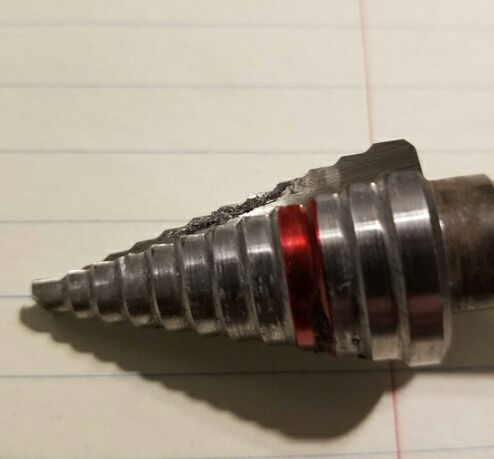
I had access to a pretty decent drill press but a Bridgeport/CNC would've been the most accurate and easiest to index between holes. This is the bit I used for most all drilling. A standard 5/8 or 11/16" bit could be used as well. If you are drilling with a standard drill bit you will need to step up by fractions several times to reach the finished size and use a countersink for a more finished look. The uni-bit made a a nice countersink and drilled through the aluminum with ease.
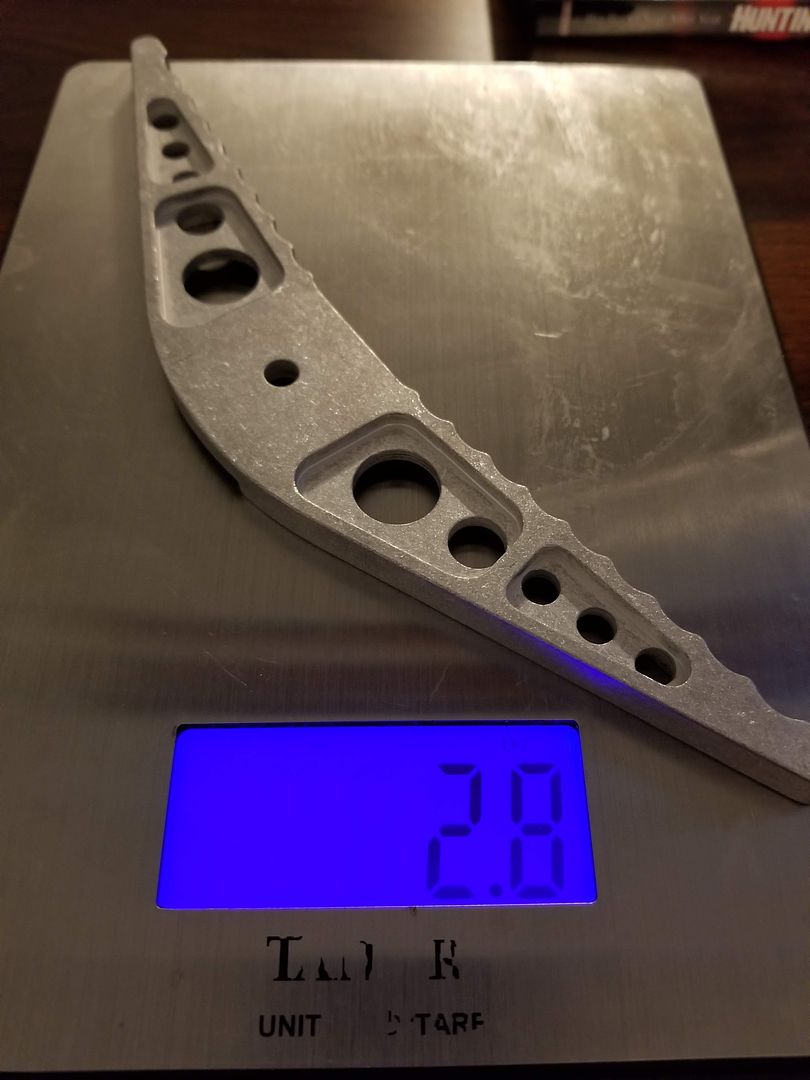
I purchased the angled ultra light double steps from DanO which weigh 2.8oz each . You will also need 1/4-20 x 2" grade eight screws or bolts for each step. (Also available from DanO) I just picked up some 2" SHCS from the hardware and used the locking nuts from old steps.
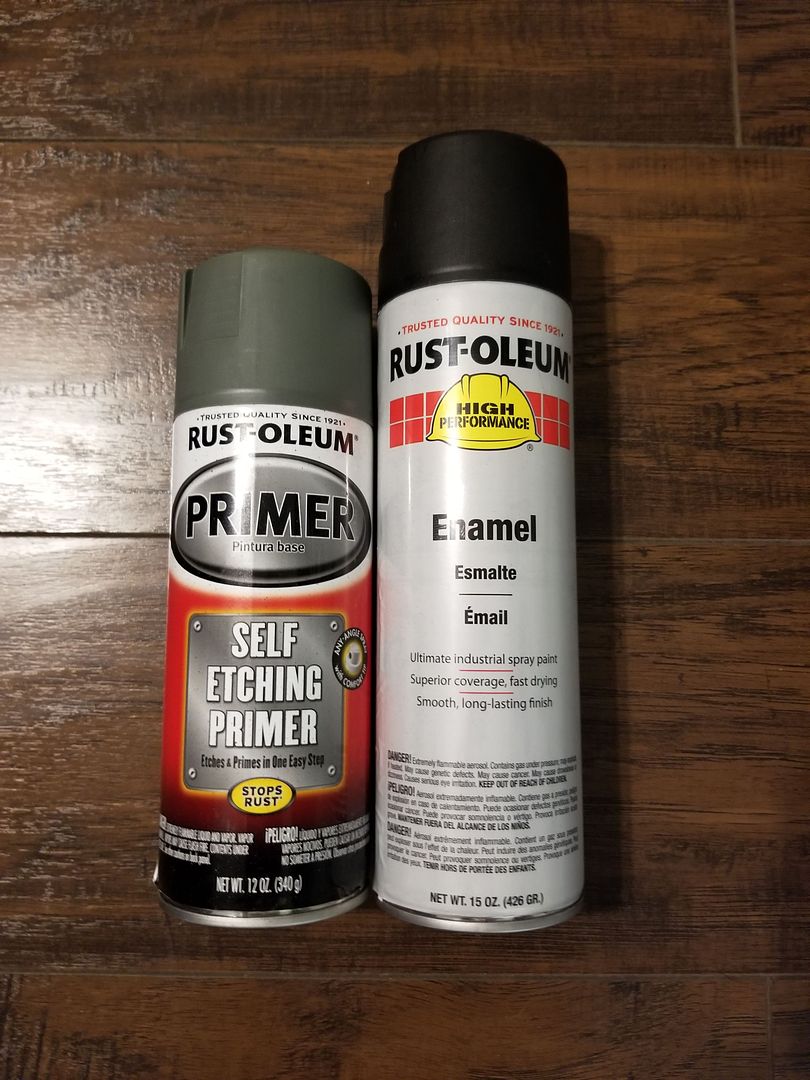
I bought self etching primer from the auto parts store and Black enamel in flat. I contemplated anodizing the steps at home but the process would've been super long for 8 steps this size. I ended up being surprisingly happy with the outcome and durability of the primer and paint.
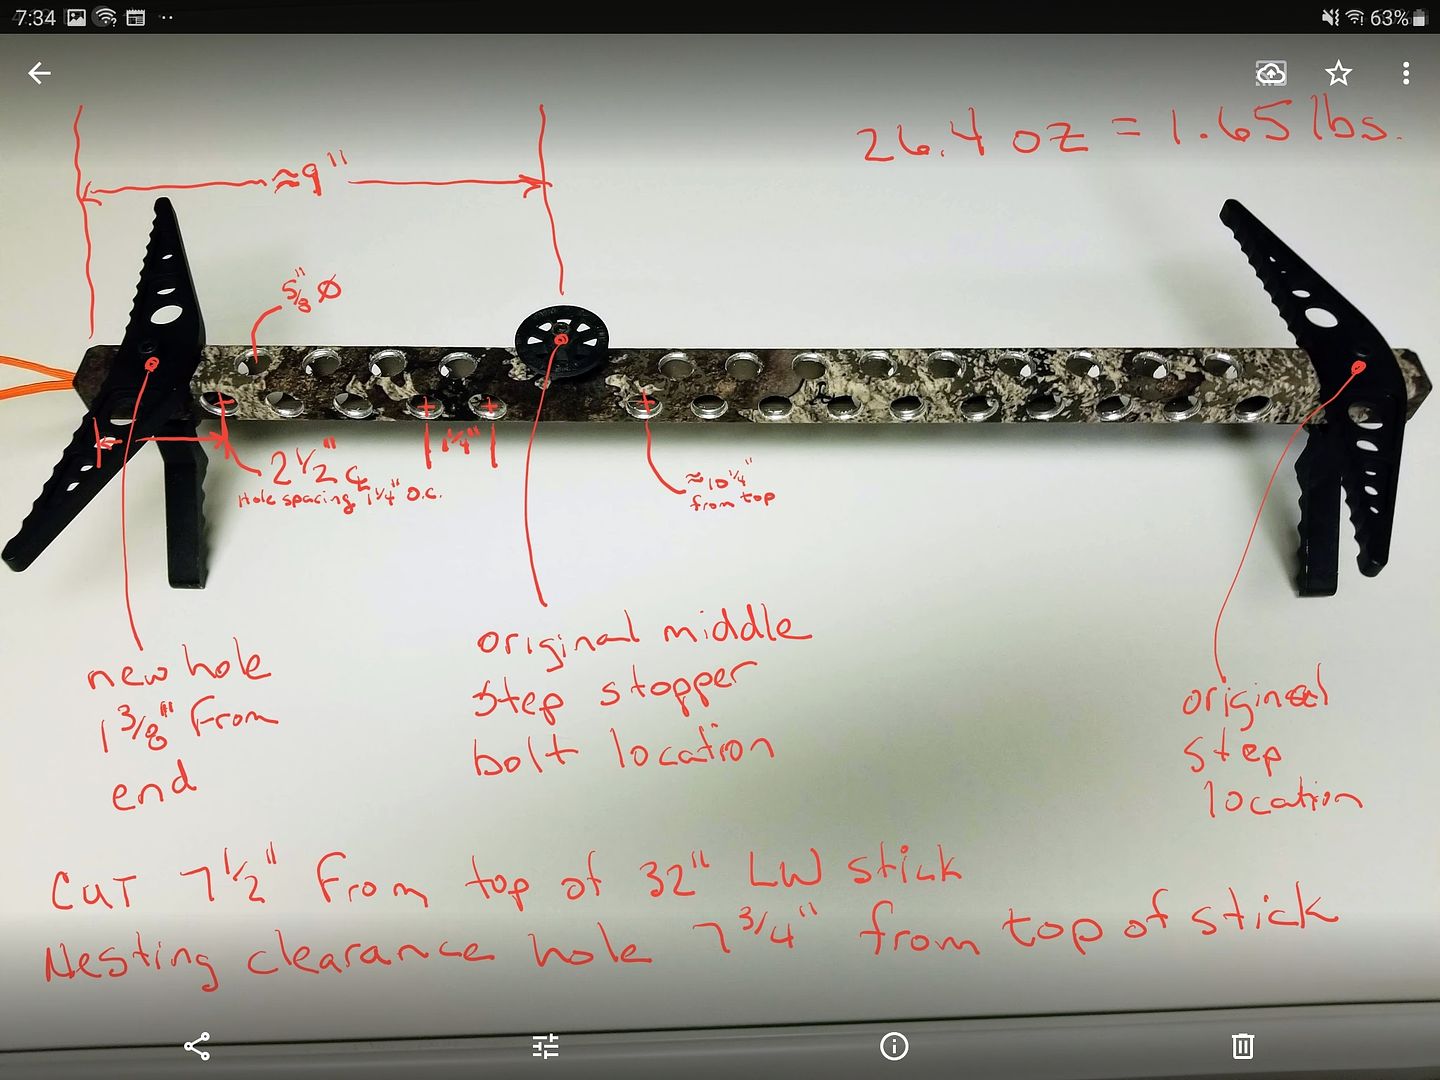
This picture has some detail on what holes I drilled and a basic reference of location. You need to shorten the stick by cutting off 7.5" from top. This allows you to use the bottom hole for the bottom step and the old middle step hole for the Versa button location. I drilled a new hole in top for the new top step. Also drilled a hole underneath to allow the versa button to nest into the stick above for stacking.
I took the time to cutout all the holes using Mark Dohring Beast stick video from Yotube. What a great way to cut using a torch and exacto knife. As a note the new double steps nest tightely to the bare stick so I removed stealth strip where they meet. I used the larger plastic washers under the standoff to allow them to pivot plus applied bow wax I also put a small plastic washer under nut of standoff for quiet and smooth pivoting. The big plastic washers just go on top of stealth strip.
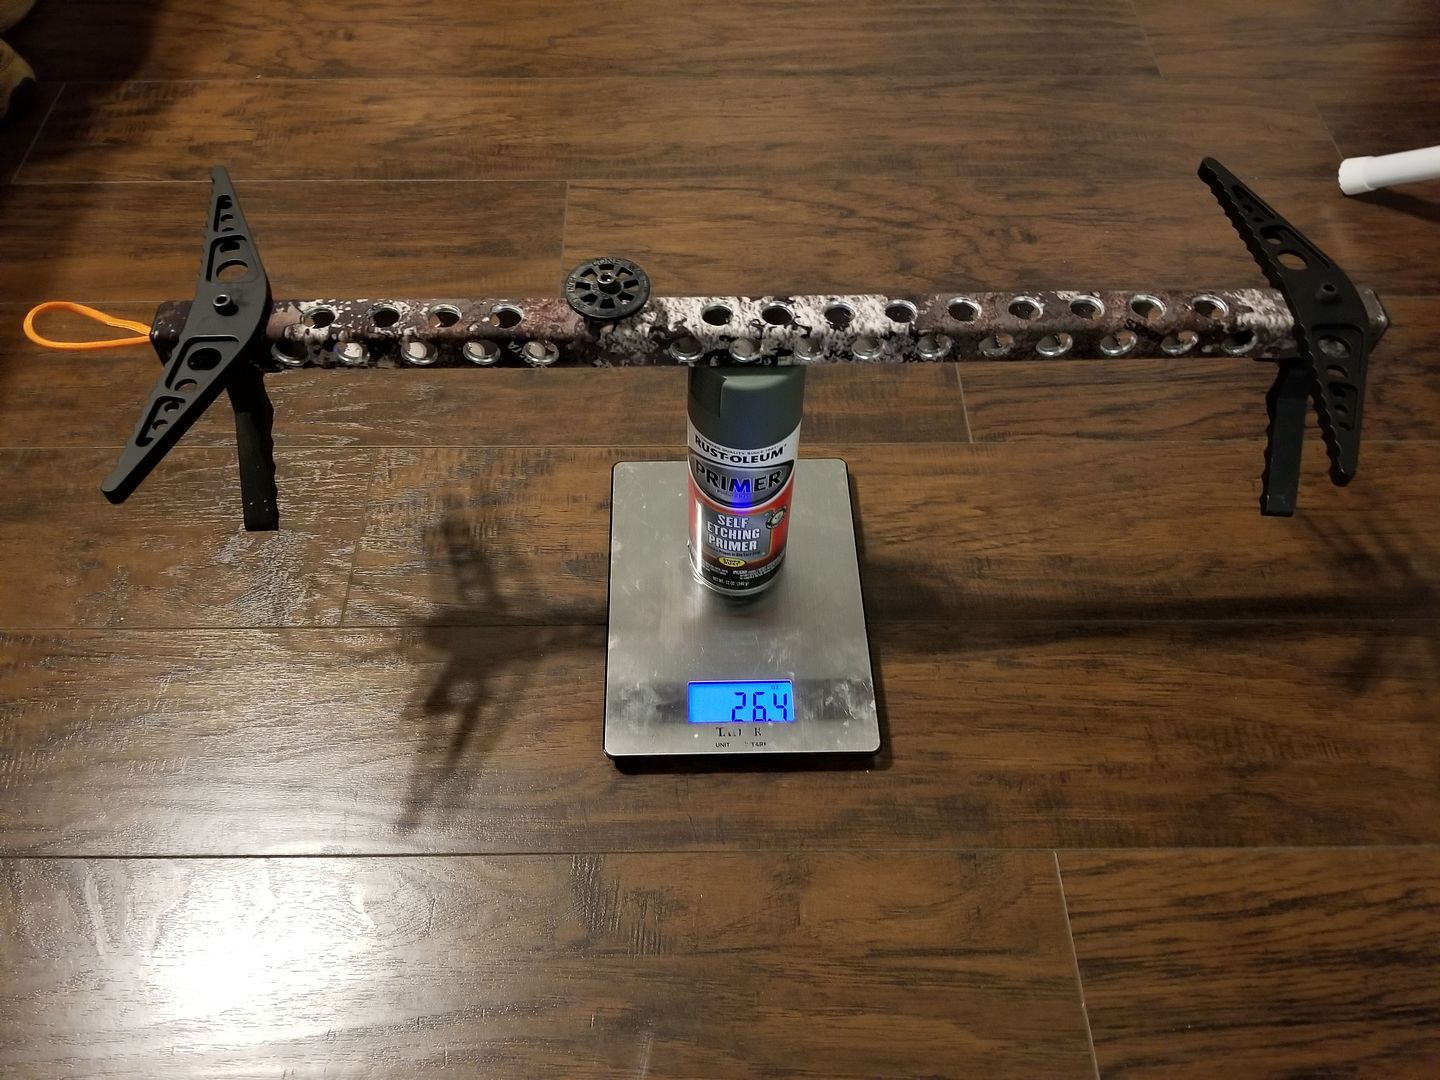
Final stick weight w/amsteel and stealth stripped is 28.9 oz or 1.8lbs. Probably could save some weight by using 7/64 amsteel daisy chained. My amsteel ropes are about 8' long after brummel and bury plus have heat shrink and a piece of elastic paracord to secure. The end is heavy so makes it easier to swing around tree. They come in at 2.5oz each

I'm happy with the final product but was a tad bit time consuming. Its a great off season project if you want a Beast type stick using your old LW's. I will be using a one step CAYG aider that I cinch to my foot and clip on to my saddle or back pack strap. Figure about 66-70" per stick so to the top of platform or ROS 23 to 24' is obtainable. Early season 3 sticks will be plenty!
Four stick weight is 7.2 lbs.but would be sub 7 lbs with a different rope if thats the target. Four Beasts are hitting 8 lbs with strap. Lots of guys on here are making some pretty light sticks that fit their needs so make sure you understand the risks and your limits.
Also want to Thank all the people on this forum who you have caused my mind to wonder and my wallet to go dry..
Sent from my SM-T820 using Tapatalk
You can see in the pic I avoided drilling holes near the versa and step locations although I do believe I could've drilled a few more without harm.
Some numbers:
32" stick w/ 1/4" amsteel rope mod = 2lbs 7oz they have a 15" step spacing which is great for the inseam challenged but most people can easily do 18" step spacing. I think there are rules imposed by the TMA to get the official stamp. maybe? I chose a 22" spacing when figuring out my final stick length. I went 24.5 inches to allow them to nest/stack. Actual step spacing ended up being 21-7/8" so close enough you could adjust the top drilled hole to make up the difference if you feel neccessary.
I included this to reference on what benefit or "maybe not" the task of drilling all the holes will save in weight.
24.5" stick = 16.5oz
After weigh reduction holes = 12.4oz = 4.1oz savings/stick
A little over a pound with 4 sticks not to shabby but it was very very tedious and if yours are stealth stripped like mine were than you are probably in for an unforgettable treat. Lets just say the shavings from the stepper bit the heat from drilling and the blue painters tape I used to lay out the holes created a total mess and I ended up stripping them down. If you ever removed stealth stripping than you already know that it is near impossible and even acetone isn't effective to desolve the adhesive
I had access to a pretty decent drill press but a Bridgeport/CNC would've been the most accurate and easiest to index between holes. This is the bit I used for most all drilling. A standard 5/8 or 11/16" bit could be used as well. If you are drilling with a standard drill bit you will need to step up by fractions several times to reach the finished size and use a countersink for a more finished look. The uni-bit made a a nice countersink and drilled through the aluminum with ease.
I purchased the angled ultra light double steps from DanO which weigh 2.8oz each . You will also need 1/4-20 x 2" grade eight screws or bolts for each step. (Also available from DanO) I just picked up some 2" SHCS from the hardware and used the locking nuts from old steps.
I bought self etching primer from the auto parts store and Black enamel in flat. I contemplated anodizing the steps at home but the process would've been super long for 8 steps this size. I ended up being surprisingly happy with the outcome and durability of the primer and paint.
This picture has some detail on what holes I drilled and a basic reference of location. You need to shorten the stick by cutting off 7.5" from top. This allows you to use the bottom hole for the bottom step and the old middle step hole for the Versa button location. I drilled a new hole in top for the new top step. Also drilled a hole underneath to allow the versa button to nest into the stick above for stacking.
I took the time to cutout all the holes using Mark Dohring Beast stick video from Yotube. What a great way to cut using a torch and exacto knife. As a note the new double steps nest tightely to the bare stick so I removed stealth strip where they meet. I used the larger plastic washers under the standoff to allow them to pivot plus applied bow wax I also put a small plastic washer under nut of standoff for quiet and smooth pivoting. The big plastic washers just go on top of stealth strip.
Final stick weight w/amsteel and stealth stripped is 28.9 oz or 1.8lbs. Probably could save some weight by using 7/64 amsteel daisy chained. My amsteel ropes are about 8' long after brummel and bury plus have heat shrink and a piece of elastic paracord to secure. The end is heavy so makes it easier to swing around tree. They come in at 2.5oz each
I'm happy with the final product but was a tad bit time consuming. Its a great off season project if you want a Beast type stick using your old LW's. I will be using a one step CAYG aider that I cinch to my foot and clip on to my saddle or back pack strap. Figure about 66-70" per stick so to the top of platform or ROS 23 to 24' is obtainable. Early season 3 sticks will be plenty!
Four stick weight is 7.2 lbs.but would be sub 7 lbs with a different rope if thats the target. Four Beasts are hitting 8 lbs with strap. Lots of guys on here are making some pretty light sticks that fit their needs so make sure you understand the risks and your limits.
Also want to Thank all the people on this forum who you have caused my mind to wonder and my wallet to go dry..
Sent from my SM-T820 using Tapatalk
Last edited: