• The SH Membership has gone live. Only SH Members have access to post in the classifieds. All members can view the classifieds. Starting in 2020 only SH Members will be admitted to the annual hunting contest. Current members will need to follow these steps to upgrade: 1. Click on your username 2. Click on Account upgrades 3. Choose SH Member and purchase.
  • We've been working hard the past few weeks to come up with some big changes to our vendor policies to meet the changing needs of our community. Please see the new vendor rules here: Vendor Access Area Rules

Knaider/Swaider tutorial

Great. Thank you for the response. I’m 6’1” and flexible. I think this is going to be the route I go. I’m looking for as little tree strapping in my climbing method as possible while still getting high up. How quiet is this method? Sometimes I get within 50-75 yards of bedding areas.
 
Great. Thank you for the response. I’m 6’1” and flexible. I think this is going to be the route I go. I’m looking for as little tree strapping in my climbing method as possible while still getting high up. How quiet is this method? Sometimes I get within 50-75 yards of bedding areas.
It is as quiet as you can be if the tree cooperates. The pines down here are tough to climb with the wild edge stepps and are just loud no matter what. Just this last Sunday I set up on an oak 20 yards from bedding and popped a doe 10 min after climbing up. Not sure the squirrels even got startled in the process. that being said when I was learning it was quite the opposite. They key for me being quiet is to relax and trust the system, often taking a minute during the climb to just stop, listen and prevent over heating with my layers. Being fast doesn't gain much in my opinion. Even taking my time Im up at 20-30' in under 10 min.
 
It is as quiet as you can be if the tree cooperates. The pines down here are tough to climb with the wild edge stepps and are just loud no matter what. Just this last Sunday I set up on an oak 20 yards from bedding and popped a doe 10 min after climbing up. Not sure the squirrels even got startled in the process. that being said when I was learning it was quite the opposite. They key for me being quiet is to relax and trust the system, often taking a minute during the climb to just stop, listen and prevent over heating with my layers. Being fast doesn't gain much in my opinion. Even taking my time Im up at 20-30' in under 10 min.

Cant imagine climbing a pine with WE. How do you deal with the sap?
 
Cant imagine climbing a pine with WE. How do you deal with the sap?
the sap isn't really an issue. Its the brittle bulky bark that basically falls off when you try to cam the stepp over and they slip forcing me to re tie it or it will dig in when I step making the line loose. its 50/50 on these trees so I normally try to find another type or use my sticks when i know that is all there is. This is what the trees look like.
 

Attachments

  • IMG_1167.jpg
    IMG_1167.jpg
    505.6 KB · Views: 150
Oh, thats a bit different bark than here. I put my stuff on a pine here one time and sticky doesnt begin to describe it. One year I used screw in steps on a pine....never do that again. lol
 
the sap isn't really an issue. Its the brittle bulky bark that basically falls off when you try to cam the stepp over and they slip forcing me to re tie it or it will dig in when I step making the line loose. its 50/50 on these trees so I normally try to find another type or use my sticks when i know that is all there is. This is what the trees look like.
I have always avoided pines unless I was putting up a ladder stand. Great protection but loud bark.
 
Are some using 1 inch flat nylon/poly webbing for these or is tubular webbing mandatory?
 
It

It is the twine that came with the speedy stitcher. I believe it is coated with wax. Very strong stuff. I purchased extra spools of it on amazon.
My wife has a regular sewing machine and I’m wondering if I can use it instead of this speedy stitcher y’all speak of
 
Tubular is definitely preferred, but I use a flat webbing that I get for free from work for all my projects. The weight rating is more then enough. As with anything diy make sure you “proof test” your work before getting to any height with it.

As for a sewing machine, there are guys who crank out some really nice stuff with their thread injectors. Most home sewing machines aren’t designed for the heavy fabric that we are using but can be used for small projects usually without stripping any gears. Just take it slow. The reason most of us use the speedy stitcher is because 1) it’s cheap compared to a sewing machine 2) it is incredibly simple to use and the thread that it uses is actually overkill by quite a bit so there is an additional built in safety factor when using it.
 
C7A2633B-A344-4E8C-98F6-CDA96F3BE58B.jpeg 2 updates to my system...
1. I originally made it adjustable. Once I figured out the length I like, I cut out the adjuster and sewed it up at that fixed length.
2. I added a strap around the ankle to keep loops from slipping off boots. You can’t see the sewing in the pictures because the loose end of the strap covers it up. I sewed it on close to the buckle. I just used what I had laying around. It is quick, super lightweight and is working perfectly.
 
BLUF: If you are going to sew, make sure you know how to sew properly for the application.

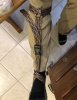
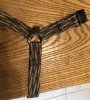
So it sounds like some people are having problems with buckles and/or stitching failures. People need to be careful with sewing especially if you are new with it. I am still waiting on all my stuff to come in that I ordered to make mine with all rated weight bearing components. From my research on sewing I learned that the forces applied to the stitching when sewing a foot loop are different than on a loop attached to a small hook or carabineer sized attachment. Essentially the wider eye on the foot loop pulls the straps apart pulling on the stitches, so the forces applied include, not only a downward force vector, but also a pulling the straps apart force vector. (Very technical terms there, LOL) With the smaller eye there isn't a pulling the strap apart force vector. Not sure if that makes any sense or not. If not, let me know and I can try to draw a simple diagram to illustrate. The bottom line is make sure you are sewing properly, and if you aren't sure you are, then consider just using knots or a configuration using pre-sewn/manufactured rated components.
I called some shoe and sewing shops in my area and found a commercial sewing shop. I brought in some 2.5'' wide motorcycle straps and they made some sewn loops for me for $5 each. They knew how to sew webbing straps for this specific purpose. While they had never heard of a saddle or saddle hunting, they have made many things for iron workers, rope access work and the like. You are correct about the resultant vectors of force, not only does your weight pull the strap down, but tears the stitches apart as well. I'm glad you pointed that out, as sewing threads sometimes make me worry that folks dont understand what stresses are involved in a system like these.
 
One way to eliminate the multi direction stress on the stitching is to make your loop larger and add a 3 bar adjuster. This should significantly reduce the stress on the stitches and ensure the stress that is there is on a single plane. It also allows me to cinch the loop to my foot.


View attachment 6257


https://saddlehunter.com/community/index.php?threads/sewing-resources-and-information.6100/

There is a video series on sewing webbing in this thread. A box x should be plenty strong in this application since these should not be receiving a shock load.
MY commercially sew loops use what looks to be a Double Box X. Im on vacation, or I would post pics. Similar to the Hawk strap above, just doubled.
I did a thing! With some things!!!!

View attachment 6560
Nice stitching
 
This is an outstanding way to get high with less weight and less time. One thing my Mom taught me was to sew, but, much like math, I thought I would never use it. Well, I knocked out a knaider in less than an hour. Had a great hunt/test run and used 5 wildedge.com stepps to get a solid 30’. I have 10 stepps and used three more for my platform. Only reason I would need to take the knaider off is if I was a sitter saddle hunter for knee pads, but I’m a stander so I left it on. All together starting from scratch I spent about $25 to make my knaider.

Thanks @Peterk1234 !!!
 

Attachments

  • CC40E282-5A8B-4F0A-8795-5FDA271C11E7.jpeg
    CC40E282-5A8B-4F0A-8795-5FDA271C11E7.jpeg
    1.2 MB · Views: 133
  • 33763A65-3E0F-41D2-8B17-6B21C6F76FC0.jpeg
    33763A65-3E0F-41D2-8B17-6B21C6F76FC0.jpeg
    1.6 MB · Views: 134
This is an outstanding way to get high with less weight and less time. One thing my Mom taught me was to sew, but, much like math, I thought I would never use it. Well, I knocked out a knaider in less than an hour. Had a great hunt/test run and used 5 wildedge.com stepps to get a solid 30’. I have 10 stepps and used three more for my platform. Only reason I would need to take the knaider off is if I was a sitter saddle hunter for knee pads, but I’m a stander so I left it on. All together starting from scratch I spent about $25 to make my knaider.

Thanks @Peterk1234 !!!

You're welcome! As for removing them when up in the tree; just twist it around your leg a bit and you will be all set. Both knaider and swaider stay in place while I am in the tree. The swaider gets cinched to my leg by the knee pad straps and its carabiner is clipped to my harness. The knaider just gets shifted to the right a bit so the hook is to the side of my leg, out of the way for placing my knee against the tree. I sit a lot when hanging. Pete
 
This is an outstanding way to get high with less weight and less time. One thing my Mom taught me was to sew, but, much like math, I thought I would never use it. Well, I knocked out a knaider in less than an hour. Had a great hunt/test run and used 5 wildedge.com stepps to get a solid 30’. I have 10 stepps and used three more for my platform. Only reason I would need to take the knaider off is if I was a sitter saddle hunter for knee pads, but I’m a stander so I left it on. All together starting from scratch I spent about $25 to make my knaider.

Thanks @Peterk1234 !!!

@irishportal is that a plastic buckle between your foot and knee? I would not trust a plastic buckle to hold my weight. I would replace that buckle with a metal one like the one in @Peterk1234 ‘s design or just sew it at the right length.

That plastic will not stay together at the slightest shock. That could easily be from slip if your foot kicks out from the tree or if a stepp slides on you.


Sent from my iPhone using Tapatalk
 
Back
Top