• The SH Membership has gone live. Only SH Members have access to post in the classifieds. All members can view the classifieds. Starting in 2020 only SH Members will be admitted to the annual hunting contest. Current members will need to follow these steps to upgrade: 1. Click on your username 2. Click on Account upgrades 3. Choose SH Member and purchase.
  • We've been working hard the past few weeks to come up with some big changes to our vendor policies to meet the changing needs of our community. Please see the new vendor rules here: Vendor Access Area Rules

Diy hide tanning

thedutchtouch

Well-Known Member
SH Member
Joined
Oct 22, 2020
Messages
3,527
Location
Maryland
I've wanted to attempt to tan a deer hide for a while now, so figured it's time to get started. I have the hide from the buck I shot earlier this season in the freezer as well as a doe hide that's in the bottom of my fridge (section of the fridge that gets too cold so it's half frozen). Going to give this a go with the doe hide first and then thaw out the buck hide as well, will keep this thread updated re: progress.

Step 1 was to acquire supplies.
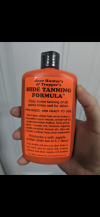
I purchased two bottles of deer hunter and trapper's tanning formula
Screenshot_20231109-192939.png

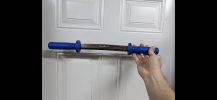
as well as an 8 inch wiebe fleshing knife.
Screenshot_20231109-192951.png

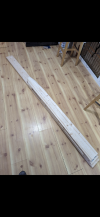
And then built myself a fleshing beam out of a few 2*6 boards I had leftover from an old project. I eyeballed the whole thing, no measurements, just used a draw knife and a palm sander with 80 grit to smooth off the curved end and propped scraps up to get it at roughly waist height when unfolded. It folds at the front and the support leg is loose so it stores much more compactly. Planning to have a foot on the bottom board to keep it from sliding, but also left myself room for a clamp if I need to clamp the front down on the deck or something. I may just flesh it in my kitchen because... Bachelor life, and the kitchen is getting renovated next year anyway in which case I'll just push it up against the wall.
Screenshot_20231109-192930.pngScreenshot_20231109-192920.png

That's as far as I got today, I need to go to the store to buy a bunch of non iodized salt tomorrow and I'll give fleshing the doe hide a try after I have salt on hand. From what I understand, next steps are dry salting for 24 hrs x2, days, then a 8hr saltwater bath, then a dawn dish soap cleaning, followed by drying out hide somewhat and applying the orange bottle liberally, once it begins to dry then work it in/break it. I plan to try to tan these hair-on for wallhangers/"blankets" (the depending on how stiff they are/how much I want to break them) and to see if I can do it. Future hides may get turned into buckskin depending on results or may het left with the gut pile/bones, we shall see. It'll be a day or two/more between each step but I'll keep the thread updated with my results.
 
I'll share my experience with that bottle and tanning some deer, a coyote, and a bobcat.

First, if you do what the bottle says, you'll end up with a hide. My oldest is at least a decade with no smells or pulled hair. 10/10 on the product.

As far as tips, it's all in the fleshing. Anywhere you don't get that godforsaken membrane off of the actual "leather" the solution won't soak and do its magic. It helps me to flesh it, and then go back after a day or two and flesh it again. Unremoved membrane will turn color and make it easier to spot and remove. A wire wheel can be handy in some areas like around the edges. "Fleshing" is a deceptive term. You can get every scrap of meat off of the hide and it will look good. But that membrane has to go. All of it.

As far as how stiff the hide will be, two things. First, you won't end up with a commercially-tanned hide at home. My understanding is that requires pretty esoteric and strong chemicals, and a hide shaving machine. Second, in lieu of that equipment, it's all elbow grease. It's relatively easy to get a wall hanger. If you get a blanket/garment, let me know how you did it. I've never achieved it.
 
In my experience, tanning is easy, softening the hide after tanning is not worth the effort.
 
Last edited:
I've wanted to attempt to tan a deer hide for a while now, so figured it's time to get started. I have the hide from the buck I shot earlier this season in the freezer as well as a doe hide that's in the bottom of my fridge (section of the fridge that gets too cold so it's half frozen). Going to give this a go with the doe hide first and then thaw out the buck hide as well, will keep this thread updated re: progress.

Step 1 was to acquire supplies.
I purchased two bottles of deer hunter and trapper's tanning formula
View attachment 94721

as well as an 8 inch wiebe fleshing knife.
View attachment 94722

And then built myself a fleshing beam out of a few 2*6 boards I had leftover from an old project. I eyeballed the whole thing, no measurements, just used a draw knife and a palm sander with 80 grit to smooth off the curved end and propped scraps up to get it at roughly waist height when unfolded. It folds at the front and the support leg is loose so it stores much more compactly. Planning to have a foot on the bottom board to keep it from sliding, but also left myself room for a clamp if I need to clamp the front down on the deck or something. I may just flesh it in my kitchen because... Bachelor life, and the kitchen is getting renovated next year anyway in which case I'll just push it up against the wall.
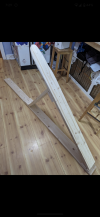
View attachment 94723View attachment 94724

That's as far as I got today, I need to go to the store to buy a bunch of non iodized salt tomorrow and I'll give fleshing the doe hide a try after I have salt on hand. From what I understand, next steps are dry salting for 24 hrs x2, days, then a 8hr saltwater bath, then a dawn dish soap cleaning, followed by drying out hide somewhat and applying the orange bottle liberally, once it begins to dry then work it in/break it. I plan to try to tan these hair-on for wallhangers/"blankets" (the depending on how stiff they are/how much I want to break them) and to see if I can do it. Future hides may get turned into buckskin depending on results or may het left with the gut pile/bones, we shall see. It'll be a day or two/more between each step but I'll keep the thread updated with my results.
Go to your local farm supply store and get granulated livestock salt, it is non iodized and much more affordable like that

Sent from my Pixel 3 using Tapatalk
 
Go to your local farm supply store and get granulated livestock salt, it is non iodized and much more affordable like that

Sent from my Pixel 3 using Tapatalk
I'm debating. Don't really have any close by so it's gas and cheap salt vs no gas and grocery store salt
 
Following. I have a coyote and deer hide frozen and waiting to try. I have the same formula and fleshing knife. Borrowed a stretcher for the coyote. Was gonna make a beam. @thedutchtouch, what did you use to shape it? Draw knife or power tools?
 
One thing to note on the OBC... It works best on hides that are fairly fresh. If they get some age on them, it still works but you risk hair slippage because the instructions do not have a pickling step. The pickling step sets the hair and plumps hide up so you can thin it.
 
Everything I read said iodized will stain the hide and make it dark

Sent from my Pixel 3 using Tapatalk
only if you have the stuff that has the other additives. Even then , its not going to stain unless the salt actually is another color other than white

Speaking of additives, if you get stock salt, some of it is pure other has additive
 
Last edited:
Following. I have a coyote and deer hide frozen and waiting to try. I have the same formula and fleshing knife. Borrowed a stretcher for the coyote. Was gonna make a beam. @thedutchtouch, what did you use to shape it? Draw knife or power tools?
Yes, Roughed it out with an old drawknife and then smoothed it with a palm sander and 80 grit sandpaper. Probably could get away with drawknife and hand sanding only, but my knife was a bit dull so I just finished it off with the sander. An orbital sander would have been easier as well but I don't own one at the moment.

@SNIPERBBB good to know with the salt, that'll make it much easier to find some, as well as the hide age. That's one of the reasons I want to try the doe skin first, it's been half frozen/refrigerated for about two weeks so it's not as fresh. The buck skin went into the freezer the day I skinned it about a month ago so hoping that one works better. Worst case scenario I'll just have to shoot another one and get on it right away I suppose.
 
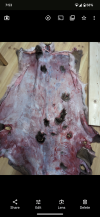
Well that was... A learning experience. Fleshing knife is way too sharp and I couldn't figure out the right angle for most of it. Also there was parts of the hide that were still a bit frozen, that didn't help and I made a ton of big holes and some small ones as well. Ended up switching to the non-knjfe side and using the 90 degree edge more like a card scraper (woodworking analogy) and that worked a lot better. Somewhat annoyed that I swiss cheesed this hide, but I suppose I learned some from it. I'm not going to continue the process with this one, threw it out and hope I have better luck with the buck hide or if I'm lucky enough to shoot another deer tomorrow with that one now that I have a little bit better idea what I'm doing... Anyhow, photo of today's lesson learned the hard way below. Next time I'm going to slow down and use the dull side from the beginning. At least non iodized salt was on sale for .80 cents @ the grocery store.

Screenshot_20231110-195353.png
 
get the mortons pickleing and canning salt, in the green box. scrape with the blade straight up and down dont try to shave or you will slice a hole. if i were you i would order a tanning kit from a taxidermy supply catalog. i use krowtann for my capes , its a pickeling and tanning all in one solution, works great for me , i have made rugs from deer hides. the trick is getting the skin thin as you can, and you still have to break and stretch it while it dries. the neck area is really thick and will be the stiffest area.
 
Well that was... A learning experience. Fleshing knife is way too sharp and I couldn't figure out the right angle for most of it. Also there was parts of the hide that were still a bit frozen, that didn't help and I made a ton of big holes and some small ones as well. Ended up switching to the non-knjfe side and using the 90 degree edge more like a card scraper (woodworking analogy) and that worked a lot better. Somewhat annoyed that I swiss cheesed this hide, but I suppose I learned some from it. I'm not going to continue the process with this one, threw it out and hope I have better luck with the buck hide or if I'm lucky enough to shoot another deer tomorrow with that one now that I have a little bit better idea what I'm doing... Anyhow, photo of today's lesson learned the hard way below. Next time I'm going to slow down and use the dull side from the beginning. At least non iodized salt was on sale for .80 cents @ the grocery store.

View attachment 94766
you should save a part of the hide and try the bottle of tan on it to see how it works, also that does not look like a salted hide, salt the hell out of it and let it dry some before scraping
 
When you're using the sharp side of the knife, you want to keep it as flat to the hide as you can with the bevel up. Some guys do bevel down but I'm not a fan of it. Another thing is check the burr of the knife. With the bevel up, the burr should also be pointing slightly up. If it's curled under you need to stand it back up.
 
you should save a part of the hide and try the bottle of tan on it to see how it works, also that does not look like a salted hide, salt the hell out of it and let it dry some before scraping
All the instructions I've seen have said to flesh before salting, not the other way around?
When you're using the sharp side of the knife, you want to keep it as flat to the hide as you can with the bevel up. Some guys do bevel down but I'm not a fan of it. Another thing is check the burr of the knife. With the bevel up, the burr should also be pointing slightly up. If it's curled under you need to stand it back up.
I sliced into the hide when I had the knife flat to the hide but didn't cause any damage with the back side almost vertical like @arrow30 confirmed. The burr makes sense though, I was definitely slicing down through the hide too easily so I'm guessing it's pointing down.

Will try again, hopefully soon. And hopefully with less holes lol
 
All the instructions I've seen have said to flesh before salting, not the other way around?

I sliced into the hide when I had the knife flat to the hide but didn't cause any damage with the back side almost vertical like @arrow30 confirmed. The burr makes sense though, I was definitely slicing down through the hide too easily so I'm guessing it's pointing down.

Will try again, hopefully soon. And hopefully with less holes lol
It takes some practice to get good at fleshing with the sharp side without turning hides to swiss cheese. The pushing(dull) side of the knife should be used more to push the easy fat and meat off the hide. Dont be afraid to really bear down with the pushing side to move the fat and meat. The sharp side is reserved for the stuff that wont come off easily. You want to go light pressure on the sharp side because you want to feel whats going on. If your knife wont cut with light pressure its too dull. When you have to put more pressure on the sharp side to cut, thats when it really gets easy to cut holes. Deer are fairly thin skinned so it doesnt take much.

Another thing too, you have to have a smooth fleshing beam , no dents or dips in it and the hide cant have burrs or any debris in it because when you get to those spots, the hide gets exposed to the knife and a hole appears.
 
Back
Top