• The SH Membership has gone live. Only SH Members have access to post in the classifieds. All members can view the classifieds. Starting in 2020 only SH Members will be admitted to the annual hunting contest. Current members will need to follow these steps to upgrade: 1. Click on your username 2. Click on Account upgrades 3. Choose SH Member and purchase.
  • We've been working hard the past few weeks to come up with some big changes to our vendor policies to meet the changing needs of our community. Please see the new vendor rules here: Vendor Access Area Rules

DIY Mesh Saddle

skell

Moderator
Staff member
SH Member
Joined
Oct 25, 2016
Messages
1,394
Location
Iowa
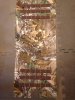
Version 1! It's almost ready for a test drive!

It is not @ckossuth quality...but I was doing alot of learning as I sewed. I will say I have a much greater appreciation for the price tag on a purchased saddle.

I do plan to do a version 2 after playing with this one for a while. I can tell I would already make some changes in demensions. And webbing color.

Now to pinch pennies for a predator...
dc040ffb2f2afc478cee9f4644ebd864.jpg
c128ad16e2d5d42b92d1defd34eb9f98.jpg
 
Impressive!

Two questions:
1) Spend any time in it yet?
2) Care to share a materials/source list? I’ve got a mantis on the way but the thought of a diy saddle just keeps tugging at me.

On another note, I took a stab at thread injecting the other night. The wife was sewing some curtains so I offered to help. She thought it was really sweet of me. I couldn’t bring myself to tell her I just want to learn so I can diy stuff for hunting.
 
Looks great. You once again prove saddle hunter are the kings of diy.


Sent from my iPhone using Tapatalk
 
I really like the fact that it is the same width all the way across. I tend to wear my saddle real low so I think this would be a really good option for me versus having one that is cut to fit your butt. I need to get a sewing machine so bad! It looks really good, top-notch job.

Sent from my SAMSUNG-SM-G890A using Tapatalk
 
there is a certain satisfaction aand even confidence in building our tools specific to what we like or need. good job!
 
Impressive!

Two questions:
1) Spend any time in it yet?
2) Care to share a materials/source list? I’ve got a mantis on the way but the thought of a diy saddle just keeps tugging at me.

On another note, I took a stab at thread injecting the other night. The wife was sewing some curtains so I offered to help. She thought it was really sweet of me. I couldn’t bring myself to tell her I just want to learn so I can diy stuff for hunting.
Thanks!

I have not spent anytime outdoors in it. Only playing around in the house. I need to finish the leg strap connection and add the bridge. Then off to the trees.

I'll work on a parts list and my thoughts/things I will change for version2 when I am sitting at a keyboard. Thats too much typing for my phone LOL
 
I really like the fact that it is the same width all the way across. I tend to wear my saddle real low so I think this would be a really good option for me versus having one that is cut to fit your butt. I need to get a sewing machine so bad! It looks really good, top-notch job.

Sent from my SAMSUNG-SM-G890A using Tapatalk
It is tapered slightly...but only about 2 inches. You can see my starting demensions a little better in these pics
1d2dcc36faf9885f20015ec40d1f500b.jpg
950f8dd74d15913d66f15dc9fe7f4a05.jpg
 
there is a certain satisfaction aand even confidence in building our tools specific to what we like or need. good job!
Thanks! And that is an understatement! I had some uncertainty initially on if I would trust the final product. Now that I have an understanding of what would all have to fail...that has vanished.
 
Looks fantastic. A heads up from my own experience making one - I found the side buckles for tightening up the lower webbing had to be metal. I broke the plastic ones I first used. Yours look like plastic but I can't tell for sure.

I made 2 kestrel-like saddles... Now I'm thinking about doing a mesh version. I had 2 rows of webbing for the molle attach points, and I'd cut back to just 1 row, after seeing how the tethrd gear pouches connect (genius, imho) and wanting to save work & weight.

Also looks like you used seatbelt webbing. I used the heavy duty milspec stuff and it was really stiff to work with on doubling over for the tether attachment areas. Yours looks great with the covers. Please do leave a materials list - and maybe list the rated strengths of things like webbing before the safety-freaks show up :)

Those buckles are plastic on mine. I went with them because I had them in house. I am planning to replace since they don't play nice with the milspec webbing. But I will probably do some test driving first!

I go back and forth on how many rows of molle. I do think the tethrd system is genius...but I really like my pouches held tight to me with no ability to swing.

The main frame is seat belt webbing, overlapped about 6 inches. Attachment areas are protected with cordura and an additional layer of webbing (exactly how @ckossuth did in his kestrel diy). The seat belt webbing is a dream to work with compared to the milspec webbing. That will be one of my big changes on version 2. Pick up some 1 inch selt belt webbing to use in place of the milspec 1 inch. Then use milspec to reinforce wear/connection areas.
 
I did three rows of molle on mine but I did them perpendicular to what is on most saddles. Three rows will hold securely most all military or tactical bags that you can buy and they won't swing around. I can place four military pouches(two on each side) on mine. While climbing the top of the bags are facing forward but they are secured with buckles and nothing falls out. They are easier to reach when placed on the side instead of the back. Here is a pic of the bottom piece of fabric before I sewed everything else on. It shows how the molle strips are placed.
 

Attachments

  • step 2.JPG
    step 2.JPG
    109.3 KB · Views: 116
I did three rows of molle on mine but I did them perpendicular to what is on most saddles. Three rows will hold securely most all military or tactical bags that you can buy and they won't swing around. I can place four military pouches(two on each side) on mine. While climbing the top of the bags are facing forward but they are secured with buckles and nothing falls out. They are easier to reach when placed on the side instead of the back. Here is a pic of the bottom piece of fabric before I sewed everything else on. It shows how the molle strips are placed.
Do you have any finished product pics handy? Any with pouches attached?
 
Well done!

I'd move your lineman loops out and make them bigger like on the Mantis. They work better.

Also stick to 1 row of molle and steal our attachment method. Way better than threading molle straps.

Sent from my Galaxy S8.
 
Well done!

I'd move your lineman loops out and make them bigger like on the Mantis. They work better.

Also stick to 1 row of molle and steal our attachment method. Way better than threading molle straps.

Sent from my Galaxy S8.

Thanks! I think the picture is a little deceptive. The saddle is a little big for me. I should have taken a few inches off the width. It's large enough I'm going to have to shorten the bridge to compensate. I need to take a pic wearing it. V2 will definitely be smaller.

I'll give the Tethrd attachment system a shot on V2. By then I'll be tired of hearing everyone raving about it!
 
Back
Top