• The SH Membership has gone live. Only SH Members have access to post in the classifieds. All members can view the classifieds. Starting in 2020 only SH Members will be admitted to the annual hunting contest. Current members will need to follow these steps to upgrade: 1. Click on your username 2. Click on Account upgrades 3. Choose SH Member and purchase.
  • We've been working hard the past few weeks to come up with some big changes to our vendor policies to meet the changing needs of our community. Please see the new vendor rules here: Vendor Access Area Rules

DIY saddle # 2 pictorial

dbennett

Member
Joined
Nov 8, 2019
Messages
53
Location
Isabella county, Mi
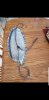
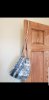
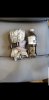
Hey guys... this is my second saddle project and the first one I did the sewing on. Had all the stuff around the shop.
 

Attachments

  • Screenshot_20191223-151240_Gallery.jpg
    Screenshot_20191223-151240_Gallery.jpg
    201.6 KB · Views: 229
  • Screenshot_20191223-151229_Gallery.jpg
    Screenshot_20191223-151229_Gallery.jpg
    217.4 KB · Views: 233
  • Screenshot_20191223-151323_Gallery.jpg
    Screenshot_20191223-151323_Gallery.jpg
    213.6 KB · Views: 226
  • Screenshot_20191223-151337_Gallery.jpg
    Screenshot_20191223-151337_Gallery.jpg
    142 KB · Views: 217
  • Screenshot_20191223-151344_Gallery.jpg
    Screenshot_20191223-151344_Gallery.jpg
    114 KB · Views: 213
I like it!! Your loops are going to stiffen it for easier hook ups?
Once my saddle and pouches are set up I don't typically remove the beaner from saddle loop to the LB loop, just on the prusik side. So for me a stiff loop isn't a necessity. I use a 4' climbing sling I had laying around for the saddle foundation, a 3' would have probably been ideal. I just shortened my bridge to compensate for the extra length.
 
Back
Top