• The SH Membership has gone live. Only SH Members have access to post in the classifieds. All members can view the classifieds. Starting in 2020 only SH Members will be admitted to the annual hunting contest. Current members will need to follow these steps to upgrade: 1. Click on your username 2. Click on Account upgrades 3. Choose SH Member and purchase.
  • We've been working hard the past few weeks to come up with some big changes to our vendor policies to meet the changing needs of our community. Please see the new vendor rules here: Vendor Access Area Rules

First DIY Saddle

INbowHunter

Member
Joined
Nov 27, 2021
Messages
41
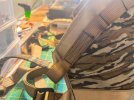
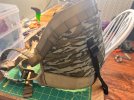
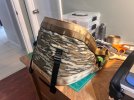
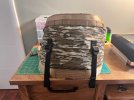
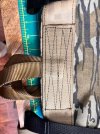
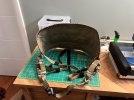
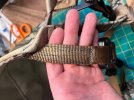
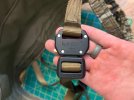
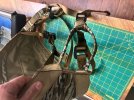
Just finished up my first DIY saddle build. I took a lot of ideas from other builds on here. This site is awesome for that! It has a 3” pleat built into it. Haven’t had time to sit in it, and its raining here, but hopefully will get some time soon. If anyone has any feedback on the stitching as far as structural integrity goes, I am all ears. Thanks for looking!
 

Attachments

  • IMG_7131.jpeg
    IMG_7131.jpeg
    146.4 KB · Views: 62
  • IMG_7130.jpeg
    IMG_7130.jpeg
    150.9 KB · Views: 62
  • IMG_7129.jpeg
    IMG_7129.jpeg
    197.2 KB · Views: 64
  • IMG_7128.jpeg
    IMG_7128.jpeg
    142.1 KB · Views: 63
  • IMG_7127.jpeg
    IMG_7127.jpeg
    116.3 KB · Views: 63
  • IMG_7126.jpeg
    IMG_7126.jpeg
    205.7 KB · Views: 60
  • IMG_7120.jpeg
    IMG_7120.jpeg
    126.6 KB · Views: 61
  • IMG_7121.jpeg
    IMG_7121.jpeg
    124.3 KB · Views: 58
  • IMG_7122.jpeg
    IMG_7122.jpeg
    99.6 KB · Views: 54
  • IMG_7123.jpeg
    IMG_7123.jpeg
    157.3 KB · Views: 59
I want to start by congratulating you. It looks pretty good. And it’s very satisfying knowing you made your own gear. Overall it’s impressive and you should be proud. Please take what I’m saying as caring for your safety and also suggesting things for comfort and functionality…. This isn’t a tutorial and I am by no means bashing your project. Quite the opposite I love seeing this type of DIY gear especially if it’s made right! I have some questions and one or two suggestions. First question is what size thread are you using? You didn’t use a lot of stitching per inch on your overlaps so I’m hoping the thread was a tex 135 and not a 92 or 70…. This is a life safety application and you want plenty of strength in those areas.

As far as suggestions:
One I would reinforce the lineman’s loops if you are a guy that uses them regularly. Hollow webbing can be chewed up from rope girth hitching it and also from carabiner gates catching it. Also after you lean against it the hollow webbing will tend to pull closed and become harder to clip in and out of. Adding some cordura on the outside and additional piece of webbing inside will make them stay open better and also last longer.
On your bridge loops, I would have went a couple inches away from the saddle to start the fold over area. This allows for a more gradual pull into the folds and if you layer up, it’ll create a little less pressure from the folds.
On your webbing bridge…. I would go back and make the fold over attaching areas a little longer and get a lot more stitching in there because that is your main connection point to the tree and more than any other point it’s going to see constant loading. You want that portion to be way stronger than that Austrialpin slider bar for just in case….
I see you used @JCLINE84 ‘s Orion concept with the webbing for pleat management? I would have personally followed his lead in sewing webbing reinforcement across that whole portion so that the stress isn’t completely on the little stitching and cordura. Over time that will eventually tear out of the material I believe that is why Jamie did what he did on his Orion.
Lastly it appears you ran the waist belt all the way to the end of the saddle body. I would have stopped it about 2” to 3” away from the ends so that you have full range of motion to twist in your saddle for shots. With the belt ran all the way to the end it really pulls away from the body making twisting more challenging and uncomfortable.
That is all. If I can help in any way feel free to reach out to me! Congrats on a nice looking saddle build
 
It looks fantastic man. Be proud. It will work great. Beat it up a good bit at ground level to look for weak points. Reinforce as needed.

My first one is not as well done as yours and I still haven't found a need to upgrade it. I've killed a pile of deer out of it.

Sent from my SM-G991U using Tapatalk
 
@Fl Canopy Stalker Hey thanks for the feedback! I posted it on here for more experienced builders like yourself to "poke holes" in the design before deciding whether or not to use it. All feedback is greatly appreciated. I'll try to answer all of your questions in an organized way.
- I am using Tex 90/V92 Premobond UV bonded polyester thread. It has a tensile strength of 13.3 lbs. I opted for this over tex 135 because tex 90 is the largest size thread recommended on my machine by the manufacturer.
-SPI for the entire project was 8. With those numbers I determined my average strength for one inch was 159lbs.
-The bottom part of the chassis has 5" of overlap with each other
-The entire webbing bridge is actually an AH bridge, I didn't feel comfortable making my own yet.

Thank you for all of the additional comfort and longevity suggestions, I will put those into my next build. As it sits now, based on the additional info above, do you think it would be safe to use?

-Zach
 
Last edited:
It looks fantastic man. Be proud. It will work great. Beat it up a good bit at ground level to look for weak points. Reinforce as needed.

My first one is not as well done as yours and I still haven't found a need to upgrade it. I've killed a pile of deer out of it.

Sent from my SM-G991U using Tapatalk
Thanks! Building something that is "live saving" is definitely a bit more nerve racking but overall I really enjoyed the process. Do you have a build thread for your saddle?

-Zach
 
@Fl Canopy Stalker Hey thanks for the feedback! I posted it on here for more experienced builders like yourself to "poke holes" in the design before deciding whether or not to use it. All feedback is greatly appreciated. I'll try to answer all of your questions in an organized way.
- I am using Tex 90/V92 Premobond UV bonded polyester thread. It has a tensile strength of 13.3 lbs. I opted for this over tex 135 because tex 90 is the largest size thread recommended on my machine by the manufacturer.
-SPI for the entire project was 8. With those numbers I determined my average strength for one inch was 159lbs.
-The bottom part of the chassis has 5" of overlap with each other
-The entire webbing bridge is actually an AH bridge, I didn't feel comfortable making my own yet.

Thank you for all of the additional comfort and longevity suggestions, I will put those into my next build. As it sits now, based on the additional info above, do you think it would be safe to use?

-Zach
Ok my aerohunter webbing bridges used the double frame buckle, I personally did not know they made them with the heavy duty sliders as well. If that’s the case then yes your overlap should have around 5600 lbs on the chassis based on the numbers you gave me. The waist belt and lineman loops have about a 4” overlap? With 6 passes… that’s about 3700 lbs. which is less than your buckle but should be adequately strong enough on the waist. I am an overkill type guy simply because of material degradation. But based on the calculations, I would feel perfectly safe using that saddle
 
Ok my aerohunter webbing bridges used the double frame buckle, I personally did not know they made them with the heavy duty sliders as well. If that’s the case then yes your overlap should have around 5600 lbs on the chassis based on the numbers you gave me. The waist belt and lineman loops have about a 4” overlap? With 6 passes… that’s about 3700 lbs. which is less than your buckle but should be adequately strong enough on the waist. I am an overkill type guy simply because of material degradation. But based on the calculations, I would feel perfectly safe using that saddle
Correct on the overlap numbers. Thanks for all the feedback! I currently have a Sailrite LSZ and it's awesome, but looking to add their Fabricator model in the future so I can start to use the even larger thread sizes. Nothing wrong with overkill, especially when your life depends on it!

-Zach
 
Correct on the overlap numbers. Thanks for all the feedback! I currently have a Sailrite LSZ and it's awesome, but looking to add their Fabricator model in the future so I can start to use the even larger thread sizes. Nothing wrong with overkill, especially when your life depends on it!

-Zach
Little hint of advice, get away from the sailrite. I had one when I first started making my own years ago and then I got my first real Juki. It was only a couple hundred more for the heavy duty Juki and the machine has been way more reliable and stronger plus many of their industrial models can sew 135 or even 207. I have like 4 of them but my go to work horse absolute favorite Juki LU 1508 NH. I can’t recommend that machine enough for saddle builds. And then I use the Tx 135 polyester bonded thread from A&E. 20 lbs tensile strength. You won’t be disappointed with that combination I promise you
 
Little hint of advice, get away from the sailrite. I had one when I first started making my own years ago and then I got my first real Juki. It was only a couple hundred more for the heavy duty Juki and the machine has been way more reliable and stronger plus many of their industrial models can sew 135 or even 207. I have like 4 of them but my go to work horse absolute favorite Juki LU 1508 NH. I can’t recommend that machine enough for saddle builds. And then I use the Tx 135 polyester bonded thread from A&E. 20 lbs tensile strength. You won’t be disappointed with that combination I promise you
Holy smokes, thats a serious set up. Appreciate the advice!
 
I also do the majority of my sewing on the Juki 1508. It’s an absolute beast of a machine but probably too much machine for the average diy guy. A 1541 will do everything you need it to. Now let’s talk about your saddle build. First of all, kudos to you for picking a great design lol. But seriously that Orion is a hard saddle to build. If you look at the way I do it there are some things you can take away that will really help you out. You’ve already gotten the advice from @Fl Canopy Stalker about your bridge loops and he’s 100 percent right. For your panel management straps you’ll want something beefier to attach them to than the cordura. I attached mine on the webbing above the pleat that houses the leg buckles, and the strap below the pleat that is part of the lineman loops. I put those attachment points under the webbing that runs across the saddle now, but in the early stages of that saddle model I was putting them on top which is fine. They don’t hold a ton of weight anyway. Your connection point for the suspension webbing is long enough I think, but would benefit from more stitches of your 90 weight thread. I use about the same amount of stitches that you used here, but I also have four rows of vertical bar tacking in there too, which ends up able to hold more weight than I have in my home gym (over 500lbs). You could easily run that stitching at the ends of your cross stitches up and down a few times to stack stitches on top of each other too (the same way you did on your molle stitching). But still, add a few rows of that pretty cross stitching and you’ll be fine. Your lineman loops need to be covered for sure and larger I think. If you keep them flat like they are then add a layer of webbing on the inside to beef them up a little. I would personally center them on your top suspension webbing but they’ll be fine where they’re at. Your legs straps look fine to me. Having them that low and connected to your suspension will probably make them awkward to walk in, but they look plenty strong. And I love the raptor buckles for your leg straps. The 1 inchers are awesome. I wish the 1.5 I use on the waist belt of saddles worked a little better but they’re still great buckles too, the 1 inchers are just perfect. Anyway, awesome first attempt. Your stitching is actually really straight and nice to look at, and that always matters a lot to me. You can build something strong but kinda ugly pretty easily. Making it strong and also good to look at is the art of the whole thing. There’s no reason not to put in that extra effort since you’re already doing the work anyway. And you seem to have a knack for making sure the stitching is straight and well spaced. Good job!
 
Thanks! Building something that is "live saving" is definitely a bit more nerve racking but overall I really enjoyed the process. Do you have a build thread for your saddle?

-Zach
I encourage you to look at a rock climbing harness in person. It will blow your mind how light duty they are and how little reinforcement is used. Saddles are complete tanks by comparison. And we are at risk of falling what like a foot or two if we do things properly? Rock climbers are going to take 10-20 feet falls every day.

I don't believe I did a build thread of my saddle. I used to sew a lot of gear but I'd always get too caught up in it to bother taking pics along the way. Here's a copy cat of a marsupial belt I made recently and the pouches I made for it.
25518a40fc884f134596645b784ea0ff.jpg
2908c5b8972d4a4500af3b80812c968c.jpg


Sent from my SM-G991U using Tapatalk
 
Why not join the seatbealt webbing on top so you can make use of that for structural integrity too? I'll have to go look at my hunting saddles to see how they do that.

- not at all a saddle maker

My personal opinion though is typical hunting saddles of this particular style support your weight in such a way that that is the most important joint by a significant margin.
 
I encourage you to look at a rock climbing harness in person. It will blow your mind how light duty they are and how little reinforcement is used. Saddles are complete tanks by comparison. And we are at risk of falling what like a foot or two if we do things properly? Rock climbers are going to take 10-20 feet falls every day.

I don't believe I did a build thread of my saddle. I used to sew a lot of gear but I'd always get too caught up in it to bother taking pics along the way. Here's a copy cat of a marsupial belt I made recently and the pouches I made for it.
25518a40fc884f134596645b784ea0ff.jpg
2908c5b8972d4a4500af3b80812c968c.jpg


Sent from my SM-G991U using Tapatalk
Fall factors and static rope vs dynamic rope. The difference in forces and force potential would shock you…. And many rock climbing harnesses use 1” to 1.5” bartacks with tex207 thread. Which means there is a lot more reinforcement on the webbing than you realize. It’s not an apples to apples comparison at all.
 
I also do the majority of my sewing on the Juki 1508. It’s an absolute beast of a machine but probably too much machine for the average diy guy. A 1541 will do everything you need it to. Now let’s talk about your saddle build. First of all, kudos to you for picking a great design lol. But seriously that Orion is a hard saddle to build. If you look at the way I do it there are some things you can take away that will really help you out. You’ve already gotten the advice from @Fl Canopy Stalker about your bridge loops and he’s 100 percent right. For your panel management straps you’ll want something beefier to attach them to than the cordura. I attached mine on the webbing above the pleat that houses the leg buckles, and the strap below the pleat that is part of the lineman loops. I put those attachment points under the webbing that runs across the saddle now, but in the early stages of that saddle model I was putting them on top which is fine. They don’t hold a ton of weight anyway. Your connection point for the suspension webbing is long enough I think, but would benefit from more stitches of your 90 weight thread. I use about the same amount of stitches that you used here, but I also have four rows of vertical bar tacking in there too, which ends up able to hold more weight than I have in my home gym (over 500lbs). You could easily run that stitching at the ends of your cross stitches up and down a few times to stack stitches on top of each other too (the same way you did on your molle stitching). But still, add a few rows of that pretty cross stitching and you’ll be fine. Your lineman loops need to be covered for sure and larger I think. If you keep them flat like they are then add a layer of webbing on the inside to beef them up a little. I would personally center them on your top suspension webbing but they’ll be fine where they’re at. Your legs straps look fine to me. Having them that low and connected to your suspension will probably make them awkward to walk in, but they look plenty strong. And I love the raptor buckles for your leg straps. The 1 inchers are awesome. I wish the 1.5 I use on the waist belt of saddles worked a little better but they’re still great buckles too, the 1 inchers are just perfect. Anyway, awesome first attempt. Your stitching is actually really straight and nice to look at, and that always matters a lot to me. You can build something strong but kinda ugly pretty easily. Making it strong and also good to look at is the art of the whole thing. There’s no reason not to put in that extra effort since you’re already doing the work anyway. And you seem to have a knack for making sure the stitching is straight and well spaced. Good job!
Thank you for all of the suggestions, I really appreciate the feedback. Your Orion was a huge inspiration for me throughout this build. I will definitely add more stitching to the areas you suggested. I originally had planned to put my lineman's loops and molle centered on the top suspension webbing but unfortunately I did not have enough clearance on my presser foot to fit it under there, so I had to slip it down farther. I'm a little OCD so I like to take my time with the stitching.

-Zach
 
I encourage you to look at a rock climbing harness in person. It will blow your mind how light duty they are and how little reinforcement is used. Saddles are complete tanks by comparison. And we are at risk of falling what like a foot or two if we do things properly? Rock climbers are going to take 10-20 feet falls every day.

I don't believe I did a build thread of my saddle. I used to sew a lot of gear but I'd always get too caught up in it to bother taking pics along the way. Here's a copy cat of a marsupial belt I made recently and the pouches I made for it.
25518a40fc884f134596645b784ea0ff.jpg
2908c5b8972d4a4500af3b80812c968c.jpg


Sent from my SM-G991U using Tapatalk
That is super clean work, my friend!
 
Why not join the seatbealt webbing on top so you can make use of that for structural integrity too? I'll have to go look at my hunting saddles to see how they do that.

- not at all a saddle maker

My personal opinion though is typical hunting saddles of this particular style support your weight in such a way that that is the most important joint by a significant margin.
If I'm reading correctly you're talking about the overlap of the seat belt webbing on the bottom and asking about why I didn't do that for the top portion?

If so, it's because the seat belt webbing is one long piece that starts on the bottom and goes all around the saddle body, so there is no "joint" per say on the top
Sorry I was saying flip it so the joint is on top. That way the molle webbing helps with stuctural support. In theory, in my mind, but again I'm no expert on much of anything.

edit: Just ran out and checked my two AeroHunter saddles (RIP) and they both have the joint on top, as I was saying.
 
Sorry I was saying flip it so the joint is on top. That way the molle webbing helps with stuctural support. In theory, in my mind, but again I'm no expert on much of anything.

edit: Just ran out and checked my two AeroHunter saddles (RIP) and they both have the joint on top, as I was saying.
I don’t think his machine is heavy enough to sew the waist belt and molle on top of doubled up webbing. That’s why he said he had to move the lineman loops. Adding that junction there would likely cause him issues sewing.
 
Back
Top