• The SH Membership has gone live. Only SH Members have access to post in the classifieds. All members can view the classifieds. Starting in 2020 only SH Members will be admitted to the annual hunting contest. Current members will need to follow these steps to upgrade: 1. Click on your username 2. Click on Account upgrades 3. Choose SH Member and purchase.
  • We've been working hard the past few weeks to come up with some big changes to our vendor policies to meet the changing needs of our community. Please see the new vendor rules here: Vendor Access Area Rules

Leatherworking Thread

Here’s how I wet mold/harden. This’ll be for a patch holder on my bag strap.


Sent from my iPhone using Tapatalk
 
Would help if I post a pic with it…
7c10e7b11cefe01d30e93c7954281bcc.jpg


Sent from my iPhone using Tapatalk
 
Busy day.

Finished stitching my new bag in a far more practical size. Added a patch holder to the strap and need to add a knife sheath to the back strap at a later date.

Also made some fix’n wax for the patches and made a small ball bag because the leather was there.

Tomorrow is the last day of the season so it’s all or nothing. I did switch powders as I was getting delayed main charge, mostly due to older powder. Went from 2F to 3F and should still be good but limiting my shots to 25y just in case.

55747a5d7093dfb62a68ac4dfd1956d6.jpg


Sent from my iPhone using Tapatalk
 
On the hunting bag #2, shown in the last post, the leather was brick hard due to the alcohol dyes and using water to turn the bag out. Baking the leather for the snoseal didn’t help.

On the way home from hunting today, stopped by fleet farm and picked up some mink oil. While only supposed to be used on the smooth side, I coated the inner bag (rough side of the leather) since that didn’t get the snoseal treatment.

The leather itself became far more supple but the gusset was still hard so I used a turkey injector to drip mink oil into the gusset fold that I couldn’t reach with the cloth. After treatment, the leather is soft, flexible and thoroughly protected inside and out.


Sent from my iPhone using Tapatalk
 
Here’s the latest leather project.

Originally, I ran the stitches fully on the outside but it was bulky and looked like crap. I then cut the stitches and stitched it inside out about 1/2 way up before turning it out which made for a much nicer looking design.

Then, I threaded in a 1/2” I.D. fitting into the neck so that the balls come out easier. Lastly, I whipped a tightly rolled 2oz piece of leather to make a plug.
59e7d4e32aa364b061706da285875af3.jpg


Sent from my iPhone using Tapatalk
 
Here's my current hunting bag.

Doing research, I found the early colonial bags plain and quite ugly. It then dawned on me the leather was probably more expensive then that it is now...and it ain't cheap now.

For the average subsistence farmer/hunter/militia, having a full grain leather bag precisely cut would have been too expensive. Instead, the remnants would have been used for the bag with a loomed strap of cotton or hemp would have been far cheaper than a straight leather strap and metal buckles.

This is a hybrid of a few different period styles but keeps with the remnants look. The strap is jute which wouldn't have been in use but replicates hemp threading pretty well.
ad0208d45824bb67aebc3dc09b07025c.jpg


Sent from my iPad using Tapatalk
 
Me likey!!!

What kind of rivets are those and due they have plastic liners to prevent rusting the blades?


Sent from my iPhone using Tapatalk
Thanks!
Those are “tubular rivets” with an antique brass finish. They cinch the leather so snugly that the blades can’t touch the rivets.
 
Not sure if the intent of this thread is for finished projects or "works in progress". If you want me to move these to a different thread, I'm happy to...

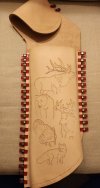
I finally got started on the quiver I mentioned in Dec 22. This will be a belt quiver that cants forward a bit for a right handed archer. I was hoping for just two pieces of leather but that will take a little bit more trial and error. This one will have a third piece of leather sewn in as a bottom. Having a squared off bottom would eliminate the need for it (or changing the shape of the top piece) but I like the angled bottom edge.

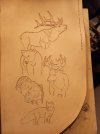
First a "close up" of the tooling. These will eventually be painted with acrylics and my wife says leave the leather natural around it... I may add some more background tooling, I haven't decided. In case it isn't clear, from top to bottom: Elk, Black Bear, White Tail, Turkey, and Fox. The second picture shows the general shape of the whole thing. I will likely use a plastic "clip" 6-arrow holder between the belt loop and the quiver portion just to keep the arrows from rattling around too much. If I can figure out a way to do that with leather, though, I might try it.

20240107_201819.jpg


20240107_215645.jpg
 
Not sure if the intent of this thread is for finished projects or "works in progress". If you want me to move these to a different thread, I'm happy to...

I finally got started on the quiver I mentioned in Dec 22. This will be a belt quiver that cants forward a bit for a right handed archer. I was hoping for just two pieces of leather but that will take a little bit more trial and error. This one will have a third piece of leather sewn in as a bottom. Having a squared off bottom would eliminate the need for it (or changing the shape of the top piece) but I like the angled bottom edge.

First a "close up" of the tooling. These will eventually be painted with acrylics and my wife says leave the leather natural around it... I may add some more background tooling, I haven't decided. In case it isn't clear, from top to bottom: Elk, Black Bear, White Tail, Turkey, and Fox. The second picture shows the general shape of the whole thing. I will likely use a plastic "clip" 6-arrow holder between the belt loop and the quiver portion just to keep the arrows from rattling around too much. If I can figure out a way to do that with leather, though, I might try it.

View attachment 98145


View attachment 98146
Great work on the carvings! Do you hand stitch those seams with two opposing needles or do you use a sewing awl?
 
Last edited:
Great work on the carvings! Do you hand stitch those seams with two opposing needles or do you use a sewing awl?
Hand stitch with 2 needles is what I've done so far. I tried a stitching awl but I find it harder to use, personally.
 
Hand stitch with 2 needles is what I've done so far. I tried a stitching awl but I find it harder to use, personally.
Well your work looks great. I’ll be interested to see how it looks when you’ve finished. Where’d you get those clamps ; what are they called?
 
A couple more pics - decided to sew it all together before painting and finishing. Some minor mistakes but overall I'm pretty happy with this. Still need to make a belt for it, too.

20240115_201349.jpg

20240115_201238.jpg

Edited because I realized my picture was mirror imaged for some reason.
 
Last edited:
I drew them (freehand) onto tracing paper from reference photos. Then I transferred them to the leather and carved them from the outline drawing. You can pretty easily trace a reference photo from your computer onto tracing paper and do the same thing, though. You can treat the monitor of your computer as a light table, which makes tracing super easy.
 
Back
Top