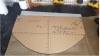
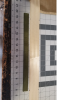
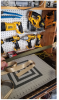
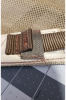
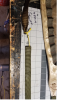
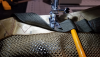
• The SH Membership has gone live. Only SH Members have access to post in the classifieds. All members can view the classifieds. Starting in 2020 only SH Members will be admitted to the annual hunting contest. Current members will need to follow these steps to upgrade: 1. Click on your username 2. Click on Account upgrades 3. Choose SH Member and purchase.
  • We've been working hard the past few weeks to come up with some big changes to our vendor policies to meet the changing needs of our community. Please see the new vendor rules here: Vendor Access Area Rules

Saddle Build-along

Just wondering, how big are you? I see you have a 90” main strap, mine was about 78”, also made one 72 that’s a bit small for me. I was not as good as you at making a detailed template with all cut measurements written. Nice work, may borrow your figures to build another and see how it feels


Sent from my iPhone using Tapatalk
 
Now im putting the binding on using the 3/4 webbing. Probably overkill, but it holds up well.
Just wondering, how big are you? I see you have a 90” main strap, mine was about 78”, also made one 72 that’s a bit small for me. I was not as good as you at making a detailed template with all cut measurements written. Nice work, may borrow your figures to build another and see how it feels


Sent from my iPhone using Tapatalk
I'm 6' and245 lbs. But, dont let that fool you...I'm fat. I know, the math doesnt add up right?

So, I overlap by 6 inches (3 and 3) when the straps come together and I start out with about 3 inches of extra.
 

Attachments

  • Binding.png
    Binding.png
    833.4 KB · Views: 308
  • Binding Applied.png
    Binding Applied.png
    2.6 MB · Views: 309
Now im putting the binding on using the 3/4 webbing. Probably overkill, but it holds up well.

I'm 6' and245 lbs. But, dont let that fool you...I'm fat. I know, the math doesnt add up right?

So, I overlap by 6 inches (3 and 3) when the straps come together and I start out with about 3 inches of extra.

You just sound husky to me, lol... got ya, I’m bout 5’11”, 195, so that prob explains it. I just did a custom fit for mine, but I haven’t tried with heavy clothes, so might need one slightly bigger still. I’m about to build one for my buddy. He’s shorter than me and prob 230ish, so he’s gunna get something bigger, your numbers might suit him well


Sent from my iPhone using Tapatalk
 
Next step for me is to mark center of the seat with 3 inches to either side. Those are my start and stop points for the main strap. Gives me 6 inches of overlap I'll also mark my 1st bridge loop. 19 inches total length with a mark 2 inches past the leading edge of the mesh and another at 15 inches past the edge, and finally the 19 inch mark where the strap comes around and meets the mesh agian. The 2 inch and 15 inch Mark's are where the reinforced bridge starts and ends, and the adjuster loop gets mounted.
 

Attachments

  • Screenshot_20190402-220423_Gallery.jpg
    Screenshot_20190402-220423_Gallery.jpg
    117.5 KB · Views: 302
  • Screenshot_20190402-220348_Gallery.jpg
    Screenshot_20190402-220348_Gallery.jpg
    104.5 KB · Views: 296
  • Screenshot_20190402-220332_Gallery.jpg
    Screenshot_20190402-220332_Gallery.jpg
    137.3 KB · Views: 280
Now to the bridge loop. I cut the tube webbing about an inch longer than I need to account for shrinkage. I use wire to pull the 2 inch webbing through the tube. I got a suggestion from G2outdoors to maybe stiffen up the loop, so im adding a piece of 3/4 webbing through the center. The I sew a couple of line across each end, and down the length of the loop twice. Then I finish of the ends, to include adding the g hook loop for the adjusters
 

Attachments

  • 34 pull.png
    34 pull.png
    842.7 KB · Views: 290
  • 34 stiffner.png
    34 stiffner.png
    729.5 KB · Views: 291
  • Cross Stitch.png
    Cross Stitch.png
    722.1 KB · Views: 280
  • Cut Tube Web.png
    Cut Tube Web.png
    762.2 KB · Views: 289
  • end stitch.png
    end stitch.png
    1.2 MB · Views: 287
  • Long Stitch.png
    Long Stitch.png
    713.4 KB · Views: 286
  • pull through.png
    pull through.png
    646 KB · Views: 283
  • Stiff.png
    Stiff.png
    1 MB · Views: 279
So, when it comes to sewing, Im no expert, and never know when I have sewn enough. To compensate for this, I sew A LOT. probably overkill, and it isnt pretty.

Once I have the 1st bridge loop done, I line up the lead edge with the mark 3 inches before the center point and get to sewing!
 

Attachments

  • Sewing.png
    Sewing.png
    2.6 MB · Views: 309
I may have missed it, but where does the hook for the g-hook come into play? How much did you bury?

Just a thought, but couldn't you sew up a loop on the 1" webbing you're running through the tubular webbing(or even double it) and tun it through and sew the length of it? Then Run a couple lines of stitching down it?

I put a hook right in the bottom of the tube webbing on the bridge loop (see attached)
 

Attachments

  • hook2.png
    hook2.png
    913.5 KB · Views: 172
Now, onto the adjusters. I start by putting a 1/4 inch fold in the 1inch webbing...
 

Attachments

  • Adj_1.png
    Adj_1.png
    764.1 KB · Views: 175
Then I fold over another 1 inch and sew at about 1/2 inch mark, creating a "V". This is what locks on the 1inch webbing that is sewn onto the saddle itself
 

Attachments

  • Adj_2.png
    Adj_2.png
    528.8 KB · Views: 183
  • Adj_frwd.png
    Adj_frwd.png
    748.3 KB · Views: 185
Then, I slide it through, put on the G hook, sew a "d" loop on the adjusting end and im done with the adjusters.
 

Attachments

  • Finished With Straps.png
    Finished With Straps.png
    2.1 MB · Views: 262
So, for the Linemans loops, I pull 2 pieces of 1inch webbing through a 12 inch piece of 1 inch tubing. I leave 6 inches of each of material on the end. I use zingit as a pull line, as this is a bit of a bear. Then, I create the loop by sewing 4 inches of the tag end back to the main webbing length.
 

Attachments

  • Zingit Pull.png
    Zingit Pull.png
    904.5 KB · Views: 211
After the first end is done, I star sewing the strap to the saddle. I start 2 inches from the lead edge of the saddle, and place the strap on the bottom of the main strap. I sew from the loop to about 4 inches down the strap and saddle. I do this about 8 times, then cris-cross and zig zag. I sew this A LOT.

Next is to continue down the strap placing molle loops. I mark every 1.5 inches on the saddle and set that line under the foot of the sewing machine. Then, I use a pencil to create some slack and sew away. Repeat all the way down until you are ready to sew in the other linemans loop.
 

Attachments

  • Molle Sew.png
    Molle Sew.png
    2.8 MB · Views: 191
And thats about it! I have to sew in the leg loops and connection points ( 2 on the belt and 2 on the bottom of the saddle just under the bridge loop). I will also put one more line of molle loops about 3 inches under the top row.
 

Attachments

  • Final.png
    Final.png
    2.2 MB · Views: 276
Back
Top