Aaron Jones
Member
- Joined
- Jan 18, 2020
- Messages
- 88
Well I finally finished my first fantom clone. Firstly, I just started sewing three or four weeks ago so there are definite things I could have done better. Several lines are terrible and not straight at all. There are definite rooms for approval.
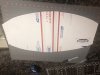
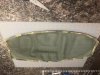
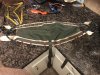
I started with the dimensions of 24 inches long, 12 inches wide in the middle, football shaped down to 6 inches.
The bridge loops were 20 inches long and the lineman’s belt loops are 9.5 inches long.
I used seatbelt material for the main webbing. I used mil-spec 1 inch webbing for almost everything else. I used mil spec mesh for the center and used multicam ribbon around the mesh. I used one inch camo tubular webbing on the outside of the bridge loops and lineman’s Loop.
I used gutermann tera 40 for thee threading and I am using a Bernina Aurora 440 QE For the sewing. The sewing machine did fine until it went through the 6 layers of material but it still managed.
I started out with the shape and cut the material.
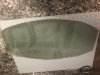
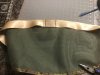
Then sewed the ribbon around the mesh.
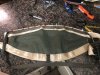
Then I measured out the seatbelt for it to go around the outside of the mesh and to give me 20 inches for bridge loops. I then put 1 inch tubular webbing onto the seatbelt material by bending the seatbelt in half. Then I put small nylon balls inside the seatbelt that was folded in the tubular webbing. I then sewed the “comfort channels” into the webbing.
I then began sewing the seatbelt webbing onto the mesh. And only sewed onto the top to begin with.
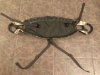
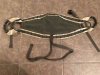
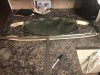
Then I took the one inch webbing and measured out the length needed for the leg loop attachments. In the photos you can see that I put the leg loop attachments across the whole bottom. I then folded more one inch webbing around the seatbelt webbing so that I could make the leg straps. I ended up using clips to hold the mesh, seatbelt webbing, and all the one inch webbing together while I sewed it.
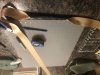
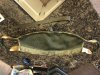
I then measured out the the length on one inch webbing to go on the outside of the seatbelt webbing for the lineman’s belt loops. I made sure to have the 9 inch lineman’s loops. I then put more tubular webbing around the one inch webbing to reinforce the lineman’s loops. I put 3 regular zip ties inside the tubular webbing to give the loops some rigidity. I did not take any photos of me doing this part. But you can see the webbing with the lineman’s belt loops.
I then used more clips to hold the lineman’s belt onto the seatbelt material on the outside. On the inside of the saddle, I put more one inch webbing that would become my waist straps later. I put them inside the clips as well to hold them. I sewed the webbing together in the middle. Then I measured an inch and a half from the middle sewn parts and sewed perpendicular to connect the webbing on the outside to the inside. You can see the sewing lines in the photos. I then clipped the bottom to hold it secure. I then sewed the bottom the same way.
I put the metal g hooks onto the legs and put the metal buckle onto the main waist strap and it was finished.
I am super happy with how this turned out. I sat in it with a makeshift bridge. It was super comfortable leaning but it took me a second to get comfortable sitting. The bottom seatbelt strap really wanted to dig into my thighs. I used the comfort channels and it helped but did not make it perfect. I will say that it still wanted ride up on me a little. I will put the utilibridge in it tomorrow!
For the next one, I will shorten the bridge loops. 20 inches is too long. I Should have down 16 inches for the bridge loops or even 14. I may try 14 next time.
I will also make the shape of the mesh better and use those clips more to hold the material. That really helped when I started using the clips.
Any suggestions and criticism is welcome!
I started with the dimensions of 24 inches long, 12 inches wide in the middle, football shaped down to 6 inches.
The bridge loops were 20 inches long and the lineman’s belt loops are 9.5 inches long.
I used seatbelt material for the main webbing. I used mil-spec 1 inch webbing for almost everything else. I used mil spec mesh for the center and used multicam ribbon around the mesh. I used one inch camo tubular webbing on the outside of the bridge loops and lineman’s Loop.
I used gutermann tera 40 for thee threading and I am using a Bernina Aurora 440 QE For the sewing. The sewing machine did fine until it went through the 6 layers of material but it still managed.
I started out with the shape and cut the material.
Then sewed the ribbon around the mesh.
Then I measured out the seatbelt for it to go around the outside of the mesh and to give me 20 inches for bridge loops. I then put 1 inch tubular webbing onto the seatbelt material by bending the seatbelt in half. Then I put small nylon balls inside the seatbelt that was folded in the tubular webbing. I then sewed the “comfort channels” into the webbing.
I then began sewing the seatbelt webbing onto the mesh. And only sewed onto the top to begin with.
Then I took the one inch webbing and measured out the length needed for the leg loop attachments. In the photos you can see that I put the leg loop attachments across the whole bottom. I then folded more one inch webbing around the seatbelt webbing so that I could make the leg straps. I ended up using clips to hold the mesh, seatbelt webbing, and all the one inch webbing together while I sewed it.
I then measured out the the length on one inch webbing to go on the outside of the seatbelt webbing for the lineman’s belt loops. I made sure to have the 9 inch lineman’s loops. I then put more tubular webbing around the one inch webbing to reinforce the lineman’s loops. I put 3 regular zip ties inside the tubular webbing to give the loops some rigidity. I did not take any photos of me doing this part. But you can see the webbing with the lineman’s belt loops.
I then used more clips to hold the lineman’s belt onto the seatbelt material on the outside. On the inside of the saddle, I put more one inch webbing that would become my waist straps later. I put them inside the clips as well to hold them. I sewed the webbing together in the middle. Then I measured an inch and a half from the middle sewn parts and sewed perpendicular to connect the webbing on the outside to the inside. You can see the sewing lines in the photos. I then clipped the bottom to hold it secure. I then sewed the bottom the same way.
I put the metal g hooks onto the legs and put the metal buckle onto the main waist strap and it was finished.
I am super happy with how this turned out. I sat in it with a makeshift bridge. It was super comfortable leaning but it took me a second to get comfortable sitting. The bottom seatbelt strap really wanted to dig into my thighs. I used the comfort channels and it helped but did not make it perfect. I will say that it still wanted ride up on me a little. I will put the utilibridge in it tomorrow!
For the next one, I will shorten the bridge loops. 20 inches is too long. I Should have down 16 inches for the bridge loops or even 14. I may try 14 next time.
I will also make the shape of the mesh better and use those clips more to hold the material. That really helped when I started using the clips.
Any suggestions and criticism is welcome!
Attachments
-
 26851193-5116-4D95-AAEE-6B2097D79A0A.jpeg83.2 KB · Views: 181
 -
 E1C2C577-9E63-47A8-AA72-F06DFECF82A1.jpeg147 KB · Views: 180
 -
 28280D6C-5761-4663-840D-C7949EEE5719.jpeg145.5 KB · Views: 170
 -
 294B4727-8EEE-49A7-BAFB-65F600A06E89.jpeg114.4 KB · Views: 170
 -
 A0CD8636-FFF2-4108-81E7-A8154D70AE6F.jpeg108.8 KB · Views: 168
 -
 7C24E13A-E85C-40ED-9499-862CC4CEA9ED.jpeg145 KB · Views: 174
 -
 1D91395B-0B21-42D6-B95E-FF9730925391.jpeg138.4 KB · Views: 180
 -
 0316ED26-9404-401D-90A7-6AA06CE8145B.jpeg157.6 KB · Views: 195
 -
 EF8C1DC9-CFD9-484A-BA78-D1FC72498B9A.jpeg149.2 KB · Views: 203
 -
 E1ACCA70-FC75-4D47-8927-C15ABC957E3B.jpeg160.8 KB · Views: 197