- Joined
- Jan 3, 2022
- Messages
- 5,906
Thanks for the insight. Nothing beats experience. I am looking forward to the build. It should be a fun project. I do want to get a good used sewing machine that can handle this sort of work.
That looks correct. I had to cross over on mine. You never notice it.Ok, I began mocking this up with one continuous loop since it has been pointed out that this allows the loops to self-adjust through the D rings and I think that having fewer breaks in the webbing should make it just a bit stronger.
Here is what I am running into. If I make one loop through the rings I end up with the starting end (A) and the finished end of the loop (B) (I have not cut anything yet) on the opposite sides of the strapping so that I seem to have to cross over the strapping at some point (D) so that (C) is on the outside of the loop as it passes the left hand D ring but meets up with (D) and crosses into the inside of the loop. I would seem that set up this way that the straps must cross and would not lay flat. Is this correct as I have it laid out?
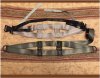
One critical part to the sewing on these, and one that the Recon is missing on the section for the leg loops, is the spacers need to be fully stitched together through the entire piece. That sewing stiffens them and holds the loops apart and gives it more comfort. That is straight from the original Anderson design too.I think it is right also after studying it for a while. I think my eyes were just crossing after working with that seatbelt material. I put some makeshift vertical dividers made of the same material I cut from some old unused harnesses and it all came together. I also took my Recon and really studied how the loops were arranged.
Now to work out the sizing. I wear a 30-inch waist in jeans. Factoring in some bulk for late season I am thinking that if my webbing straps are 30 inches and the D rings will add another inch to each side easily, I should be OK. This would make it a couple of inches wider than my Recon, which I find to be very comfortable. I have the small Recon and it is 28 inches wide stretched out. This was just the initial mockup. I may end up sizing it just like the Recon.
The loop would be fixed at the uprights circled below with box X stitching and most likely 3 box X stitching between the verticals.
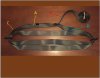
What size thread are you using? There is a formula for what each inch of stitching will have for breaking strength. It is in one of the sewing threads. I forgot which 1 i put it in. You could have an actual theoretical breaking strength that should be fairly accurate if you wanted to do some simple math.This is where I am so far. I built a fixture to hold the rings while I wrestle with the webbing. The white lines are the overlap of the ends of the webbing loop. As it sits now I will have 10 inches of webbing overlapped where the loops join up with 5 box X stitches securing them. I think that should be strong. The yellow lines are where the two inch webbing spreaders will be. The red line is the center. The D loops are 30 inches apart.
I think it is right also after studying it for a while. I think my eyes were just crossing after working with that seatbelt material. I put some makeshift vertical dividers made of the same material I cut from some old unused harnesses and it all came together. I also took my Recon and really studied how the loops were arranged.
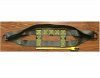
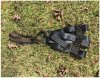
That is a nice looking first attempt! Enjoy the process and don't be afraid to tweak it and try new ideas and share as you go. We are all still searching for perfection that we can't achieve.Ok, so after finding a great deal on a Singer 15-91 sewing machine and getting supplies and trying to learn how to sew I got to sit in my first home grown saddle today. This is a test saddle and I do not trust it (my sewing) to use at any height other than just right off the ground. It is 28 inches between rings and I constructed it using two loops connected like the Anderson and Recon. I am still getting the hang sewing so it will likely be a while before I start on what I hope will end up being a true finished product to use at hunting height. This has been a fun learning experience so far and has been very satisfying. I plan to keep making them until I get good.
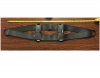
Here I am sitting in the saddle on my practice tree out back. This is about as high as I want to go in prototype #1. I have to say it is pretty comfortable. Here is a picture of the saddle. My stitching showed improvement from the start of the project to the end. I'm pleased with my first attempt. Thanks again to all those who have shared their experience along the way. I appreciate it.