
-
The SH Membership has gone live. Only SH Members have access to post in the classifieds. All members can view the classifieds. Starting in 2020 only SH Members will be admitted to the annual hunting contest. Current members will need to follow these steps to upgrade: 1. Click on your username 2. Click on Account upgrades 3. Choose SH Member and purchase.
-
We've been working hard the past few weeks to come up with some big changes to our vendor policies to meet the changing needs of our community. Please see the new vendor rules here: Vendor Access Area Rules
You are using an out of date browser. It may not display this or other websites correctly.
You should upgrade or use an alternative browser.
You should upgrade or use an alternative browser.
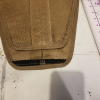
Expandable Football (no monkey)
- Thread starter always89y
- Start date
- Joined
- Jan 6, 2020
- Messages
- 230
Now you're just showing off
It should stay closed. The mesh is pretty stiff. It may start to want to stay open after some use and I will add some 2inch elastic webbing in 3 spots if that does happen. I did put a stitch in the crease to get it to hold.Will the pleat close or stay gaped like the Flex?
Sent from my iPhone using Tapatalk
To many hobbies! This one just happens to be on top right now. Original ADD kid here.You really dont have any other hobbies do you?
Give us some ball park measurements please.
27 inches wide, 17 inches tall with a 5 inch pleat. So, 12 inches closed, 17 inches open in the center (or so).
I feel like I will need to reinforce the corners of the pleats since the webbing chassis does not cover it. Feels like it would come apart after some use. Im going to sew in some 1 inch webbing squares behind the pleat seams, then bind the sides with folded 2 inch webbing. Will post pics as progress is made.
So, I played around with leaving the sides open (not reinforced) with 2inch milspec elastic webbing used as binding, to allow the saddles full length to expand and not have a pinch point. I thought this might lend itself well to the use of the adjustment nodes on the bridge loops. Because of the angle that the bridge loops naturally take when under load, the ends pretty much stay together regardless. So, if you fully expand the pleats, the ends dont expand much, if at all. So, I went ahead and used 1 inch webbing to back the ends. Still, if im using 6 adjustment positions on the bridge loops, this renders the bottom 2 useless. So, im going to reduce the adjustment positions to just 4 on this one.
Attachments
Razorbak66
Well-Known Member
- Joined
- Oct 17, 2019
- Messages
- 1,648
Im impressed..i cant wait to find time to get my machines going so i can build some saddles for me and my friends
joesoup
Active Member
@always89y where are you sourcing the mesh? I want to play too.....
@always89y where are you sourcing the mesh? I want to play too.....

joesoup
Active Member
WOWsers….a great source indeed. (money flying out the window)…..
Careful...it WILL consume you!WOWsers….a great source indeed. (money flying out the window)…..
Aaron Jones
Member
- Joined
- Jan 18, 2020
- Messages
- 88
New to the whole differences in saddles.. so I imagine this will be a stupid question. What is a pleat?
is it extra fabric in the middle that expands when you sit and lean in it? And then retracts back when no pressure is on it?
is it extra fabric in the middle that expands when you sit and lean in it? And then retracts back when no pressure is on it?

PRetty much. It stays "pleated" until you pull either the top or bottom of the saddle. Then you can fold it back in. Its not automatic, but rather an optional 5 inches to deploy if needed.New to the whole differences in saddles.. so I imagine this will be a stupid question. What is a pleat?
is it extra fabric in the middle that expands when you sit and lean in it? And then retracts back when no pressure is on it?