
Didn't you know they don't knot them anymore. You pull em out and burn the ends. No need to learn this one (what they did for Mrs Pooh anyway)Fallopian Tube Knot
Used for a good time without repercussions.
Lol. I had to bring that one back from an old post.
-
The SH Membership has gone live. Only SH Members have access to post in the classifieds. All members can view the classifieds. Starting in 2020 only SH Members will be admitted to the annual hunting contest. Current members will need to follow these steps to upgrade: 1. Click on your username 2. Click on Account upgrades 3. Choose SH Member and purchase.
-
We've been working hard the past few weeks to come up with some big changes to our vendor policies to meet the changing needs of our community. Please see the new vendor rules here: Vendor Access Area Rules
You are using an out of date browser. It may not display this or other websites correctly.
You should upgrade or use an alternative browser.
You should upgrade or use an alternative browser.
Know your knots...
- Thread starter Swingin' Free
- Start date
emrah.oruc.7
Well-Known Member
- Joined
- Apr 11, 2019
- Messages
- 222
Shameless plug but I did a series of videos on my Youtube channel for exactly this reason. Just a few basic saddle hunting knots. I did 4 or 5 vids (including how to tie a tubular webbing bridge). I was new to all this last year so I figure it might help newbies to the saddle/knot world. Here’s a link to the first one. You can scroll through the other vids if you’re interested.
Emrah
Sent from my iPhone using Tapatalk
Emrah
Sent from my iPhone using Tapatalk
I posted in the thread that I assume spurred this one. Knot-choice (and knot advocacy) is something to be extremely careful about. You need to be able to consistently and easily inspect any knot that you use (whether you tie it or not) and reliably tie it correctly. You also must test the heck out of it at ground level.
This is why the Figure 8 on a bight/figure-8 retrace is the go-to, with an ample tail (6 in plus) and optionally a backup knot. I use the backup knot primarily as an extra/easy way to check and confirm that I have plenty of tail, and increase the security of the knot against loosening when tied, especially in stiffer rope like HTP that requires a much firmer dressing to really set the knot. It's a strong, reliable, easy to tie and inspect knot.
I personally believe that telling people to tie a figure 8 follow through with 6 in of tail on their tether (and link to proper instructions!) is more productive from a safety perspective than just telling them to buy a manufactured/spliced set of lines - simply because there's a better chance at getting people to do something that doesn't cost them extra money and wait time, vs. blowing 60-100 bucks on a pair of ropes.
I don't know of any cases where people have screwed up this knot...which I CANNOT say for the following ones.
The next knot that's non-negotiable is a stopper knot. Normally a double-overhand with plenty of tail. https://www.animatedknots.com/double-overhand-stopper-knot Especially on a stiff rope like HTP...you need to set, re-set, and inspect the heck outta this. It'll save your life, but only if it's tied and secure.
I use and prefer scaffold/poacher knots on my hitches, and have generally preferred a distel hitch.
I tie the distel first, with extra length in the cord. Make damn sure that there's a secure stopper knot on my tether. I test the heck out of it. I weight it slow, weight it fast. Weight it heavy, weight it light. Weight it with tension on the tag, and without. Weight it with a dry line, and a wet one. This is important. I've had hitches that I considered secure at the time. Then conditions shifted slightly, and my stopper knot saved me from a serious fall.
10000x if you are messing around with self-tied prusiks, alternative hitches, etc...do not skimp on testing!
poacher/scaffold I tie directly around my carabiners (https://www.animatedknots.com/poachers-knot), with an over-long section of cord. I'll weight it to set the hitch and test the knot, then loosen the knot, slide it up closer to the hitch, move the excess cord through, redress the knot, and reset/retest it. I test like this until I have the carabiner-to-hitch cords as short as possible (this helps to keep the distel dressed - a poorly dressed hitch will not grab - and also improves performance with a tender), until I've thoroughly tested every conceivable scenario. Then I cut the ends, leaving long tails, and test some more.
Note: there are alternative ways to tie the poacher and scaffold, that can result in a SLIP KNOT rather than one of the most secure end loops. Do not screw this knot up.
The last knot that I use is an overhand on a bight for webbing bridge. Keeping a long tail is critical on this as it will loosen under cyclic loading. Again a barrel backup is useful primarily for enforcing that you always have this tail.
Make sure you get enough tail.

Fallopian Tube Knot
Used for a good time without repercussions.
I would not recommend the bowline because you can untie it easily. If there is pressure off of it it can loosen. I have use that knot in construction for 35 years but never as a safty line to hold a person.
I would not recommend the bowline because you can untie it easily. If there is pressure off of it it can loosen. I have use that knot in construction for 35 years but never as a safty line to hold a person.
A bowline is great for certain applications. When I hunt with the SRT method I tie my pack to the end of my rappel rope with a bowline to hoist and lower. But utility is all I use it for.
Sent from my iPhone using Tapatalk
LOTS
If you can’t tie knots tie lots...
But seriously, here are a few I use regularly:
Figure eight on a bight-Loop on my rappel line
Distel hitch-this is my friction hitch of choice on tether and lineman’s belt.
French prusik (autoblock)-backup on rappel
Sent from my iPhone using Tapatalk
If you can’t tie knots tie lots...
But seriously, here are a few I use regularly:
Figure eight on a bight-Loop on my rappel line
Distel hitch-this is my friction hitch of choice on tether and lineman’s belt.
French prusik (autoblock)-backup on rappel
Sent from my iPhone using Tapatalk
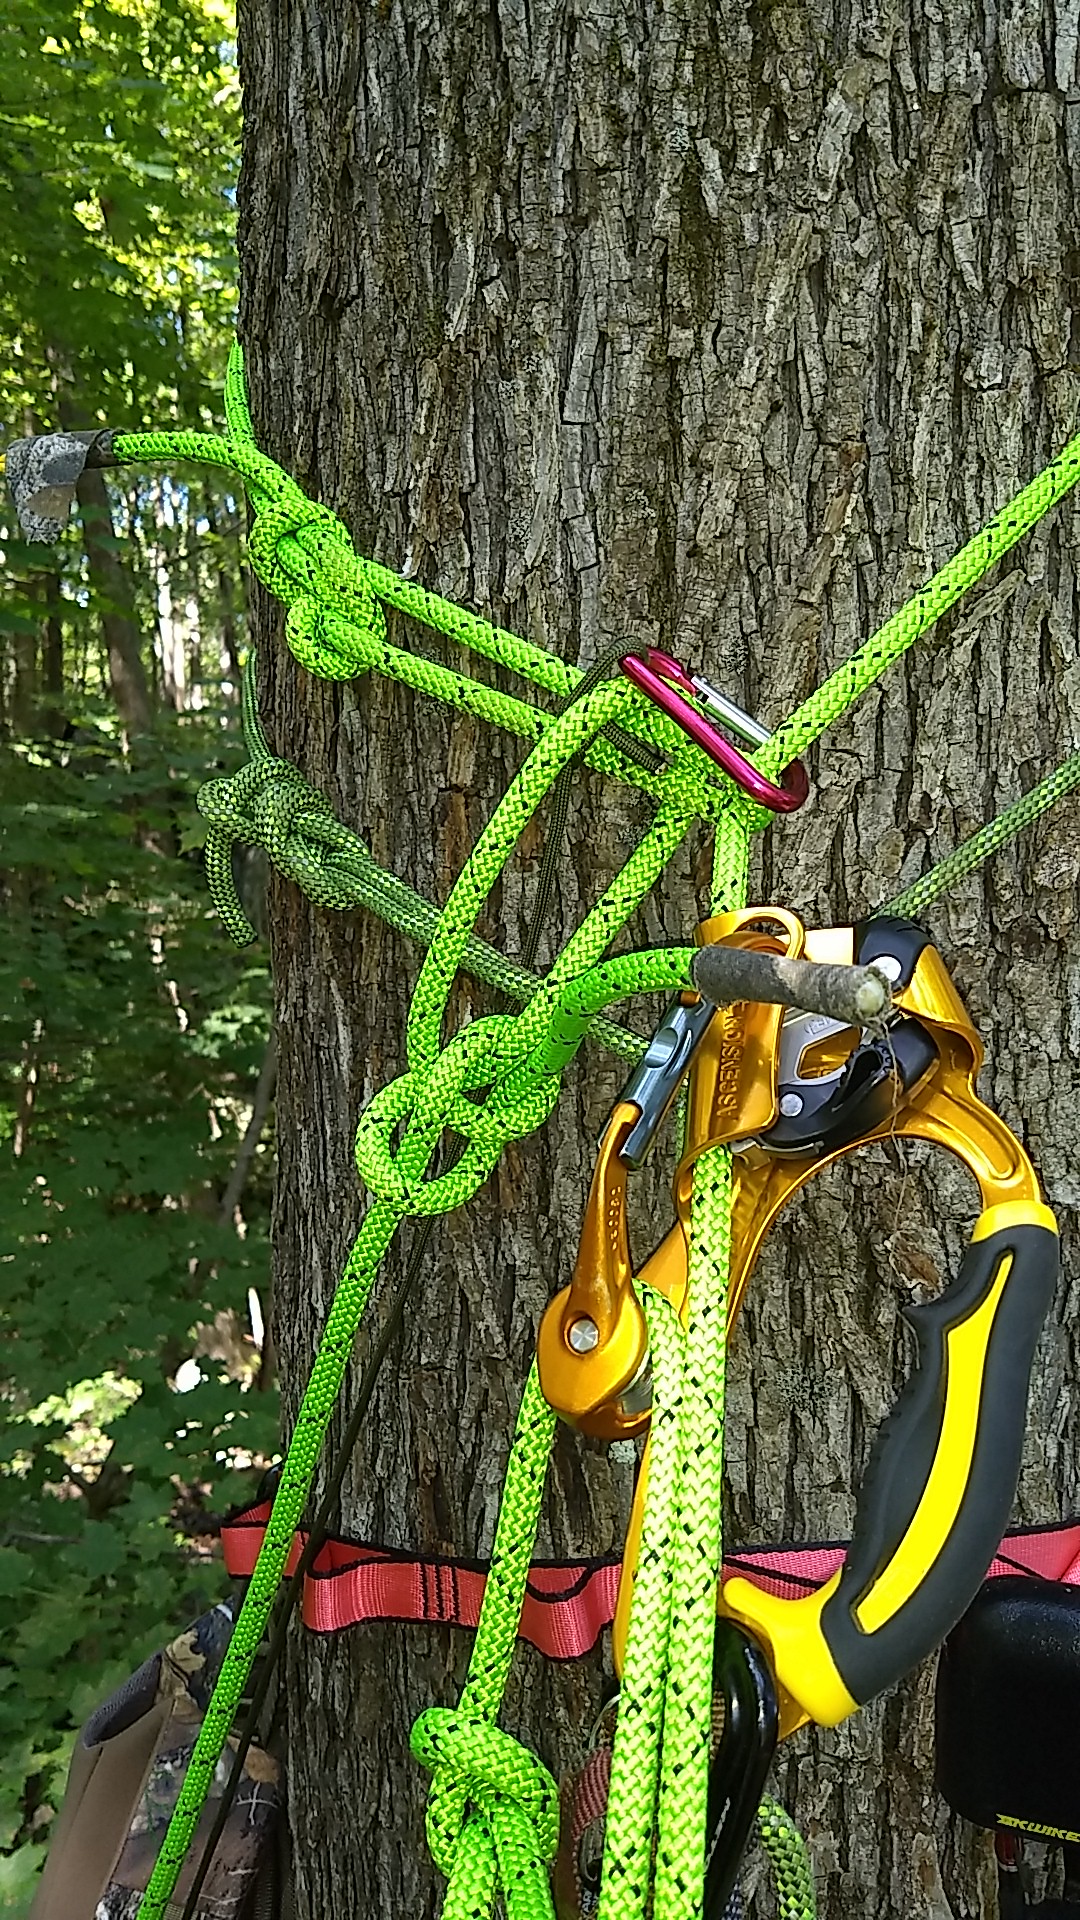
I used this last year for a while when I thought it was cool. I think it is a bowline with a yosemite backup. The yosemite backup may not be right. I asked Sam but he wasn't sure.  After coming to my senses, I switched to a figure eight loop. Note backup tether with figure eight loop in case yosemite let me down.
DON'T DO THIS, IMHO.
After coming to my senses, I switched to a figure eight loop. Note backup tether with figure eight loop in case yosemite let me down.DON'T DO THIS, IMHO.
- Joined
- Oct 2, 2020
- Messages
- 1,582
Knottonight
used by my wife to repel me.
used by my wife to repel me.
I like the schwabisch on my lineman’s. And run the tag end back through the carabiner. I got rid of my ropeman and don’t miss it at all. I don’t even use a tender. Super easy to adjust and bites well yet releases well. I did do an extra wrap so it honk I have 5 wraps before coming back down and through.
Knots 3D is another good app.
Knots 3D is another good app.
You’re right not a Yosemite backup, only a cowboy bowline, the tail went around the “tree“ in the opposite direction then the one to produce a regular bowline. A better backup for the bowline is the Scott’s Locked method.I used this last year for a while when I thought it was cool. I think it is a bowline with a yosemite backup. The yosemite backup may not be right. I asked Sam but he wasn't sure.
DON'T DO THIS, IMHO.
I once attended a rope rescue class taught by one of the most experienced cave rescue professionals in the U. S. and he had an extremely stout young firefighter tie a bowline and snug it as tight as he could. He flipped this knot over a desk and rapidly flipped it 3 times and the knot was gone. We all believed him when he told us to always trust your life to a figure 8. It remains my primary life safety attachment knot. When this expert gave us personal experience examples of lives lost (with names) to bowline failures he made believers of most of us. He had to do the knot over the desk trick several times for Firefighters whom used this knot for many years. I also trust rated sewn eyes, just my opinion.
The rope rescue fire crews in my city forbid a bowline as well - same reasons
New guy here, after reading probably a thousand posts and watching easily 100 youtube videos, mostly to learn how to tie stuff, I've come to the conclusion that the best practice is probably just to do a figure eight on a bite for both ends of linesman and tether. Linesman - one end girth hitched to your saddle, other (tail) end attached back to the carabiner your prussik runs off of. Do the same with the tether. That way if either prussik or schwa-bitch slips (due to lack of original tension) they slide straight back into your your figure 8 (default stopper) which is hooked into your carabiner and attached to your saddle. Therefore there is no way you slide off the back end of either safety rope.
I just have to call BS on the failure of a bowline knot. Yes it can be made to capsize on itself, If you poorly dress it and don't put a stopper knot on the tail. Those would-be poor practices with any loop knot.
That being said, I do favor figure eight for our uses in hunting. It is fairly easy to tie and for our purposes easy to untie. It most likely won't come untied if you don't dress it properly and or leave sufficient tail. It weakens the Rope the least of the loop knots. BUT there have been several accidents from people only partially tying a figure eight, Lynn Hill being one of them. I have personally stopped several people from making this mistake.
For a tie-in knot I always favored a round turn bowline," double rabbit hole" with a solid stopper knot. Never get distracted and leave it partially tied. It's about 2% less the strength of a properly tied Figure 8. And you can take the big wipper on it and still untie it very easily.
What BS are you calling? There are examples upon examples of bowlines coming undone.I just have to call BS on the failure of a bowline knot. Yes it can be made to capsize on itself, If you poorly dress it and don't put a stopper knot on the tail. Those would-be poor practices with any loop knot.
That being said, I do favor figure eight for our uses in hunting. It is fairly easy to tie and for our purposes easy to untie. It most likely won't come untied if you don't dress it properly and or leave sufficient tail. It weakens the Rope the least of the loop knots. BUT there have been several accidents from people only partially tying a figure eight, Lynn Hill being one of them. I have personally stopped several people from making this mistake.
For a tie-in knot I always favored a round turn bowline," double rabbit hole" with a solid stopper knot. Never get distracted and leave it partially tied. It's about 2% less the strength of a properly tied Figure 8. And you can take the big wipper on it and still untie it very easily.
No one is talking about knots capsizing on themselves. The bowline is
1) easier to tie wrong
2) harder to inspect
3) comes undone easier (including when undesired!)
Than a fig8 on a bight (and mostly you're tying on s bight rather than as a follow through)
Yes in the examples of the rescue class, in this thread, they were talking about capsizing the knot. This can only be achieved by tying the knot loosely not dressing it,and not adding a stopper not. A parlor trick
As I said the Figure 8 is the appropriate knot for our purposes. Even poorly tied, crossed lines, undressed, short tail, it is highly unlikely to fail.
As I've stated elsewhere in this forum the three or four knots that you need for saddle hunting you should be able to tie in the dark tired on autopilot 100% of the time.
I would agree if you're incapable of tying a bowline or any other knot, 100% of the time you shouldn't be using it for life support.
A bowline doesn't come untied because of its properties,but a lack of understanding of those properties. I wouldn't know how to tie a bowline improperly, but it wouldn't surprise me if I've tied it ten thousand times , literally.
I don't believe in fear-mongering. I believe you should make informed decisions, assess the limitations, and use the appropriate tool for the task at hand.
In Swift water rescue the most important knot is the not-a-knot.
- Joined
- Sep 6, 2014
- Messages
- 967
I spent an hour with a very experienced arborist yesterday. He said yes the figure 8 is a good knot but he still prefers the bowline. He showed me a variation so it will never come undone. He called it a "bowline w/ a crimp". I can't find it online but basically you leave a long tag and then tie 1/2 hitch around the main line and the tag. There'e a little twist at the end that I'm not explaining correctly so don't quote me. I have not practiced it yet but it looked fairly simple. He said he favors this one because it can always be untied and never come undone unless he unties it. He also showed me a "false crotch" rope. It is his prefered method. No knots and IMO probably the most secure method I've seen. Also spendy! His cost $140 just for the "crotch".
Crotch is always gonna cost u something.... Some cost more than others... 140 for crotch doesn't sounds to bad