• The SH Membership has gone live. Only SH Members have access to post in the classifieds. All members can view the classifieds. Starting in 2020 only SH Members will be admitted to the annual hunting contest. Current members will need to follow these steps to upgrade: 1. Click on your username 2. Click on Account upgrades 3. Choose SH Member and purchase.
  • We've been working hard the past few weeks to come up with some big changes to our vendor policies to meet the changing needs of our community. Please see the new vendor rules here: Vendor Access Area Rules

Useful hunting related 3D printer files

If you're not a CAD person, Tinkercad is hard to beat. My 9yr old makes stuff using Tinkercad, and I've made a bunch of stuff with it. I've reached the limits of what it can do for some of the projects I want to make, so I'm learning Freecad right now.

Agreed, tinkercad is super simple. I've tried Fusion360, but just can't get my head wrapped around it. So many commands. I feel like it needs its own college course lol. I was able to design some support legs for my surround sound center channel, but had my cousin on a zoom call with me. He's an engineer and has had a ton of experience with Fusion. I tried to go back without his help and just couldn't make anything work.

BT
 
I recently bought a K1 MAX. For me, this thing is fast. I have two other printers... I bought an Ender 3 back in 2019 on a flash sale for $110 and was plenty pleased with it. After a week or so I realized that I had not printed anything since my kids kept it busy printing flexi dinosaurs and Pokemon stuff. I came across another flash sale on an Ender 3 Pro for around $120 and ordered that one. I made mods as time went on and needs increased. The Ender 3 is moderately modified (better hotend, BLTouch auto bed levelling, SKR board, RPi with Octoprint, better part cooling) and was the one for the kids. The Ender 3 Pro is heavily modified with the same mods as the Ender 3, plus linear rails, upgraded to 400x400 build plate, dual Z motors and increased height (350mm?), AC plate heater, etc.
The K1 MAX was pretty much ready out of the box. Here's a video of it printing a test file that came pre-loaded:
If you look at the build plate, this is it's first print. It took about 15 minutes to assemble, and 10 mins or so to calibrate. Calibration is simple - select calibrate from the menu and it does the process unattended. I've been very happy with it so far, and it cuts my print times at least in half.
It is a little pricey IMO, and does have a couple of flaws.


Anyway - hope you don't mind 
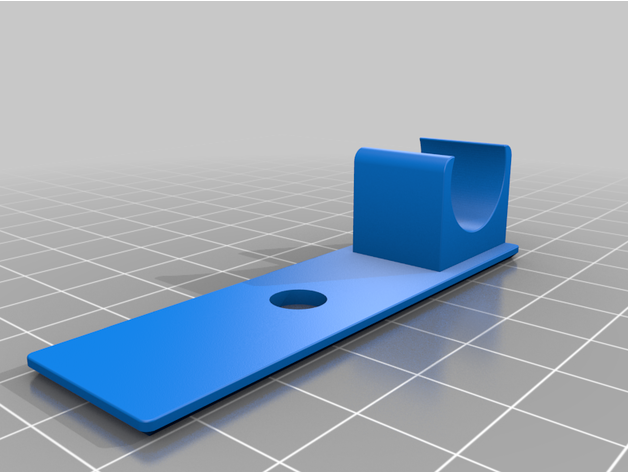
@7mmremmag , but I put a file out there to be able to mount a laser pointer to a camera mount such as yours:
View attachment 98982
Since I put my cameras 8-12 feet up in trees while standing on a stick to deter theft, this lets me aim the camera using the laser pointer instead of guessing where it's aimed at. Clip the laser in, strap the camera up and aim with the red dot, and then unclip the laser pointer and climb back down.

Did you buy a pre-made kit to upgrade your build plate size and height? I have an Ender 3 S1 that I've made a few upgrades to - upgraded hot end, silicone bed springs, insulation on hot bed, creality sonic pad running Klipper (this was a game changer for sure) and I have a few different build plates to print on. I'd love to increase the size though. I've come across a couple things I'd like to have printed but my build space isn't big enough.

BT

For my Ender 3? I got the kit from enderextender.com . It takes a couple of hours to put together.
I bought the heated pad separate since they were out of stock at the time - I tried using the 200x200 pad for a few weeks, but grew frustrated with adhesion issues. The larger heat pad solved that (and switching from the glass bed to PEI sheet).
 
Agreed, tinkercad is super simple. I've tried Fusion360, but just can't get my head wrapped around it. So many commands. I feel like it needs its own college course lol. I was able to design some support legs for my surround sound center channel, but had my cousin on a zoom call with me. He's an engineer and has had a ton of experience with Fusion. I tried to go back without his help and just couldn't make anything work.

BT

Best way to learn it is to follow along on the youtube videos drawing stuff. After that just start grabbing random things around the house and drawing them up.

The constraints are really useful once you learn them, the hardest part to fusion is just learning the best workflow. I try to draw stuff how it is going to be manufactured. For 3d printed stuff, I will start with the face I want on the print bed and build up from there.

Also, the mirror function is a pretty good time saver if your part is symmetrical.
 
@Gator i did finally get a chance to check out the camera arm as well. In my opinion the design need some work otherwise I would have sent it to you already. Better than I expected but has some issues. Additionally the rotating head that Cgm used is fixed which kind of defeats the purpose in my mind. I didn’t care for it.
62BDDAE0-E81B-45A3-809F-7E9B0DCAC6B4.jpeg
 
@Gator i did finally get a chance to check out the camera arm as well. In my opinion the design need some work otherwise I would have sent it to you already. Better than I expected but has some issues. Additionally the rotating head that Cgm used is fixed which kind of defeats the purpose in my mind. I didn’t care for it.
View attachment 101502

Was it stable on the tree? The arms are easy to draw up but the tree bracket would be way more difficult for me. I’d still like to have the file if you don’t mind


Sent from my iPhone using Tapatalk
 
Was it stable on the tree? The arms are easy to draw up but the tree bracket would be way more difficult for me. I’d still like to have the file if you don’t mind


Sent from my iPhone using Tapatalk
The tree bracket is what needs redesigned. Other than that it was pretty stable. I can send you another I printed as well and it can give you something to work off of. I’ll PM you and get your address again and add details on the part files.
 
Working on a small bracket that accepts a rotating head for trail camera. This works well but still have some refining to do. RevB coming.View attachment 101493View attachment 101494View attachment 101495View attachment 101496View attachment 101497
One recommendation is to print it sideways(strap slot slot vertical), then you’re not fighting overhang, but mainly for strength so you’re relying on the strength of the material not how well the layers laminate together. Cool design!
 
Just got my first print going. Exciting!

2cd1f8e8dbb57ca8b8af8cbce9d72a27.jpg


Sent from my iPhone using Tapatalk
 
How did it go?
Printed quite a bit since this. All have went well except for one where my filament got tangled and stuck. Biggest issue thus far has been cleaning up the part after printing. Any tips or tricks? I was under the impression they would just snap off but it seems to be printing a very thin extra width to the base that's not coming off easy (been cutting off with a knife).
 
Printed quite a bit since this. All have went well except for one where my filament got tangled and stuck. Biggest issue thus far has been cleaning up the part after printing. Any tips or tricks? I was under the impression they would just snap off but it seems to be printing a very thin extra width to the base that's not coming off easy (been cutting off with a knife).
Well don’t be stingy let’s see some of the prints! Good deal though glad you are off and running.

And if you have a layer so thin almost translucent that you have to scrap off and doesn’t remove with the part off then that means your nozzle to bed height is likely too close. You could z offset it in your slicer software with a +.05mm bed offset or you could reset your z stop height (nozzle to bed) height.

Additionally, it doesn’t take long but waiting for the bed to cool allows the part to come pop right off. What type of bed does your printer have? Also, I use acetone for thin strings then they scrape off very easy with a small scraper. Anything less comes off when I wipe it. I use cheap microfiber towels from HF and finish mine with alcohol for squeaky clean. I’m using a glass bed currently with no tape or adhesive.
 
Printed quite a bit since this. All have went well except for one where my filament got tangled and stuck. Biggest issue thus far has been cleaning up the part after printing. Any tips or tricks? I was under the impression they would just snap off but it seems to be printing a very thin extra width to the base that's not coming off easy (been cutting off with a knife).

What supports and filament are you using? It also sounds like you have autobrim turned on in the slicer (assuming Creality Print) under the bed adhesion settings. Those usually pull off reasonably easily, or clean up quick with a razor knife or a box scraper. If your part is large and flat (ie: has a lot of contact with the bed) it may not need a brim.
Supports are always (in my experience anyway) a tricky thing. I generally try and orient the part so that it doesn't need/needs minimal supports. Otherwise I try and orient it so the supports are on a side I do not care about (like the bottom) unless it increases the print time or filament usage substantially.
 
As above mess with offset distance and make sure no brim is enabled. A razor is a pain, I found its much quicker/easier to get that off by scraping with the square side of spatula that comes with printers.
 
Back
Top